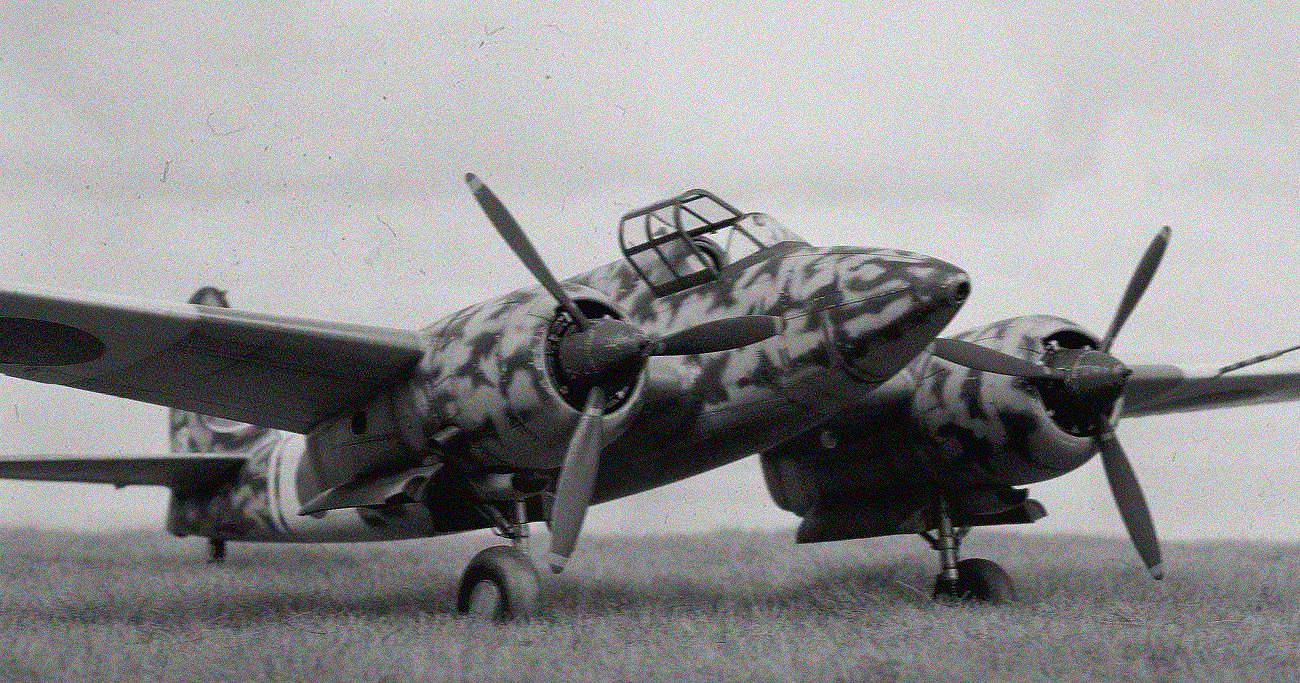
Hasegawa 1/48 Kawasaki Ki-45 Toryu (Dragon Slayer)

This is the 1/48 scale Hasegawa Ki-45-KAI in the markings of the 3rd Chutai/53rd Sentai based at Matsudo airfield, November 1944.

A full build article of this model appears in March ’09 issue 161 of Tamiya Model magazine.

I have added a bit of grain to these photos through Photoshop just to take away that ‘digital sharpness’.

This was a commission build of one of my favourite I.J.A. aircraft.

This is a beautiful kit with virtually no vices. (None that I can remember anyhow.)

Hydraulic lines were added to the undercarriage legs and an ignition wiring harness was added to the front of each of the Ha 102 engines.

The interior is straight out of the box. I think I probably added a simple scratch-built harness to the pilot’s seat but can’t be sure.
More Photoshop.

I was so impressed with this kit that I built one for myself.

I built this one in the colours of the aircraft flown by 1st Lt Takumi Yamamoto of the 8th Hakkou-tai, ‘Kinnou-tai’, Special Attack Squadron, based at Nielsen Air Base in the Philippines.

Lt Yamamoto flew this Toryu on its Kamikaze mission on December 7th 1944. This and eight other Nicks were destroyed while attacking U.S. forces in Leyte Gulf.

Hi Chris, the paint chipping on the exterior is exceptional !!! Very well done indeed !!
cheers Pete.
LikeLike
Hello Chris,
As always, great job, I like both version…
I am curious, what interior color did you apply?
Thanks in advance.
LikeLike
Hi Guillermo, my notes tell me it is a mix of 90% XF-49 Khaki and 10% XF-64 Red Brown, both being Tamiya Acrylics.
Cheers,
Chris.
LikeLike
Chris,
Thanks, I will take note of it.
Cheers
Guillermo
LikeLike
Hi Chris, fantastic painting!!!, a question, is paint chipping in pencil or brush?. and another question, what color you painted first, gray or dark green?.
Thanks in advance.
LikeLike
Hi Carlos, firstly all the chipping was done with a silver pencil and secondly the model was painted in overall IJA Grey with the green blotches sprayed over the top. Before the green was fully dry the model was carefully polished with the finest Micromesh cloth which removed most of the soft edges from the blotches. I think that this gives the same finish as seen on many of the aircraft in my reference photos.
Hope this is of some help,
Regards, Chris.
LikeLike
Hi Chris, fantastic job as usual! Do you remember whether the markings for these Toryus (both of them) are out of the box or you rather used some aftermarket decals?
Regards,
Tomasz
LikeLike
Hi Tomasz, the Kamakaze markings are from an old set of Aeromaster decals called ‘Special Attack Squadrons’ SP48-06 released back in ’96.This set contained markings for 27 aircraft of various types. The markings for the 53rd Sentai aircraft were sourced from the kit and the above Aeromaster set. These decals have long been discontinued.
All the best,
Chris.
LikeLike
Sure thing! Thanks for the info Chris.
Regards,
Tomasz
LikeLike
Hi Chris. Great idea to use micromesh cloth, now I understand why the green blotches looks so realistic and to scale. Thanks for the tip, I will try.
All the Best
Carlos
LikeLike
Hey Chris
Excellent work on BOTH “Nicks”!!
I was wondering about what color you had used on Yamamoto’s aircraft? Dark Brown is called for, FS-30118, but that looks to be too light. What did YOU use on your model? Thanks in advance
LikeLike
Hi Frederick, it has been a few years since I did this one and I am not exactly sure of the quantities I used, but I do know the paints I mixed were Gunze acrylic H-78 Olive Drab with a touch of Tamiya XF-64 Red Brown. The main reference I used was ‘Famous Airplanes of the World No. 21’ that has a photo of this plane on its second last page. Unfortunately these publications don’t carry any English captions so the colour I used is bit of a judgement call on my part.
Hope this is of some help,
Cheers,
Chris.
LikeLike
Thank you Chris. I have been doing a little digging and believe I have found out, what I needed to know…..I think? Anyway, I appreciate your taking the time to answer my question. I hope you have a very Merry Christmas and have a Happy New Year as well.
Best Regards,
Frederick J Seitz III
LikeLike
Chris, first I really enjoy your work. How did you create the dark green splotches–did you use low psi, heavily-diluted enamel? Thank you very much.
LikeLike
Hi DJ, the paint used on this and most of my models is water based acrylic and I always keep the pressure at around 25 psi. The method for doing these blotches was to use my usual, very thin, mix of paint with the airbrush adjusted to its finest setting. The outline of each blotch was carefully sprayed and then filled in. Before this green paint was completely dry the blotches were very carefully polished with the finest Micromesh cloth. This removes most of their soft edges giving the result you see here.
Hope this answers your question. If not let me know. I’m always happy to help if I can.
Cheers,
Chris.
LikeLike
Qué barbaridad !!!.
LikeLike