Zoukei-Mura 1/32 Focke-Wulf Ta 152 H-1

New photos and the original build shots of a model which I completed back in 2011.

Cockpit interior complete, just waiting for the installation of the instrument panel and seat.

Even though it was going to be concealed behind closed cowlings I still gave the beautiful little Junkers Jumo 213E engine a quick paint job.

Cockpit and other interior details are fixed in place.

Once the main construction was complete the engine was attached to the front of the fuselage.

This shot shows some of the extensive riveting that was added to the entire external skin of the model.

The application of the main camouflage colours. Undercarriage and various other smaller parts have also been painted and weathered.

Mottling, Reich defence tail bands and some weathering have now been added.
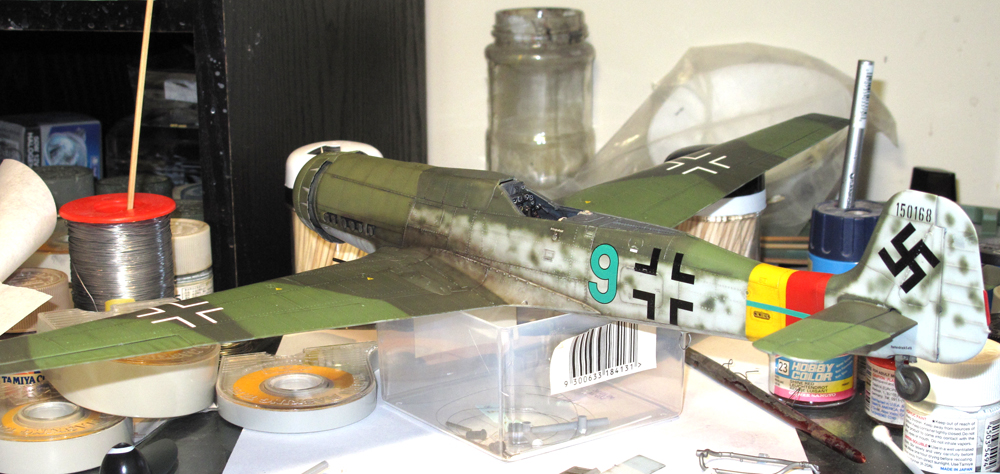
Decals are now in place. They represent the markings of a JG 301 aircraft flown by Oberfeldwebel Willi Reschke.

A better shot of the lower surface riveting.

The competed model.


Very nice Mr Wauchop!
LikeLike
Thanks Rodger, great to hear from you!
LikeLike
Chris, reveals every termination the photograph and unsurpassed quality, I congratulate you!!
Benjamin
LikeLike
Thank you Ben. All compliments are humbly accepted.
LikeLike
Hi Chris , I’ m really glad you posted this again as its one of my favourites of yours. From the perfectly executed mottels to the exhaust staing and wing root chipping to the subtle weathering on the underside that is bursting with finesse ; its hard to say what I like best. What more can I say, its just brilliant !!!!
I actually held off buying this kit untill I saw your build of it … i was so inspired i just had to get it. I’ve done some work on the cockpit but thats about as far as i’ve got yet.
I’m also working on an Australian Spitfire Mk Vc from the old Hasegawa kit which i’m rescribbing and riveting and throwing aftermarkets parts ai ti……its taking a while.
So whats on your bench at the moment Chris, I hope its something luftwaffe
All the best cheers,
Peter
LikeLike
P.s I forgot to mention, the spitfire is in 1:32
LikeLike
Hi Pete, it’s always very gratifying when I hear that I have inspired someone. That has always been my intention with this site and I love it when I hear that it happens.
I was commissioned to build the old Hasegawa Mk V several years ago for a guy who was going to add it to a collection hanging from his games room ceiling! It had to look as though it was flying so the gear was up and the pilot was included. I was horrified at first but by the time it was finished it actually looked pretty good! Yours will look a million times better I’m sure.
As for my work bench, we’re having some pretty major renovations done right now, which includes re-doing my work space for me, so model building is on hold for a couple of months at least. The next commission build will not be Luftwaffe, nor even an aircraft, but an Iraqi T-55 Enigma. The next thing I build for myself will probably be the Airfix 1/24 Typhoon.
Sorry it’s not Luftwaffe but it is a favourite of mine and I can’t wait
All the best,
Chris.
LikeLike
Outstanding work there Chris!!
I really miss seeing your kits in person in your shop.
LikeLike
Great to hear from you Matt. I was thinking of you just the other day when I was at the dentist next door the old shop. How’s it going with you these days?
LikeLike
That really is a superb model!
LikeLike
Thanks Radleigh, it really is one of my favourites.
LikeLike
Now thats one awesome piece of Model (like all the other ones wich are shown in this Blog, actually i am big fan of your “style”)
Sorry for being a smart-arse but the Ta 152 H Series was powered by the Jumo 213. The DB 603 was scheduled for the C Series 😉
cheers
LikeLike
You are absolutely correct Dennis and my only excuse is laziness! When I was writing these captions I used the magazine article in Military Illustrated Modeller as my reference and the photo of the engine was incorrectly described as a DB 603. Although I wrote the magazine article I was not responsible for the picture captions. This is no excuse of course, so thanks for being a ‘smart-arse’ and letting me know. I’m very pleased to see that someone is paying attention and I shall make the correction immediately.
Thanks again Dennis, I’m now relying on you to keep an eye out for any further corrections that may need attention.
Hope you keep enjoying the pics
All the best,
Chris
LikeLike
Hi Mr. Wauchop! Amazing build! I’m also currently in the process of building this bird myself and I’m wondering what camo scheme you went with? Also do you have any references for adding rivets to the model? Thank you so much and again, splendid build!
LikeLike
Hi Julian, please call me Chris! I chose to paint the model in the colour and markings of this aircraft flown by Oberfeldwebel Willi Reschke because it is the only operational Ta 152 H1 that I could find clear photos of. Even though these pics are post war, and the plane is carrying RAF markings, you can still see most of its original camouflage. The main reference I used for the riveting detail is a relatively old Japanese publication-Model Art No.336 FOCKE WULF Fw190D & Ta152. This contains fold-out plans in 1/48 scale with fairly accurate rivet detail. I’m not sure about the availability of this book any more but if you do a web search you might just find one.
Good luck!
Cheers,
Chris.
LikeLike
Hello Chris
Am a big of Ta 152 , I like the green 9 really great.
wanted to ask whether it might be possible to show that one or other picture on our website . natural source is correctly identified
best wished
Frank
LikeLike
No problem Frank, happy to oblige as long as correct credit is included. A link to my blog would be nice as well, but not essential.
All the best,
Chris.
LikeLike
http://hsfeatures.com/features04/ta152hcw_1.htm
Hi Chris ,
Thank you that I may show the images of the green 9 on our website , we may also show the green 4 Walter Loos , see link . Of course, the source is acknowledged , or blog page
cheers Frank
LikeLike
Hi Chris! Julian here again, I’m just about to reach the painting stage on my Ta 152 (finally!) and I can’t decide what color to use on that power egg! Chose to go with RLM 82 and 83 (dark and light green) for the fuselage and wings instead of adding RLM 81 as what some people might say…but I’ve noticed in the references that the power egg had a different color…any clue on what’s the closest paint I could use for it? Thanks again so much!
LikeLike
Hi Julian,
It is hard to tell what colour the cowling was but I chose to paint it in a non-standard version of RLM 81. This was a mix of Gunze Sangyo H 421 RLM 81 with quite a bit of H 422 RLM 82 Light Green which they call RLM 83. As I said it is my own mix which is about the same tone as the b/w pics. That’s my theory anyway. I have seen it painted using quite a brown version of 81 which looks good too. Without original colour photos you can’t really be wrong so do what you think looks right.
I know this is a bit vague but I hope it is of some help.
Cheers,
Chris.
LikeLike
Thanks so much for your quick reply, Chris! Just to confirm, the colors you picked for your bird was RLM 82 and RLM 81 for the fuselage and wings? And that non-standard version of RLM 81 for the cowling?
LikeLike
Julian, my Ta is overall 82 dark green and 83 light green with my custom version of 81 brown violet for the cowling. What I should have said above was that Gunze name RLM 82 as Light Green and RLM83 as Dark Green. Now I’m confusing myself.
Sorry about that.
LikeLike
Pingback: Zoukei-Mura 1/32 Focke-Wulf Ta 152 H-1 | Focke Wulf TA 152
Hi Chris , since now your Green 9 Ta 152 is represented with us on the website . With attribution , if you feel like drop by under http://www.ta-152.de
Frank
LikeLike
http://hsfeatures.com/features04/ta152hcw_1.htm
Hello Chris
I like the green 4 of Walter Loos scale well , I may also show these pictures with us?
cheers Frank
LikeLike
Hi Frank, the photos of green 4 were taken by Brett Green and so do not belong to me. I think it would be O.K. to use them but I’m sure Brett would appreciate it if you asked him first.
Cheers,
Chris.
LikeLike
Very very nice job!
LikeLike
Thanks Mario, I’m really glad you like it.
LikeLike
Hi Chris,
What a beauty indeed. Lovely.
As all your other models, which are for me the top in modeling. I especially like the colors you use, which are warm and look absolutely authentic.
I see you used yellow triangels on the wings. Are they all the same, or did you use a MW 50 one on the left wing? Did you use a GM1 decal too on the left fuselage side?
Could you please tell how you accentuated the rivets?
Currently I am in the process of making the same plane (1:48, Dragon).
Looking forward to see some of your new models appear soon.
All the best,
Johan
LikeLike
Hi Johan,
I’m really glad you like the model, it is one of my favourites. The reason I used yellow octane triangles is because in the photos of green 9, even though they are black and white, it is clear that they are a solid colour and it is my interpretation that they are yellow. The triangle on the inner filling point on the port wing is indeed marked as MW 50. No GM1 markings were used as they were not provided and I could not find any reference for them.
The rivets are accentuated, once the model has been painted, by carefully polishing with a Micro-mesh 8000 abrasive cloth while the paint is fresh and still a bit soft. This removes the paint from the slightly raised rivet head and the ring around it.The smooth side of a well used nail buffer will give the same result. Do some tests first!! as it easy to scratch the soft paint.
Hope this explains it enough.
Cheers,
Chris.
LikeLike
Absolutely.
Thanks a lot for your reply, Chris. Such a pleasure to get some advice from the master himself.
Trying to get my Ta 152 finished as much as possible before the cold sets in here, and I cannot airbrush anymore (in te garden). Maybe I should move to Australia 😉
All the best to you.
Johan
LikeLike
Truly a great master at his craft. Bravo Chris.
LikeLike
Hi Chris, beautiful Ta-152, as usual great build & finish, how was the assembly, was it difficult to put it together?
LikeLike
Very superb model, outstanding . This is my favorite aircraft of WW II. I am very glad to see this kit very realistic. It seems to be in 1945 in a Luftwaffe airfield. Manuela compliments.
LikeLike