Hasegawa 1/32 Focke Wulf Fw 190 A-5

Fw 190 A-5 flown by Oblt. Walter Nowotny, Staffelkapitän of 1./JG 54, Russia, summer 1943.

After some filling and re-scribing the first major job undertaken was to add the rivet detail. This was achieved with the aid of lots of Dymo tape as a straight edge, this MDC rivet punch and a good set of scale drawings.

With the scale drawings as a guide, and using a small metal ruler and graphite pencil, the start and end points of the rivet lines were marked out as accurately as possible. An appropriate length of the adhesive Dymo tape was then stuck between the pencil marks and using the rivet punch, the lines of rivets were carefully pressed into the plastic. The spacing between each rivet is done purely by eye and therefore is not 100% accurate but with practice (and I’ve had lots) it becomes fairly automatic and the result quite acceptable.

In this shot of the left fuselage half, as well as rivets, you can also see some of the detail that has been filled using Milliput.
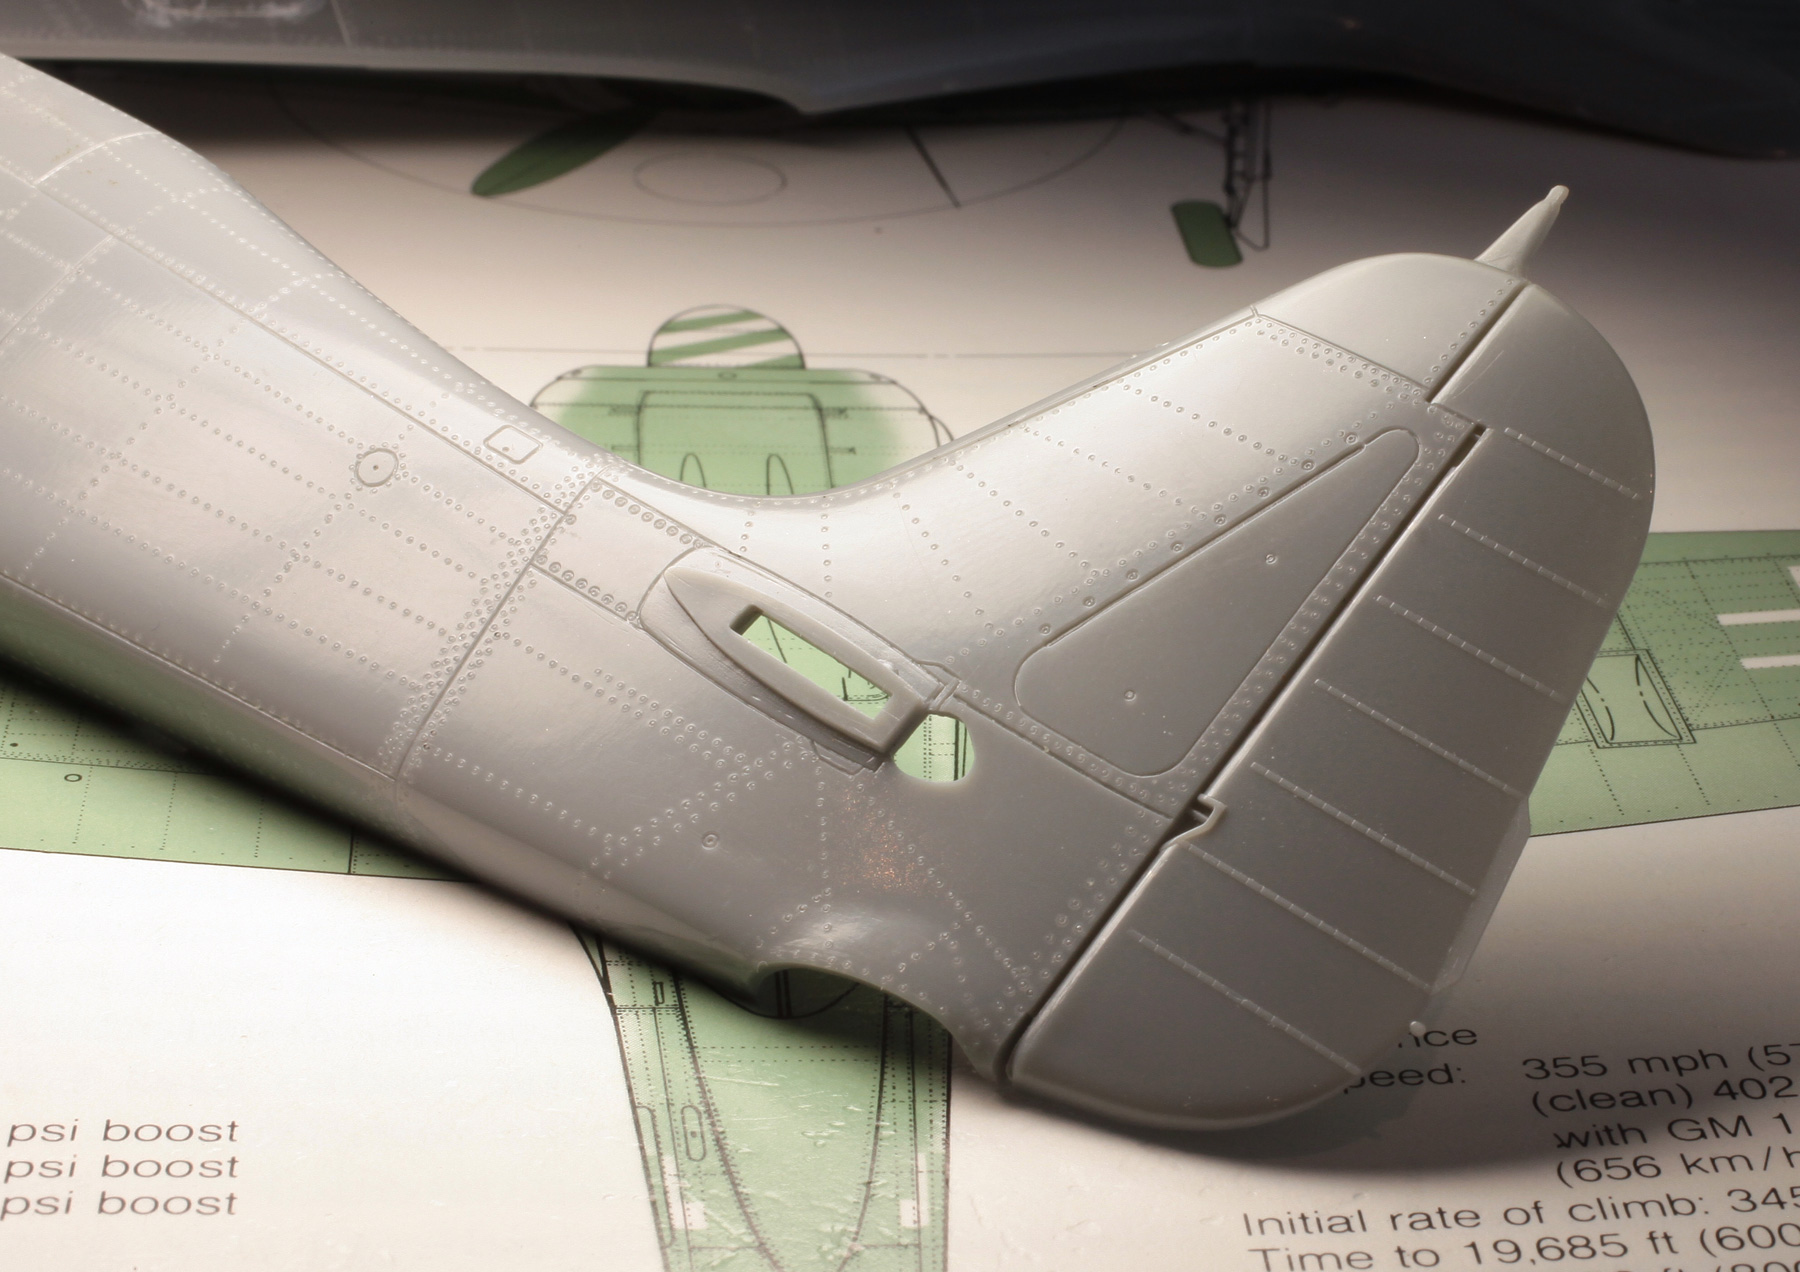
The extra effort taken in adding the rivet detail is time consuming but the result, although subtle, makes a big difference to the overall look and surface texture of the finished model.

In this shot of the almost complete cockpit tub can be seen the canopy guide rails which were added using Evergreen plastic strip.
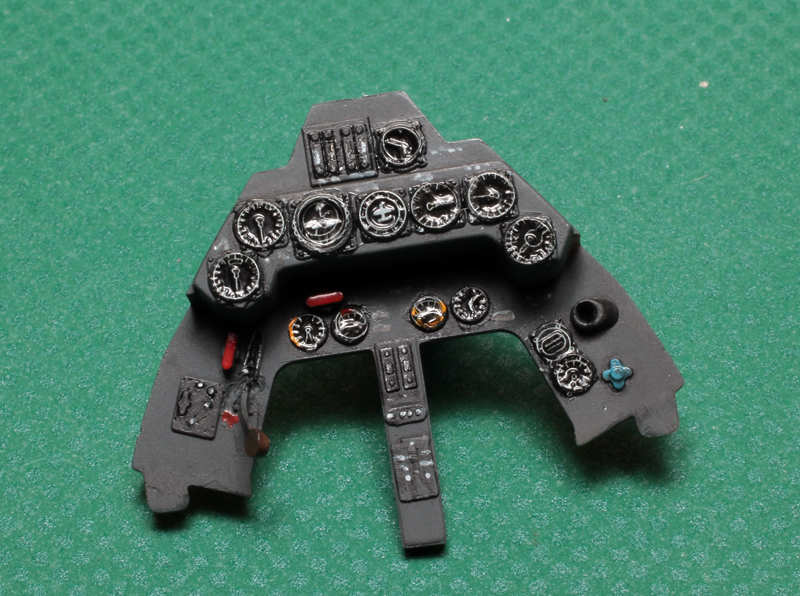
Each instrument dial was cut from the kit decal sheet and applied individually. Fiddly, but with these tired old eyes it’s a lot easier than painting ’em!

Safety harnesses were made from paper-backed lead foil and fine wire bent to shape to form the buckles.
Undercarriage parts plumbed, painted and waiting for installation.

The yellow theatre markings and RLM 02 in the wheel wells and flaps were painted first and then masked off with Tamiya masking tape before the main camouflage colours were applied. In this shot the masking has been removed from the wing tips and wheel wells.

Upper surface colour application begins with the lighter of the two greens. This is my own field mix of RLM 71 Dark Green with about 30% RLM 82 Light Green to try and represent the improvised colour used by the JG 54 ground crews.
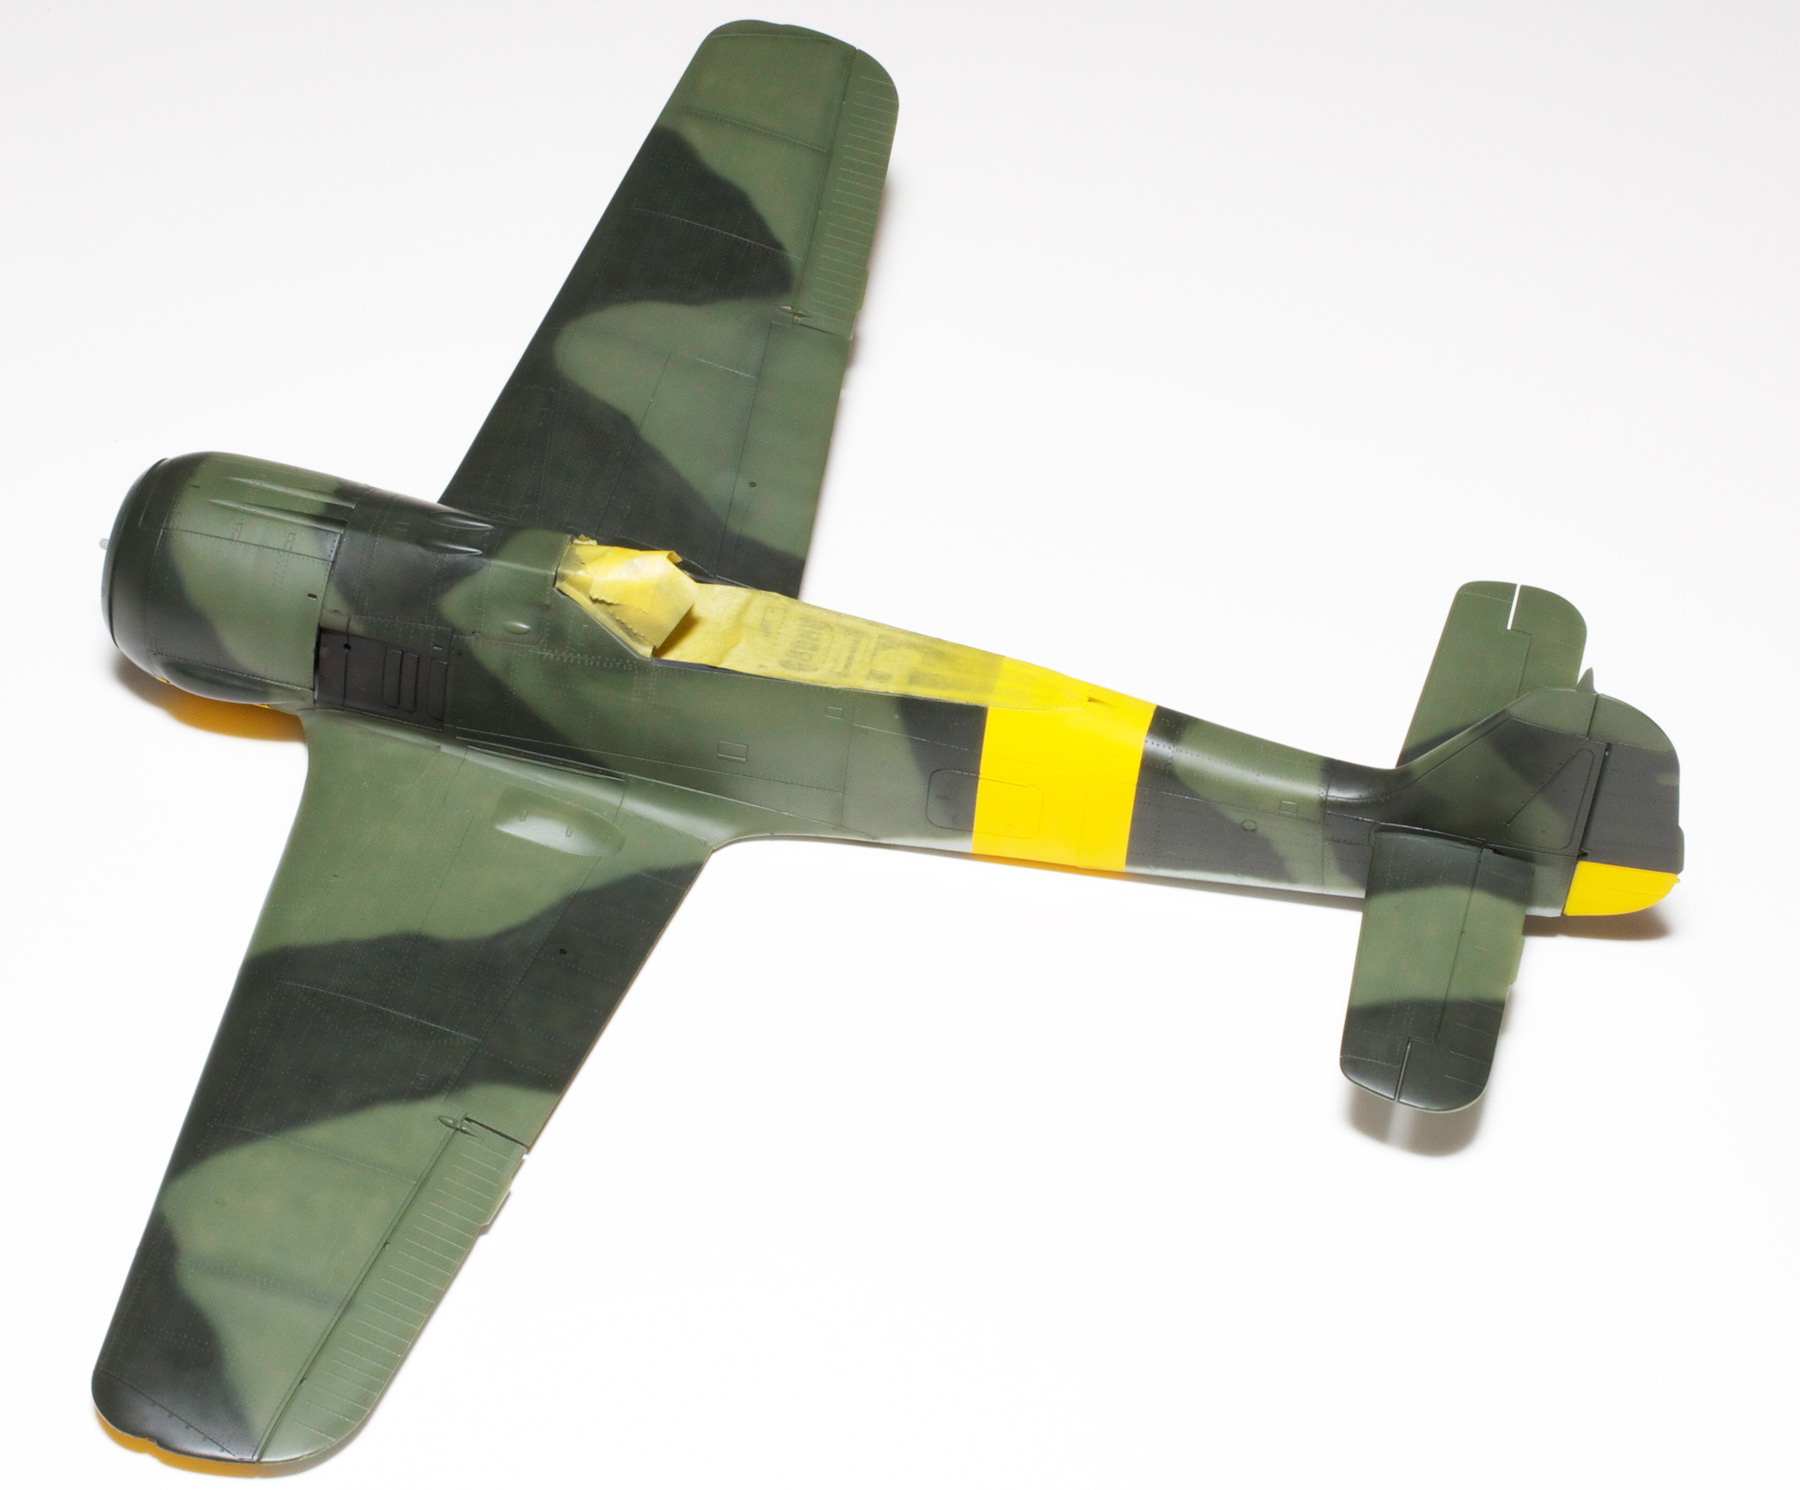
RLM 70 Black Green was used as the second colour for the upper surface camouflage. Masking tape has now been removed from all yellow theatre markings.

With all camouflage colours applied, masking tape removed and panel lines drawn in with a very sharp 6B pencil, weathering has begun.

With all painting and weathering complete the model is just waiting for the installation of all its dangly bits.

In this and the next close-up shot you can see how the rivets just show through the paint.

All the paint chips were carefully applied using a very sharp Prismacolor silver pencil. The light exhaust staining was achieved by first spraying Tamiya XF 57 Buff and then a patchy overspray of a very thin mix of Tamiya Red Brown and Flat Black. This colour was also used for the main, darker exhaust staining down the fuselage sides and the build-up along panel lines where appropriate.

The spiral on the spinner was carefully brush painted.

Nylon mono filament was used for the radio antenna with small drops of white glue for the insulators. The backs of the prop blades were first painted silver and then over-sprayed with RLM 70 leaving the tips silver.

The yellow markings were also dirtied up using the black/brown mix.

My favourite angle of the 190. Markings are from EagleCals decal sheet EC#83 FW 190A-5s.

Hi Chris,
Finally a new post! Good to have you back Chris. I was a bit worried, since you didn’t post anything for so long. Well, the wait was worth it! Excellent job on this one. And the ‘in progress’ photos are very welcome too. Freshly finished?
Cheers,
Tomasz
LikeLike
Hi Tomasz,
This one has taken a while because we have been having some pretty major renovations done to the house. Almost back to normal now thankfully.
LikeLike
Great stuff Chris, I used the same rivet tool on a 109 and I reckon that’s half the reason why I now wear glasses! Wish I had left mine a bit more raised though as I think yours has the ‘look’, particularly from low angles. Anyway, I always stop by to see your latest work and this is a masterpiece!!
LikeLike
Thanks Phil, and you’re right about the glasses.There are about double the number of rivets on the 190 though so I now also dribble and slur my speech a bit!
LikeLike
What a beautiful build!
LikeLike
Thanks Roger. The 190 build is becoming a bit of a routine now, this being the seventh in this scale. It’s still my favourite though. Can’t wait to see what Zoukei Mura do with theirs!
LikeLike
Some really top photos there Chris. I really like the close up of the fuselage from the portside, very nice ! Its always nice to see WIP pics and I think you nailed the colours and weathering spot on !
Neat Freehand rivet spacing is not easy to accomplish either, well done.
Definitely another Chris Wauchop classic, top stuff !!!
Cheers
Peter
LikeLike
Thanks again Pete, I will try to take more build shots with the next one. When my client picked this one up he informed me that he had just ordered the new Tamiya Corsair so I will be building that one some time in the near future. Can’t wait!
All the best
Chris
LikeLike
Great as always !!
I have to try your field mix
LikeLike
Thanks Chris, with my mix I was tying to match the beautiful colour profile in the Kagero book. Give it a try.
LikeLike
Thank You for this post! Great work!
LikeLike
Thanks Andrew, I am very pleased that you like it. It was a nice change to do a 190 in this paint scheme.
LikeLike
As always, it is great to see your models in the high quality BIG screen photos, to properly see & appreciate the realistic paint detail. :o)
It’s Mr Chris, who use to post on HyperScale.
Messerschmidt Bf 109E-4/7 Trop
http://www.hyperscale.com/features/2000/bf109e4cb_1.htm
Why doesn’t Brett Green modernize HyperScale format for bigger computer screens already ?!
LikeLike
I still have stuff on HyperScale but that 109 is not mine. All the posts of my work are under my name, Chris Wauchop. And I think the reason that Brett does not use a bigger format is so other people can’t use the photos for publication! People rip my shots off all the time but I don’t really give a stuff so long as they give me some sort of credit!
LikeLike
I know it’s not yours :o) I was saying this is Mr Chris B. who made that 109E-4/7 Trop
saying as always I like your big model photos.
About HyperScale small format – that is a good reason then to prevent copying.
LikeLike
Hi Chris, I hope you had a nice Christmas this year. Any chance you started on the Tamiya Corsair yet I would love to see some pics.
I’ve put some 1:32 RAAF Spitfire Mk.Vc cockpit WIP pics up on Largescalemodeller if you’d like to take a look and my 1:32 ZM Ta 152 pics are in there as well..
Here’s the link ……
http://forum.largescalemodeller.com/topic/3257-raaf-spitfire-mkvc/
have a Happy New Year,
Cheers,
Peter
LikeLike
Hi Pete, Seasons Greetings, and no I haven’t been given the Corsair yet, so no photos. The pics of your stuff look great! Can’t wait to see them finished, especially the Spit! To fill in time before I get the Corsair I’ve been building a 1/72 Hasegawa Ki 67 ‘Peggy’ that I was asked to do years ago. I haven’t built a 72nd scale kit in quite a few years so it is taking a bit of time getting used to how small everything is, especially the Eduard P/E set that was supplied with it. It is looking pretty good though and the paint job takes no time at all so is good fun. I will post some shots here as soon as it is finished.
All the best,
Chris.
LikeLike
Hello Chris!
I’m a big fan of your work. I have a question for you though. Like you, I use the Aztek airbrush and really like it. However when doing Luftwaffe-mottles do you use the airbrush as a regular double-action airbrush pulling back on the trigger for paint or do you use the combined action available on the Aztek where air and paint is controlled by just pressing down on the trigger?
You probably get this type of questions all the time, but what better way to learn techniques then from the master! 🙂
Bedt Regards from Sweden!
Emil
LikeLike
Hi Emil,
Sorry I’ve taken so long to answer your question, but I have been busy getting photos ready of my next model for this blog plus writing an article for Brett’s mag.
You’re right, I do get asked this question a lot and I always give the same answer- I basically use the Aztek as a single action brush, in that I set the needle to the width I require and just press the trigger straight down. When I need to vary the width of the spray I adjust it with the rear silver roller wheel. For spraying Luftwaffe mottle I usually have the needle set as fine as it will go and use it like a pen to draw the outline of the blotch. Once the outline is done I then fill it in with the airbrush on the same, fine, setting. To me this gives quite a realistic result and I use this method on all scales from 1/72 through to 1/24. It takes a little practice but, I think its worth the effort. Practice on an old model first.
I’m sure there will be a bit of swearing, but when you master it you won’t use any other method!
Hope this helps,
Cheers from Oz!
Chris
LikeLike
Thanks a lot Chris for helping me out! 🙂
Looking forward to seeing your next model.
All the best!
Emil
LikeLike
Chris,
I am still open mouth! Your rivet detail work is impressive, and I want to ask you for to know, what plans reference did you use to do it?
Thanks in advance.
Guillermo
LikeLike
Hi Guillermo, sorry I have taken so long to answer your question but my server made a big change to their Dashboard and I hadn’t noticed the new ‘low-viz’ comment indicator until today. Anyway to answer your question, the reference I used as a guide for doing the rivet detail on this model are plan drawings by Rikyu Watanabe. These plans are in an old publication ‘The Great Book Of World War Two Aircraft’ from the 1980’s. I don’t think this book is available any more but I’m sure you can find similar plans on the net.
Probably not the answer you wanted, but it’s the best I can do.
Cheers,
Chris.
LikeLike
Hello Chris,
No problem, thanks for your answer. I can tell you that I know Watanabe’s artwork and I have three books with his job. Sadly, I don’t have Fw-190, but it looked like very known. Well, I will use Model Graphix plans to do this part.
Thanks again
Guillermo
LikeLike
How´s it going, Chris?
A very nice build, you should be well pleased.
FW 190 is my favorite plane and in a summer camouflage scheme looks really beautiful. I´ve been comparing your kit to Kagero´s profile and the layout of the camouflage is very reliable. I agree with a soft chipping and I like weathering.
Two questions:
.- Why did you mix RLM71 with RLM82? According to recent studies RLM71 was the suitable color and I think RLM81 didn´t appear until the end of the war.
.- Why did you leave the peaks of the back side of the propeller on natural metal?
Related to Walter Nowotny´s planes I have the hasegawa kit of the FW 190 Wk-Nr 410004 famous for it was the plane with Nowotny achieved his 250th victory. Studying the camouflage model I´ve found different points of view and the profile varies depending on the kit manufacturer. Perhaps you have studied this aircraft, if so, I´d like to know your opinion about it and which one would be the best camouflage to represent this fighter.
Looking forward to your reply.
Regards,
Oscar.
LikeLike
Hi Oscar, to answer your first question, there are quite a few colour photos of JG 54 FW 190s painted in non standard colours. These colours included various shades of green and sometimes brown. The colours I have used are my interpretation of the field mixes applied at squadron level. The lighter of the two greens was, I’m sure, sometimes RLM71 but in several of these colour photos it is obvious to my eye that a much brighter shade of green was used. I’m not saying that RLM82 was used in this field mix, only that it is the colour I have used in my mix. It has been suggested that captured Russian paint stocks were used in these mixes which, I think, was probably the case.
In answer to your second question, the reason for showing bare metal on the back of the prop blades is to show the wear caused by the rough surface conditions of the airfields being used. There are plenty of photos showing this effect.
As for Wk. Nr 410004, there are no colour photos of this aircraft but I’m pretty sure that it was painted using similar colours that I have used on 1501 just not covering the original grey mottle on its tail.
Hope this answers your questions.
If not let me know.
Cheers,
Chris.
LikeLike
Hi Chris, I’ve just stumbled upon this and my inner engineer feels the need to explain 😉
The reason of wear seen on many propeller blades of WW2 era aircraft has nothing to do with the terrain or surface conditions they operated. The reason for this wear is, well, physics itself. The tips of the propellers of many (if not most) of the WW2 airplanes traveled with speed exceeding supersonic speed. This produced shockwaves, basically bands of very very high pressure separated by extremely low pressure. Such difference in pressure is sudden enough to explode windows. In case of propeller blade, the effect is very local but strong enough to wear of the paint at the tip (and at the back because the shockwave is propagated behind the propeller). This is the reason why you can see bare metal at the back of prop blades on many WW2 era photos.
Sorry if this is boring, just thought you might be interested.
Cheers, Tomasz
LikeLike
what kit did u use here???? the old fw190 or the spcl edition?
LikeLike
Hi Vicente, this is kit number HST23 Focke Wulf 190A-5. Nothing special about it that I can remember.
Cheers,
Chris.
LikeLike
Chris, I’ve been staring at this model for ages, it’s so gorgeous! I’m building a 83″ wingspan RC model of the FW 190, I would love to try and recreate this paintscheme for it, although I cannot find any information at all on the internet about it. I could just use your photos as reference, but I’d love to actually see photos of it! If not this scheme I was thinking of making it an A7 of sturmstaffel 1, thanks! / John
LikeLike
Hi John, there are only a couple of photos of this aircraft but there are some really good colour profiles around. The best of these are in Kagero’s publication ‘JG 54 Green Heart Fighters No. 97002’. This is a booklet containing photos, beautiful three view illustrations and decals for three different JG 54 aircraft and was the main reference I used when painting this model and I’m sure it’s still available and relatively inexpensive. As for a Sturmstaffel 1 190 A7, I’ve done one of them too! Lots of pics on Hyperscale.
Cheers,
Chris.
LikeLike
Thank you so much for your quick reply Chris!
I managed to find some photos of Nowotny standing in front of the plane, I’ve always been inspired by your models , my favorite was the sturmstaffel 1 one but this scheme is so nice and would be great for my rc model, here’s some work in progress
Photos, it’s got a wingspan of 2.1meter (84″) I’ve got some work to do to convert it to an A5 variant 🙂 thanks Chris and keep up the great work!
Here’s the photos http://planeofpain.tumblr.com/post/138201371883/working-on-my-fw-190-rc-model-21m-wingspan
LikeLike
Boy oh boy that looks great! Can’t wait to see it finished.
LikeLike
Hi Chris,
Found your wonderful A-5 build while searching the net for some news on ZM s FW190. Its funny to see that someone else has taken the time to do the whole fuselage of an 1/32 fighter. The result is stunning and you have my respect for having the model finished. Mine is a 2005 long term project and was converted into an A-4 with a circuit, lights, sound and motor in it. Everything running so far but I had to stop until Henri Dähne (friend of mine) had the new spinner and prop ready to replace the wrong Hasegawa ones. Cheers
Danny alias fockewings
LikeLike
Hi Danny, when you say “do the whole fuselage” I’m assuming that you are referring to the addition of the rivet detail. If this is right I will say that in this scale I do find it necessary to add this subtle, but quite visible detail to give the model a more realistic look. Would love to see yours when it’s finished.
All the best,
Chris.
LikeLike
hi Chris, how do you know when to use a wash or a pencil for the panel lines? Also, what is your way of weathering leather seating surfaces and tarps, etc? Finally, what’s your fave way to realistically weathering a bare-metal plane?
i hope i’m not asking too much, just enjoy your work so much and just want to learn a thing or two =D
LikeLike
Hi KAYSEE, to answer your first question I only use a pencil to define panel lines, rivets, etc when a light colour is the base. This light colour is usually an under surface colour like RLM 76 or 65 on Luftwaffe aircraft or Medium Sea Grey on RAF planes. This technique really only works on these, or similar, light colours. Of course it is only the first step in my weathering process. Lots of subtle shading with the airbrush follows. I use a very thin black wash when the panel lines, etc are being applied over darker cammo colours because the pencil shows up as too metallic!
When a leather look is required the base colour (usually flat brown or similar) is sprayed and shaded with the airbrush. Once thoroughly dry I use either my finger or a fine Micromesh cloth to polish the matt paint until a smooth, low shine, leathery look is achieved. For tarps or canvas I first use a dark brown oil wash followed by careful shading with the airbrush.
For bare metal sufaces I first apply a dark wash to the panel lines, etc and again use the airbrush for some subtle, or not so subtle shading depending on the effect I wish to achieve.
Hope this answers your questions.
Cheers,
Chris.
LikeLike
Hi Chris! Great FW190!
Where can i get these scale drawings for rivets?
Cheers,
Marc
LikeLike
Hi Marc, the reference I used for the rivet pattern on this model are from drawings done by Rikyu Watanabe. These drawings were published by Bonanza Books in their ‘Great Book of World War II Airplanes’ back in the 80’s. I don’t think this book is still available but you might be able to find one on Ebay.
Cheers,
Chris.
LikeLike
Thanks for your help. I’ve found one on ebay for a good price. 🙂
Cheers,
Marc
LikeLike
What RLM colors do you use? Gunze?
LikeLike
Yes Marc, always Gunze water based acrylics for the RLM colours unless indicated otherwise.
LikeLike
Congratulations from France ; your models are impressive (as are the photos) and inspiring.
LikeLike
Thank you for your kind words Renaud, it is always very flattering to know that I can be inspiring.
Cheers,
Chris.
LikeLike
Hello Chris
first congratulate you for your tremendous work, it has been my inspiration to build this model,
I wanted to ask you, what reference photos you used for this model, I searched everywhere but I only found one of the emblem “Rammbock”
thank you
Rafael
LikeLike
Hi Raf, you are absolutely right, there is very little reference on the web for this subject. I think the only shot I found was the same one that you did. Fortunately my client supplied me with the Kagero decal set for this and several other JG54 aircraft. The book that accompanies these decals includes beautiful three view colour profiles and a couple of good photos as well. These were my main inspiration when painting this model. The profiles and photos are on the web and will probably be the best reference you can find.
Sorry I couldn’t be more helpful.
Cheers,
Chris.
LikeLike
Hello, my name is Gerardo, i live in Uruguay. i admire your work, your painting techniques and the results you achieve are the most reallistic in my opinion. I have a question, how do you weather the panel lines? Not the the panel line itself, but the subtle surroundngs of it. All the panel lines in your models have that subtle “grime” around them that makes the model super reallistic!
Also, when you don’t use a pencil for the panel lines, do you use a “wash” of some sort?
Thank you very much!
Gerardo
LikeLike
Hi Gerardo, I will answer your second question first. As you have noted I use a very sharp 2B graphite pencil to enhance the panel lines and any other engraved detail on light painted surfaces. A very watery wash of semi-gloss black is carefully brush painted into this detail on the darker painted surfaces. To answer the first part of your question,these lines are then very subtly shaded with the airbrush using a really thin mix of black/brown. This takes a bit of practice but will give that grimy look that you have mentioned. And always remember that subtly is the key as it is easy to go too far and difficult to reverse. I use this mix to generally dirty-up surfaces on the model as well as a heavier application for exhaust stains and gun dust.
Hope this answers your questions.
Cheers,
Chris.
LikeLike
Wow, thanks for the quick answer! That was exactly what i was looking for, straight and to the point. I hope someday i can master this technique as good as you do!
Thanks a lot for your time and i always say to my friends that i always look up to your models as an aiming point to what i want to achieve as a modeller!
Cheers!
LikeLike
Hi chris, i am about to try the pencil technique for panel lines. A question though, does the surface need to be matt or glossy for the 2B pencil to work well? In it’s current state my model is glossy as i just applied decals.
Thanks a lot! Gerardo
LikeLike
Hi Gerardo, the pencil will work better on a matt surface but will also work on a semi gloss or gloss surface. If it is a full gloss finish I would probably use an oil wash instead. Gloss over the decals first though.
LikeLike
This is an absolutely exquisite piece of work Mr Wauchop! Not only is this my favourite variant of the ‘190 but also my favourite Camouflage Scheme and Jagdgeschwader.
Please accept my highest/sincere compliments for this piece of work.
Salute !
D.Rees
LikeLiked by 1 person