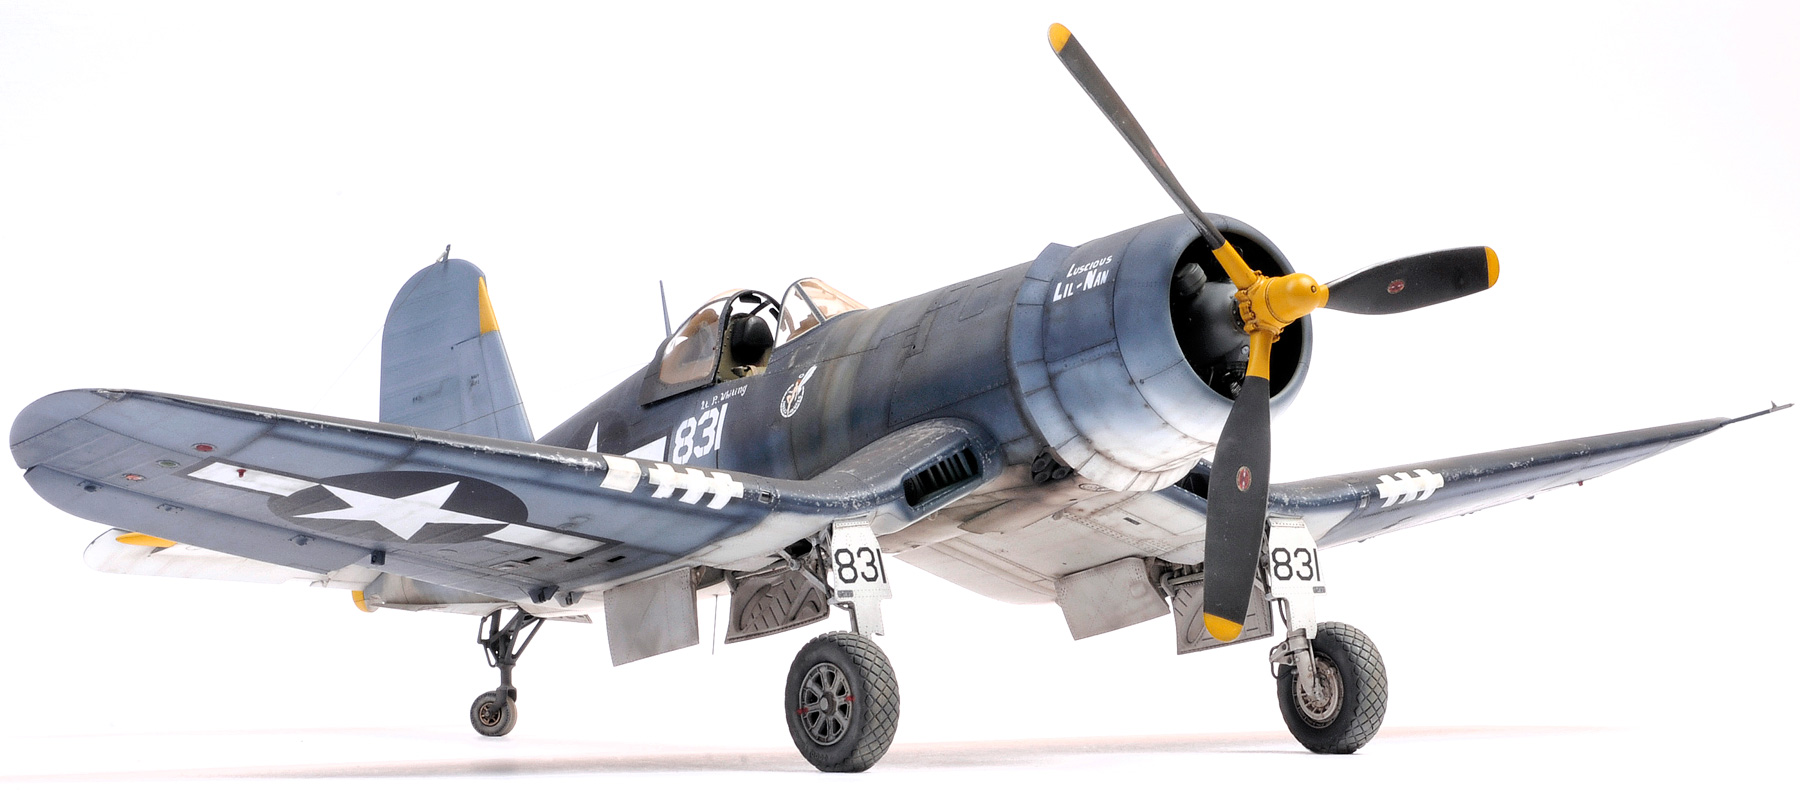
Tamiya 1/32 Vought F4U-1A Corsair

F4U-1A of VMF-321 flown by 1Lt.Robert Whiting on Guam, August 1944.
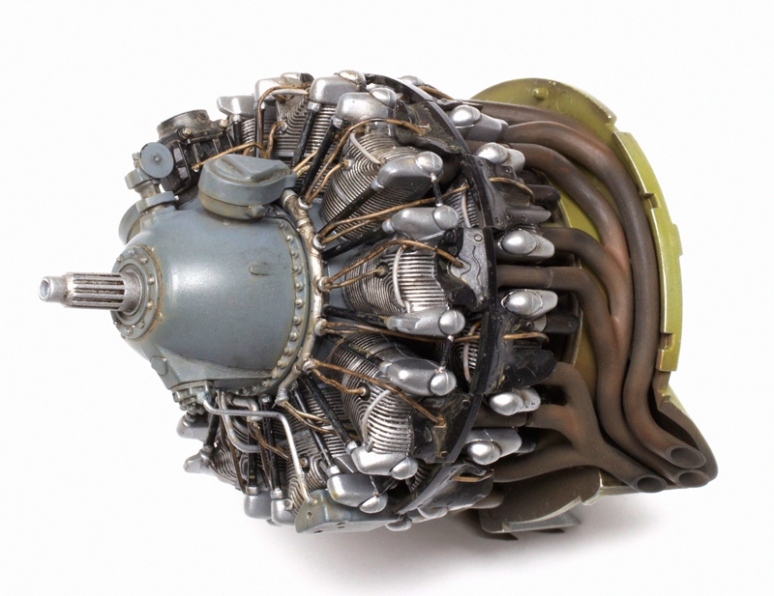
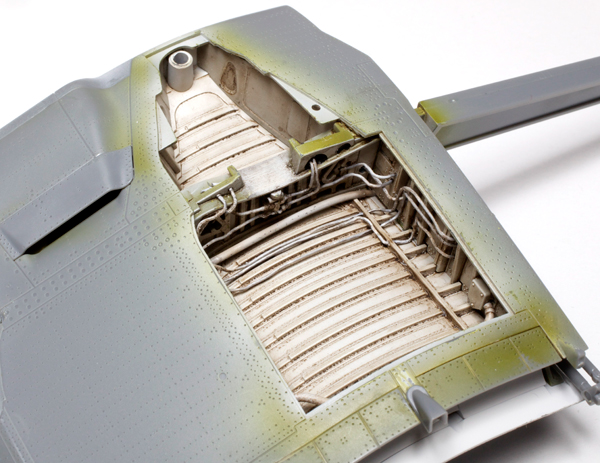
Pratt & Whitney R-2800-8W engine with extra wiring and plumbing. The exhaust manifold is not glued in place at this point.
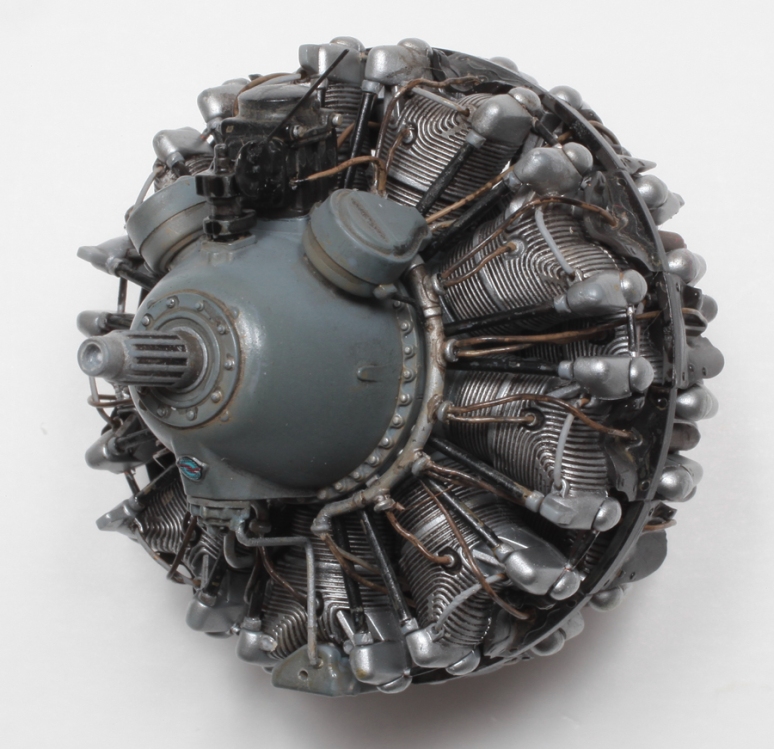
The finished engine.
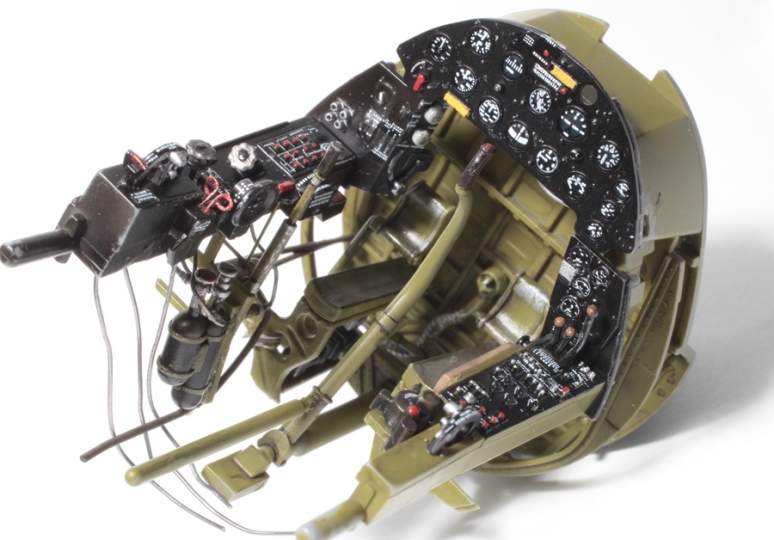
Cockpit with Barracuda’s stencils and placards decal set added. I did use the kit decal for the instrument dials but with a slight variation. The main panel was first painted semi-gloss black then the clear dial face panel was glued in place as per the instructions. Next I cut each dial face from the kit decal sheet and applied them individually to the front of each instrument. Once dry, each dial received a drop of clear gloss. I think this gives a much clearer result than applying them to the back of the clear instrument part.
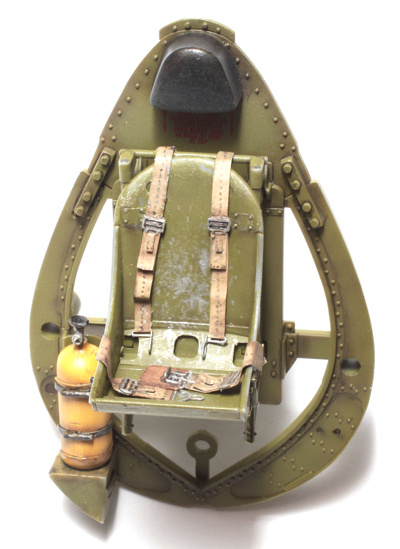
The rear bulkhead with seat, safety harness and oxygen bottle attached.
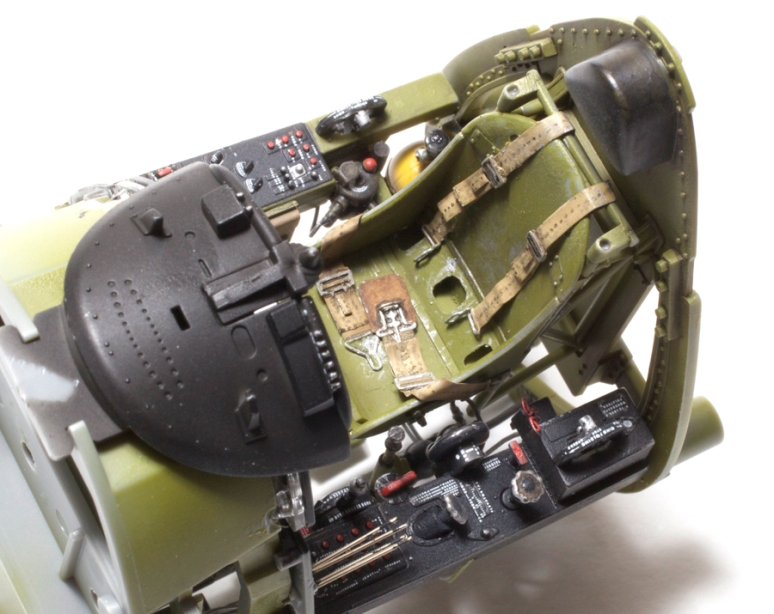
Main cockpit components together.
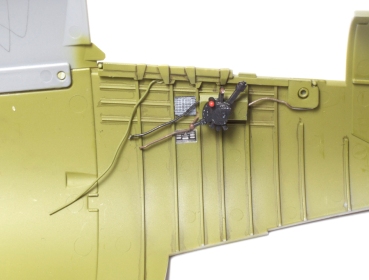
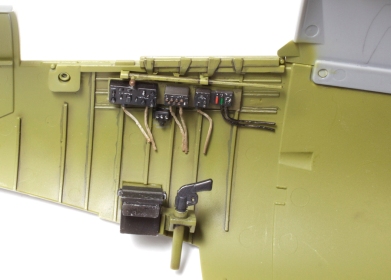
Cockpit sidewalls with a bit of extra wiring.
The cowl flap hinge and pulley system was added using bits of plastic card and rod with stretched sprue as the wire. This is nowhere near 100% accurate, but it is quite visible and looks better than nothing.
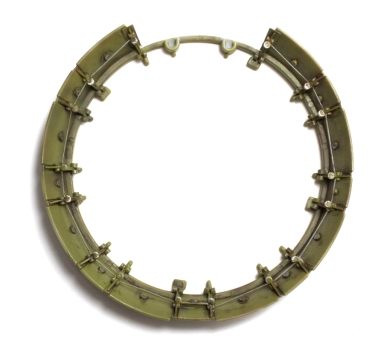
Wheel wells received lots of extra plumbing. This was made using fine solder wire and it is quite complicated, so good reference is essential.
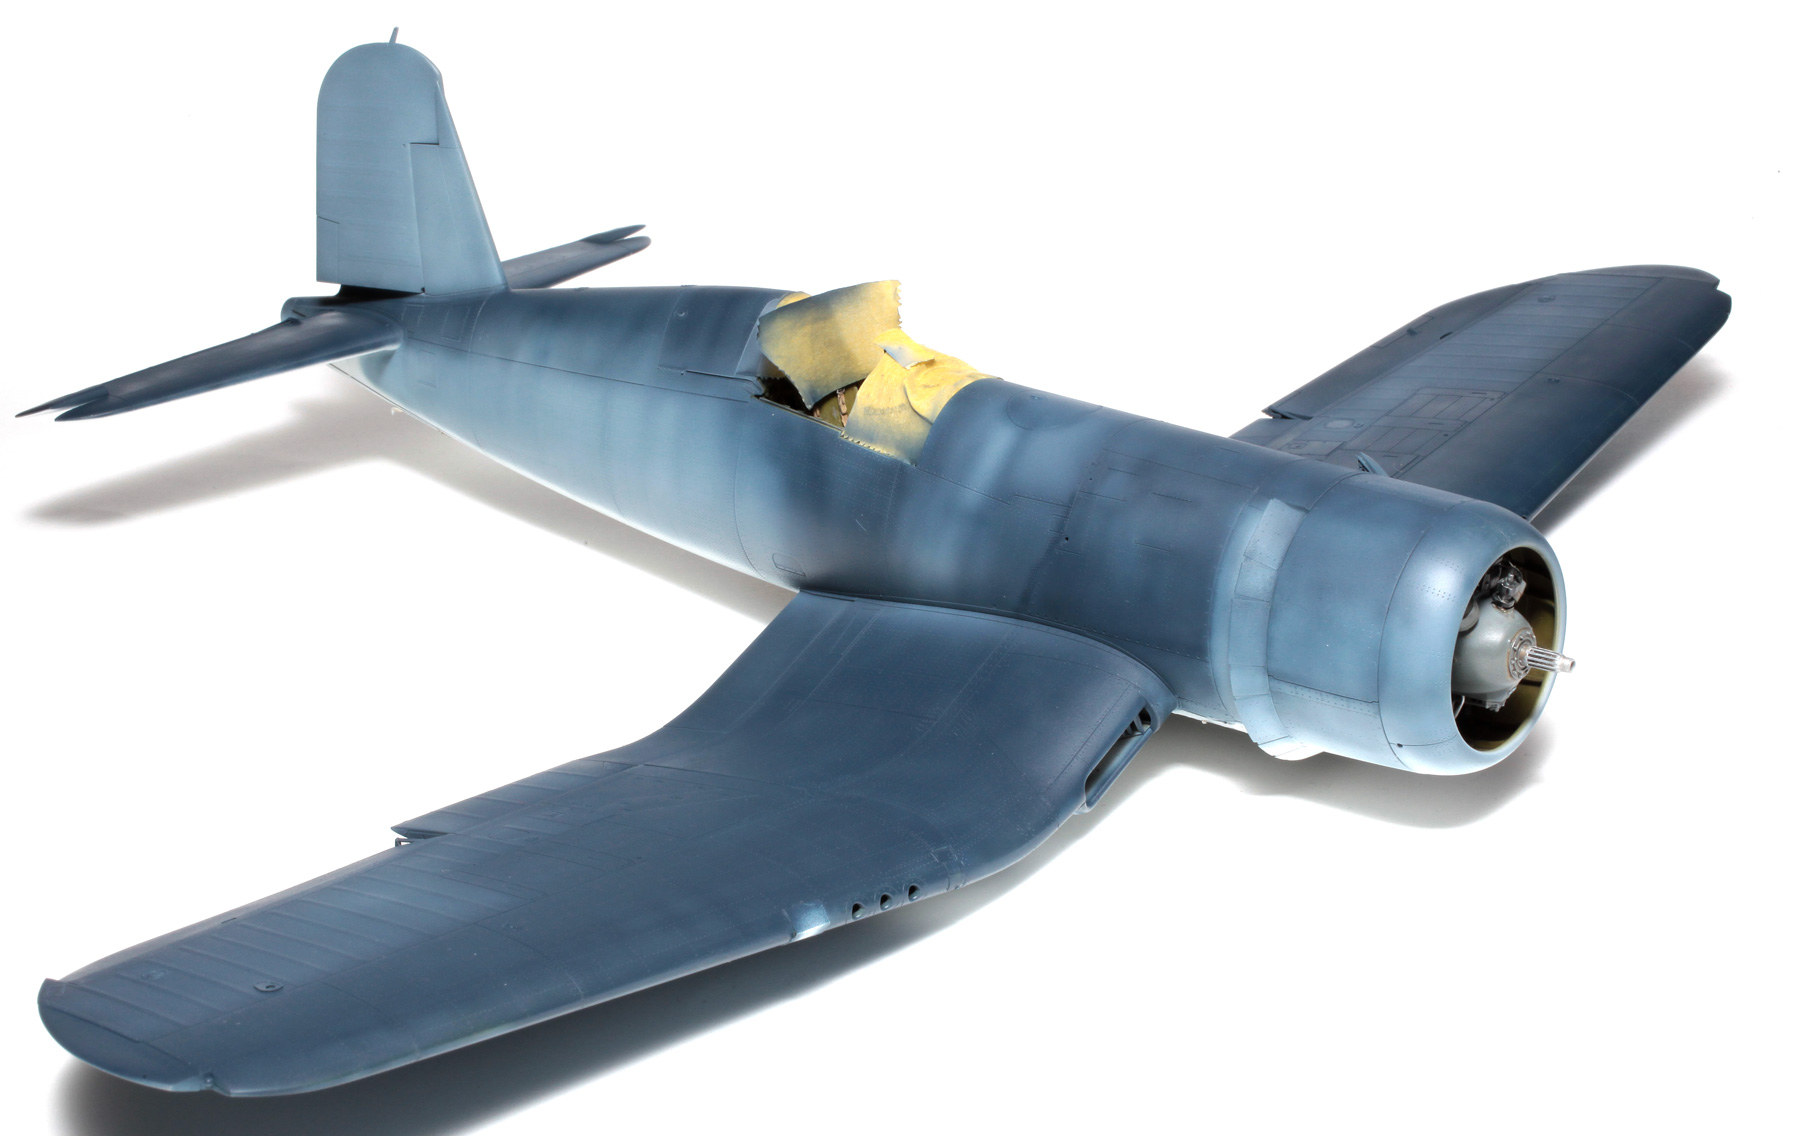
Initial cammo colours on. Notice the fairly uneven spray job around the fuselage in front of the cockpit. This is where the heavy staining from the leaky fuel tanks will be applied.

In this shot the weathering is well underway. This includes the fuel stains down both sides of the forward fuselage and across the inner wing, lots of Prismacolor silver pencil paint chipping along rivet lines and where fuel cell sealing tape has been removed, and the general grubbiness across the wings which was achieved by very carefully spraying ‘random’ dirty marks with the same colour used for the fuel stains. This colour is heavily diluted Tamiya XF-59 Desert Yellow.
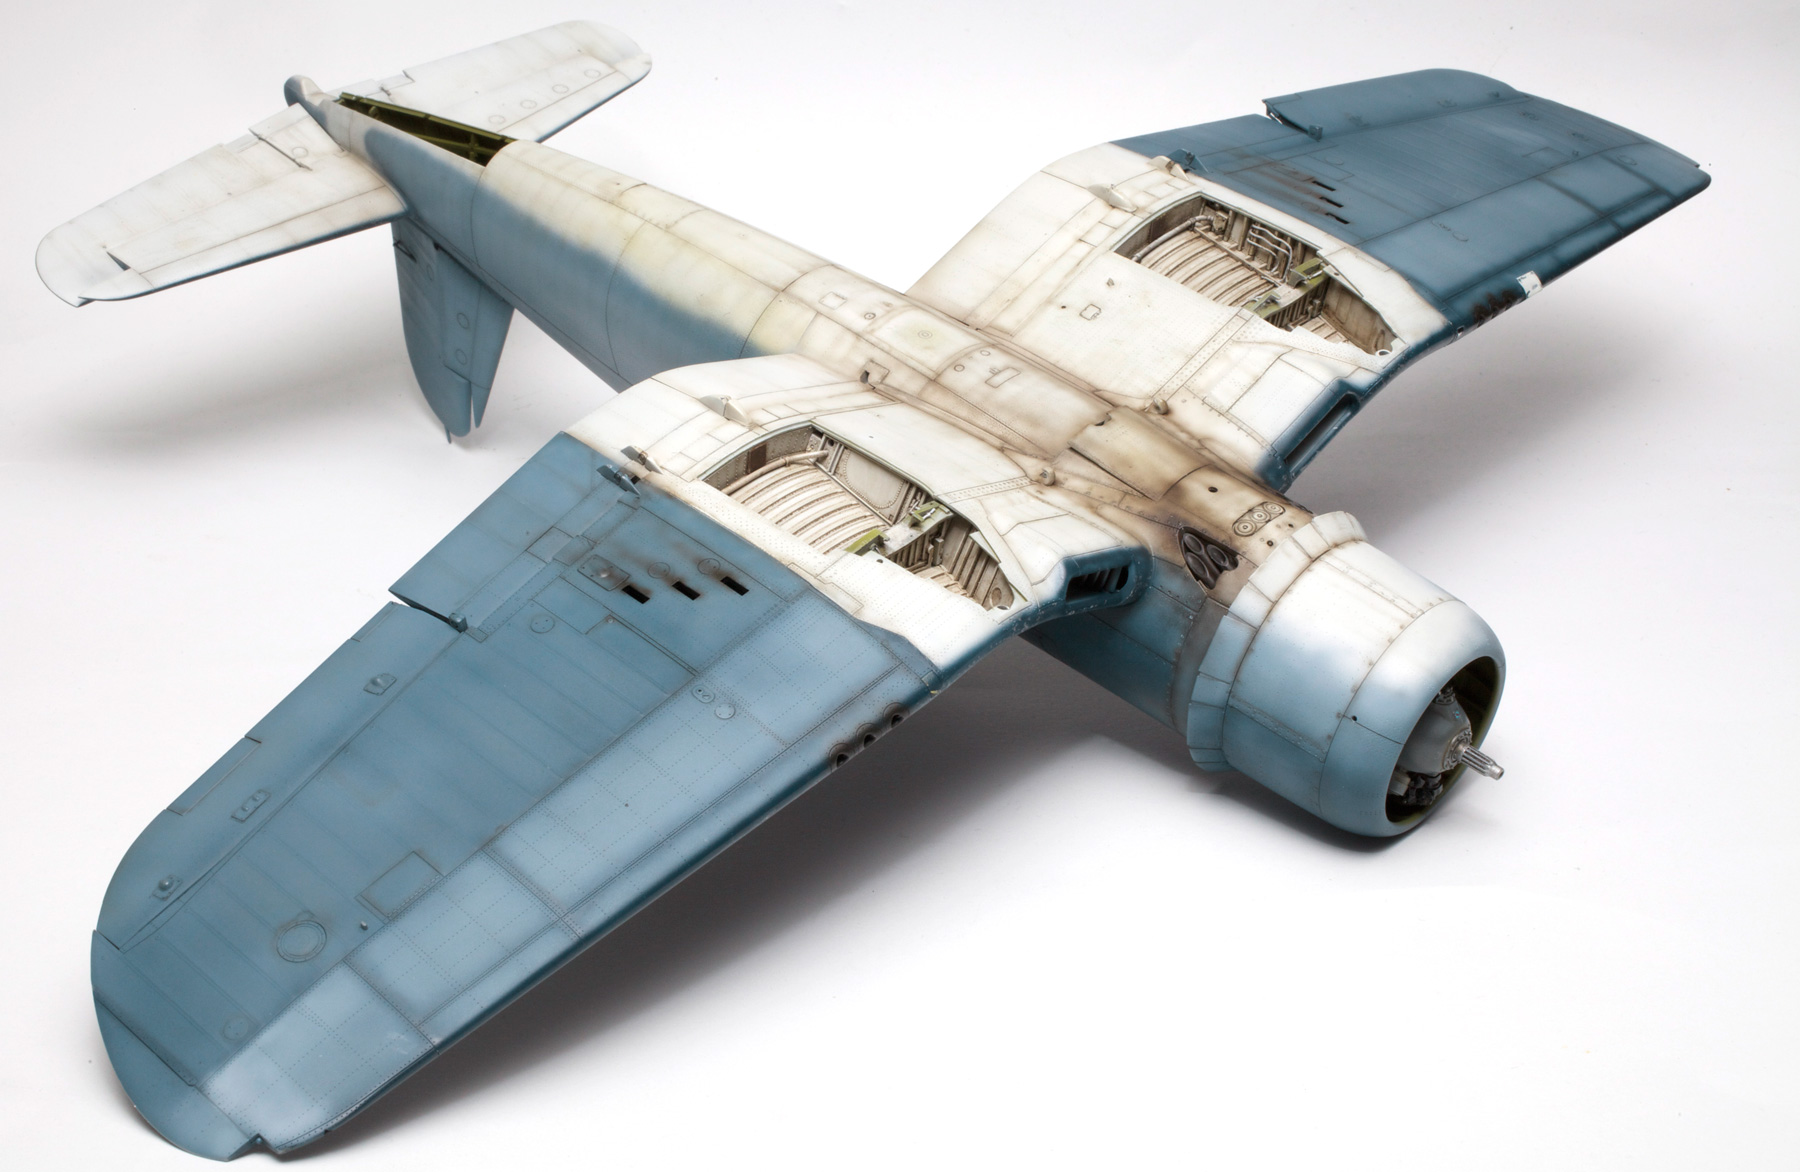
Undersurfaces were fairly heavily weathered as well. Lots of dirt and exhaust stains on lower fuselage. Two shades of intermediate blue were used on the outer wings with some panel lines painted darker navy blue as per some photographic references.

The kit main wheels and tyres were replaced with resin items from Barracuda. The tail wheel assembly was later painted black as per reference.

Even though EaglCals instructions indicate that the trim markings on the tail and prop hub of this VMF-321 aircraft are to be white, I’m sure they were yellow. Also during this period VMF-321 planes carried different pilot and aircraft names on either sides of the cockpit and engine cowling. As the only available photo of this aircraft is of its righthand side, I chose not to use the duplicate personal markings on its other side as indicated by EagleCal.
GALLERY


What a clever boy you are! Chris, that is wonderful. Thanks for the inspiration. Hope you are doing one of the new 1/32 Mossies. Cheers. Roger.
LikeLike
Thanks Roger. And yes just waiting for Brett to finish his build.
LikeLike
Looks awsome great job
LikeLike
Excellent work Chris, as usual. Very nice to hear from you with this new build. How would you rate the model?
LikeLike
Thanks Tomasz, 9 out of 10
LikeLike
An amazing job as usual and great inspiration to wannabes like myself, thanks for sharing
LikeLike
Thanks Steve. Always very pleased to inspire.
LikeLike
Hi Chris,
its brilliant ! I particularly love the fuel stain down the fuselage side and over the wing, you nailed the effect perfectly ! Is that the Barracuda ignition ring I see on the engine ?
-Not much modelling at my end, I’m swamped in exam study at the moment. I did manage to cross the border into Czech Republic and check out the local modelling show in Brno. Definitely some cool stuff to see if you can time it with a trip to Europe. I picked up the new Hph 1:32 Fw 189 there and it looks quite nice indeed.
I can’t wait to see what you do with the Tamiya mossie, do you have a scheme in mind yet ?
cheers,
Peter.
LikeLike
Thanks Pete, I really like the fuel stains as well- I surprise myself sometimes. Not from Barracuda, the ignition ring is out of the box with added wiring. We will be back to Europe next year sometime I think. As for the Mossie it will be something from the kit decals unless some after market ones appear fairly quickly.
All the best and
keep studying hard,
Chris
LikeLike
hey Chris, If your in Austria next year come and say g’day
Cheers Peter.
LikeLike
Lovely work Chris!!
LikeLike
Thanks Matt. Are you still in town?
LikeLike
Mad Crazy Hand Skills Chris! Beautious work.
Aloha Clint
LikeLike
Aloha Clint, had great fun doing this one.
LikeLike
My favorite building module? ALL OF THEM! it´s a Master piece! thank you share it with us.
LikeLike
I love the Corsair as well Jesus and it’s not hard to do a good job when you start with such a beautiful kit.
LikeLike
Thank you, it’s gorgeous
Rick Prokopchuk iMac 27inch 3.2Ghz Intel Cor i5 8GB RAM OS X Yosemite 10.10.3
>
LikeLike
Thanks Wiz.
LikeLike
Speechless. This is truly diabolic man! I can’t believe the degree of perfection achieved. I thought your Stuka G-2 was unbeatable, but this time you’ve gone even farther.
Bravo Chris! Superb build and awesome painting.
LikeLike
Thanks Oscar. They’re never perfect but I do like the the look of this one.
LikeLike
Nicely done Mr Wauchop!
LikeLike
Thank you Mr Kelly!
LikeLike
FINISH BEAUTIFUL !!!!
LikeLike
Thank you Ben, I appreciate your words.
LikeLike
I really like the colouring on your exhaust manifold. How did you do that?
LikeLike
Hi Zane, the colours I used on the exhaust are my usual mix of Tamiya XF-64 Red Brown and XF-1 Flat Black. They were first sprayed Red Brown and the shaded with a dark mix of the two colours. Once this dark shading was done selected areas were highlighted with straight Red Brown until I was happy with the way it looked.
I hope this makes sense,
Cheers,
Chris.
LikeLike
Really excellent, I will take a closer look at the rest of your work to see what I can learn.
Thanks for taking the time.
LikeLike
Sorry – a few more newbie questions: Where do you get the decals that go on the switch panels in the cockpit, is that aftermarket? How do you do your switches so perfectly? Do you do it with a brush? I tried to isolate each switch using a 0000 brush, but still wasn’t able to pick them out as you have.
Zane
LikeLike
Zane, they are from Barracuda decals and are available on line from barracudacals.com. As for the switches, they are painted with a 10/0 brush and I’m sure you’ll be able to get the same result using your 0000 brush and a bit more practice.
Don’t give up,
Cheers,
Chris.
LikeLike
Thanks Chris, seeing that you can do it gives me hope 🙂
Zane
LikeLike
Wow, another stunner Chris! I Really like the way you’ve captured the worn paintjob. The yellow accents on this bird are a nice touch as well!
Looking forward to seeing your next masterpiece! 🙂
Regards!
Emil
LikeLike
Thanks Emil. I don’t know about it being a masterpiece, but the Mossie is on its way.
LikeLike
Stunning weathering & shading. I’m tackling own corsair now, battling with the difficulties of fading, weathering & shading a pretty much “overall blue” color scheme & your pics are a reference and an inspiration. If mine looks ahlf as good as yours when finished I’ll be v happy. Thanks for taking the time to take & post the step-by-step shots.
LikeLike
Hi Doug, the fading effect I did was achieved by using the intermediate blue as the faded version of the darker navy blue. Once the darker blue upper surface colour had been applied a very thin mix of the lighter intermediate blue was lightly sprayed over the areas that were to represent the fabric covering, fuel staining or any other spots that I thought needed a bit of variation. A thin mix of the darker blue was then carefully sprayed around edges, along panel lines and over any raised detail. This will soften edges and subtly blend the two colours. Also a very thin mix of Tamiya XF-59 Desert Yellow was used for fuel stains and general grubbiness. It is important to keep these mixes quite thin as you get a degree of transparency when applying them. It also makes correcting any mistakes easier because you don’t have too much paint building up!
I really hope this is of some help.
Cheers,
Chris.
LikeLike
Appreciate the response & yes, your comments are helpful. It looks like the demarcation between color-bands was sprayed freehand? I’m going to try to replicate your technique using Vallejo & Tamiya paints. I’ve been trolling around websites & boards looking at all the big corsairs out there & this one (in my opinion) absolutely takes the cake. Would love to watch/buy an abbreviated video/dvd of your airbrushing this sort thing (corsair, stuka, 109, Uhu…) & I’m sure others would too. Your aircraft are truly works of art. Thanks again
Doug
LikeLike
Excellent, as always. In any sport, the main thing-always at a high level. Thank you for your excellent work.
LikeLike
Thanks Andrew, I’ll try to keep it that way.
LikeLike
Top job like usual, Chris.
I always find myself looking forward the latest works coming off your bench.
You never disappoint. Great stuff! The cockpit is especially well done.
One question, the gun covers, how did you make them?
LikeLike
Hi Oscar, it’s taking a little longer for them to come off the bench these days. I guess I’m just slowing down as I get older. The tape covers over the gun ports are simply strips of white decal cut from some of the unused bits on the kit decal sheet.
All the best,
Chris.
LikeLike
Just found your blog while searching the net for build reviews of this kit and I must say you have done a wonderful job on her. I love the weathering as the final result looks very convincing as if I’m looking at a real aircraft. All you need is a appropriate base and background cover.
LikeLike
Chris,
I was through with this kit when I dropped in at your site half a year ago. I saw your work, cleared my work bench and started another one. Many thanks for the inspiration, your model was my guiding star in all these months.
http://imodeler.com/2016/04/tamiya-f4u-1-corsair-132/
All the best,
Halvar
LikeLike
Thanks Halvar. Always very pleased to be provide some inspiration, and wow, your birdcage looks fantastic! Keep up the great work.
Cheers,
Chris.
LikeLike
Hi Chris,
your model is top notch as usual!
Could you please share the specific colours and makes for these US Navy blues and whites?
Thanks very much
Cheers
Alex
LikeLike
Hi Alex, the paints I used for the two upper surface blues are both Gunze Sangyo acrylics, specifically H56 Intermediate Blue and H326 Blue FS 15044 (Thunderbirds). The white is a 50/50 mix of Tamiya acrylic XF-2 Flat White and X-2 Gloss White.
Hope this answers your question.
Cheers,
Chris.
LikeLike
Hi Chris,
thanks very much for the prompt answer! Totally useful!
Ta!
Alex
LikeLike
Chris…..I’ve followed your work for years through Brett but just stumbled onto this site. Your work is the highest form of art in my opinion. I’ve read your techniques with great interest. One thing that struck me was how straight your black.black mix is applied? Is there a trick or is that just talent? Also, is the pencil weathering technique you used on the Zero a standard step or was that unique to that aircraft because of it’s light coloring? Thanks a ton for sharing your work.
LikeLike
Hi Parker, I always feel very humble when people refer to my work as art. To me it’s still mostly fun with a bit of work thrown in and always extremely satisfying when the result is good. As for the black/brown mix, it is usually around 2/3rds brown to 1/3rd black and about 75% thinners to paint. There’s no real trick to its application, more technique, finest setting on the airbrush and pressure set at about 15psi. The technique used on the Zero was indeed unique to that particular model because of its overall light colour scheme. I only use a pencil to mark panel lines, etc on the light coloured under surfaces and then carefully overspray them (to varying degrees) with the thin black/brown mix. With the Zero I didn’t want this detail to be too dark so the method described in the article was used.
I really hope this explains it. If not give us a yell.
Cheers,
Chris.
LikeLike
It does…thanks so much. I remember Brett telling me you apply your airbrush weathering incredibly fast. Maybe that’s the trick how your lines are so straight and precise? I can’t get over the precision and subtlety. I’d pay good money to observe an airbrush session of yours. BTW, just visited Australia for the first time…..incredible country.
LikeLike
Dude, I suffer from Corsairious Malarious. Thanks for giving me a fix. You’re my hero.
LikeLike
Glad to ease your suffering Don, but please seek immediate medical attention! I’ve heard that this condition can be extremely serious.
Take care,
Chris.
LikeLike
Hi Chris, stellar as usual. One question on the colors you used, I was looking at the H326 and for Mr Color is a gloss finish, but on you’re pics it looks quite flat. Never used Gunze before. Cheers.
LikeLike
Other question Chris, how do you achieve the withe edge representing, probably, the sealant used around the frame of the windshield? Your model is beautifully finished.
LikeLike
Hi Mauricio, H326 is indeed gloss but I have added a few brush loads of Tamiya Flat Base to the Gunze jar to make it semi gloss rather than flat. I prefer to work with this finish rather than full gloss or completely flat.
In answer to your second question the white around windscreen frame was, in reality, sealing tape and on my model it was simply achieved by masking and spraying the white after the blue paint on the frame was dry.
Hope this answers your questions.
If not please keep asking.
Cheers,
Chris.
LikeLike
Thanks a lot Chris for the answer, they are pretty clear, useful and motivational as I’m starting this kit pretty soon with the same color scheme.
LikeLike
Chris- once again you have inspired me! After much debating, I purchased this kit and began work on it last night, starting with the engine. I can only hope to emulate what you have done.
Question: do you recall what paints/colors were used in the cockpit, and the blues on the sides and upper exterior? Cheers, Steve Rewey
LikeLike
Hi Steve, really glad to hear that I have inspired you again. You won’t be disappointed with this kit, I can guarantee you of that. To answer your question, the interior is painted Gunze Sangyo H58 Interior Green and my notes tell me that upper fuselage colours are, Gunze H56 Intermediate Blue on the fuselage sides, vertical tail and underneath the outer main wings and a 70/30 mix of Gunze H326 Gloss Blue and Tamiya XF-18 Medium Blue on the upper wings, fuselage and tailplanes.
Hope this answers your question.
Cheers,
Chris.
LikeLike
Thank you so much Chris! Gunze paint is impossible to find in the states, however I have a layover in Nagoya next week. I plan on raiding the hobby shops!
LikeLike
Hello Chris –
While taking the cheap man’s way out, I chose the new Revell boxing of the Corsair. This allows me to splurge on some Eduard PE.
So I read with keen interest your comments, and can’t wait for all the bits to come in and get started. One comment I picked up on was what you said about detailing the landing gear bays, and needing a good source of information and/or photos. I think I have one of just about every book and magazine article ever written, but still have not come across good plans for the gear bays. Can you share your source of info you used? I know I can’t match your level of artistry, but I’ll give it a shot!
Thanks again for your efforts in helping us less-gifted “plastic-abusers” and “glue-sniffers”, you’ve set the bar very high!
Thom
LikeLike
Hi Thom, sorry I’ve taken so long to answer but have been otherwise occupied. To answer your question I got most of my reference for this from the net. In particular page six of this site – https://www.net-maquettes.com/pictures/f4u-1a-corsair/ – has the best shots of wheel well detail.
LikeLike
Superb. Well done indeed. Comprehensive and yet subtle.
LikeLike
Thanks Pete, glad you like it.
LikeLike
I want it
LikeLike
You can’t have it.
LikeLike
Chris, congrats on a brilliant collection of models!
I was led to this F4U-1A build via Google and what a treasure trove of information and refs.
Thanks for posting in such detail.
This will give you a laugh….. I’m making a start on the old Revell 1.32 kit it’ll give me the chance to apply some new scratch building techniques.
I enjoy doing battle with an old kit, and trying to upgrade my skills and the finished article.
Your work here gives me more than enough reference material to get stuck in.
I’ll have a cruise through your other builds another time.
Cheers
LikeLike
Very beautiful job, though I’m curious what led you to conclude the trim on the empennage and prop hub was yellow? White was indeed the standard trim marking carried by Marine Corsairs at that time (the Navy and by extension Marines were VERY strict about color and markings; Note that you very rarely find red trim on Navy and Marine birds after Coral Sea. Bob Galer’s Wildcat is one of the few exceptions I can think of).
LikeLike
Fundekals http://www.fundekals.com/images/Corsair/usmc32/USMC_Inst_32rev3_19.pdf. Check the tone of some of the photos included here and I’m pretty sure that these details are not white.
Let us know what you think.
LikeLike
Amazing piece of work! So beautiful & realistic! Always loved the F4U Corsair!
LikeLike