Revell 1/32 Me262 A-1a
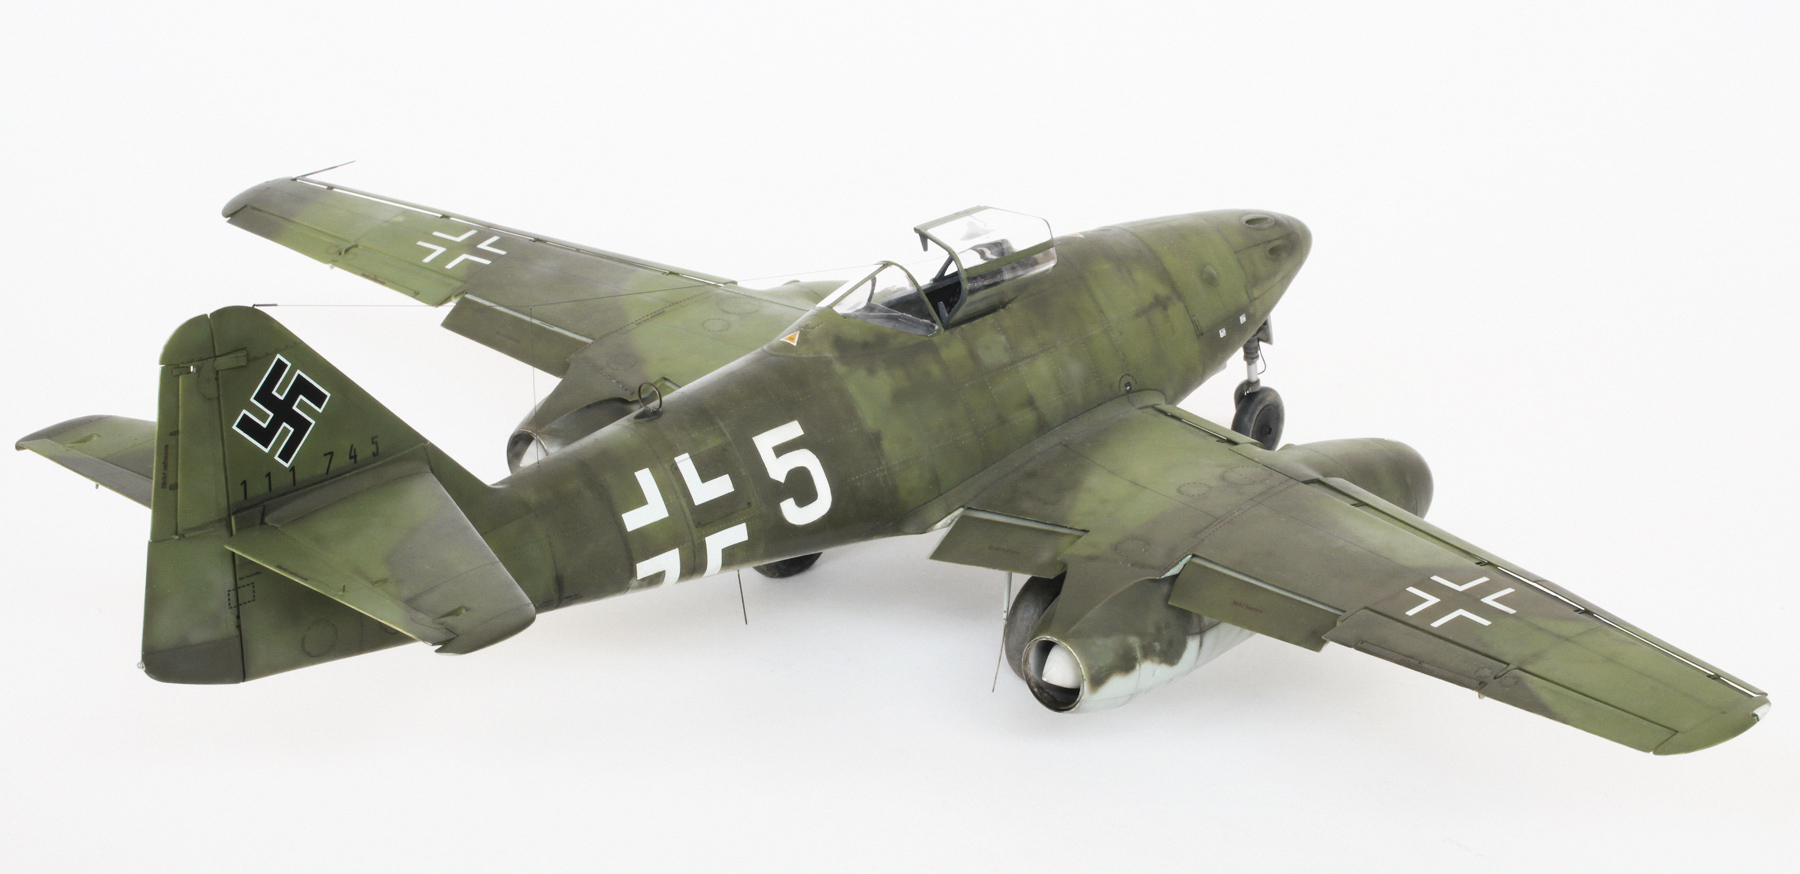
Me262 A-1a SCHWALBE

Messerschmitt 262 A-1a flown by Unteroffizier Eduard Schallmoser, JV 44, München-Riem, Germany, April 20, 1945. Schallmoser was flying this aircraft when he accidentally rammed a P-38 Lightning, slicing its complete tail assembly off with the jet’s starboard wing. Sustaining only light damage, Schallmoser was able to return to base and land safely but I’m not sure whether this aircraft ever flew again.

The seat’s leather cushion was first sprayed matt orange and then carefully shaded with a thin mix of red brown. The deeper creases were then shaded with my black/brown mix. Cracks and scratches were brush painted using straight black and a lighter shade of the original orange. Once dry the cushion was rubbed with my greasy fingertip to give it the leathery sheen. Small wire loops were added to the top of the seat back as attachment points for the safety harness.

Cockpit interior waiting for the addition of instrument panel and safety harness.

Toe straps were added to the rudder pedals. These were made using thin strips of lead foil.

Lots of wiring was added to the back of the instrument panel using various gauges of lead wire.

As I was not sure how much of the wiring was going to be visible it only received a rough coat of yellow. Each separate instrument dial was cut from various decal sheets and added to the individual bezels after the complete panel had been painted.
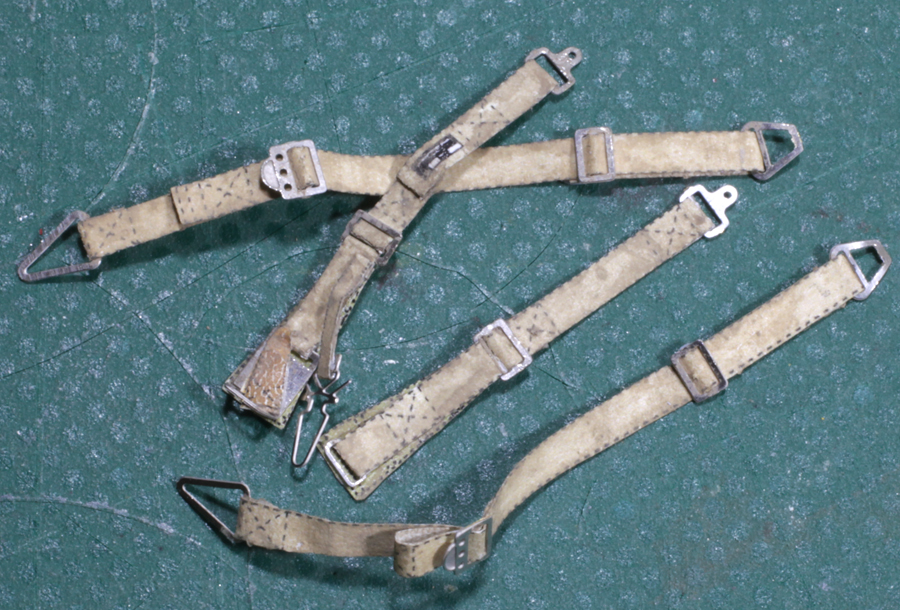
HGW’s Micro fabric seatbelts and P/E buckles assembled and weathered.

Cockpit tub ready for instillation.
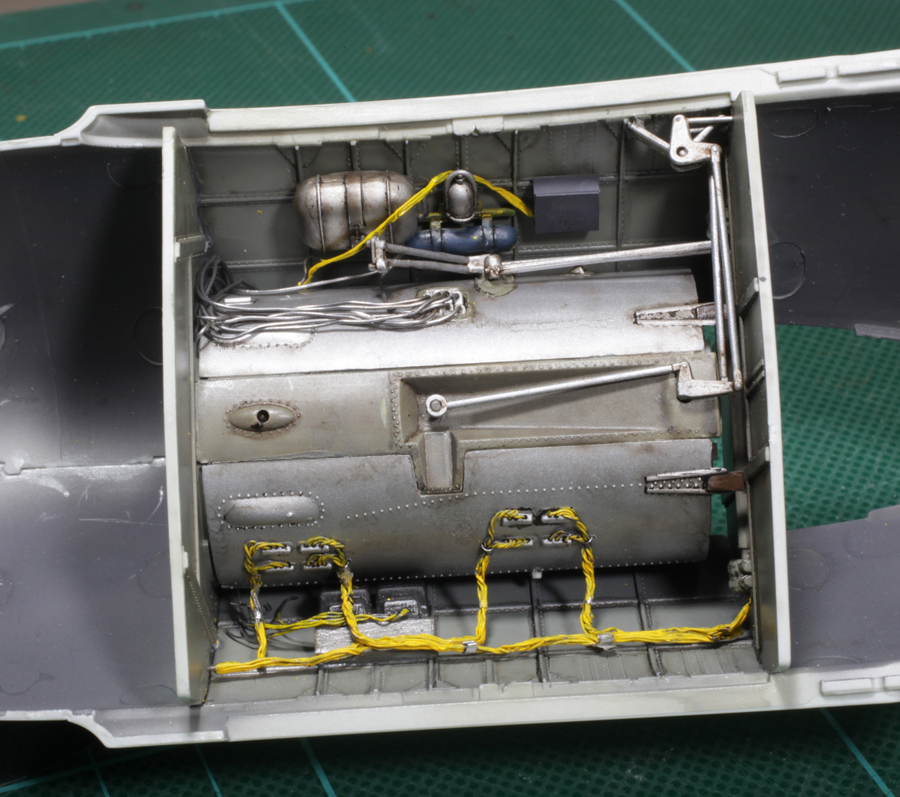
Underneath the cockpit tub with lots of wiring detail added. This area will be visible through the landing gear openings.

The kit’s ring pull handles in the tip of the bullet-shaped Riedel starter engine fairings were removed and replaced with finer scratch-built items.

A push rod was added to the rudder’s offset trim tab using fine brass wire.

If you do not want to build your model with open gun bay and engine cowlings then a fair bit of filling and sanding will be necessary because of the rather poor fit of these parts. Also I was not happy with the uneven contours around the front end of the nose and, again, a lot of filling and sanding was required to make this area look right. The tips of the cannons’ blast tubes were also added.

The emergency canopy release handle was added. This was made from Evergreen plastic strip that was cut and bent to shape.

Initial application of camouflage complete. The colours look very bright in these shots but once matted down and weathered the vibrance was reduced considerably. Also visible in this and the next couple of shots are rows of rivets that were added to the fuselage. I didn’t do any on the wings due to a severe lack of motivation.

Gloss coated with decals applied. The W.Nr. on the vertical tail was made using individual numbers cut from several different decal sheets.

I could not find a decal to match my reference for the tactical number ‘5’ so I drew it free-hand and scanned it into the computer and printed it to the correct size onto self adhesive paper. Using a new very sharp scalpel blade, masks were carefully cut out and the number was sprayed on both sides of the fuselage.
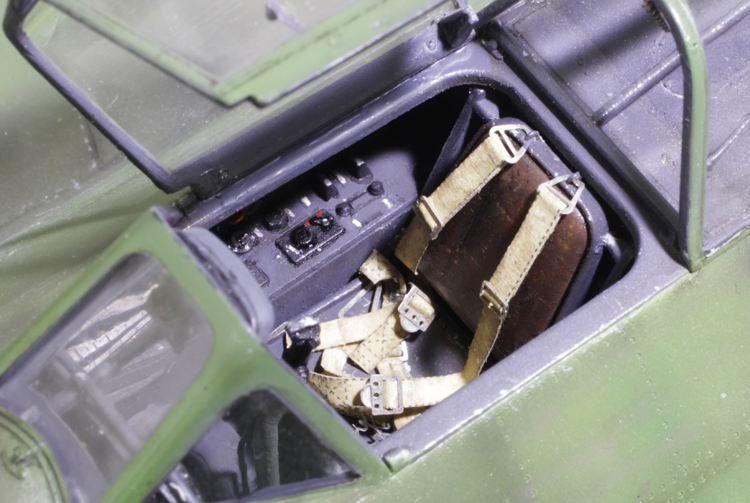
Cockpit interior complete.

In this shot you can see the tiny brass wire hook holding the radio antenna wire, the safety wire holding the open canopy, the locking handle on the inside of the port canopy frame and the grab handle on the inside of the canopy centre frame.

All the dangly bits ready for installation. Lots of detail added to these parts including hydraulic and pneumatic lines, a new DF loop made from scrap P/E bent to shape, and the brass wire end on the FuG-16ZY antenna mast which is lying on top of the new pitot tube made out of telescoping brass tube. Also note the authentically hand-painted No.5 on the front nose gear door.
Gallery


Chris, awesome job!
As always your Kira are an inspiration to me.
Thanks for sharing!
Michel
LikeLike
Kits*
LikeLike
Whoaaaaa! love it! congrats on another amazing piece:) and thanks for inspiring us yet again!:)
LikeLike
What else to say? Another stunning piece from your workbench Chris! How is your overall impression on this Revell release in terms of detail, accuracy etc.?
Regards, Tomasz
LikeLike
Hi Tomasz, it’s all pretty good but in this scale I guess I expect it to be a lot better. I blame Tamiya for spoiling me with their efforts in this scale. I wish they would do something 1/32 WWII Luftwaffe.
LikeLike
Yeah, Tamiya spoiled us all 😉 Have you tried Trumpeter’s kits? They have some 1/32 Luftwaffe fighters, including couple of Schwalbe versions. Although, I’ve seen some comments that the Trumpeter 1/32 kits are over-engineered.
LikeLike
The Trumpeter kits that I have worked on were certainly over-engineered and inaccurate in places. Their 1/32 Mig 15 is one the very few kits that I have given up on and thrown in the trash. I’m afraid it’s Tamiya, Hasegawa or nothing.
LikeLike
This is a masterpiece … thanks Rembrandt
LikeLike
Nice stuff Chris!
LikeLike
Thanks Mr Kelly!
LikeLike
stellar as always
LikeLike
Once again, an astonishing end result Chris, everytime i come to see your work for inspiration and reference and a new kits is up there it’s pure joy. I love what you’ve done with the 1945 look on the schwalbe… great “fives”… cheers!
LikeLike
Well Done Chris, You seemed to catch the “flavor” and the complexity’s of the 262.
LikeLike
Chris as always your finished product is very inspirational.
I’m curious what colors/finishes you use on the oleo portions of your landing gear struts.
Something about them just looks right to my eye.
LikeLike
Chad the oleos were first sprayed with Alclad II Lacquer Chrome. A thin black line was then carefully brush painted at each end. These were then very subtly shaded with the black brown mix that I use on just about everything. I really must emphasise the subtlety of this shading. It’s very easy to go too far.
Hope this explains it.
Cheers,
Chris.
LikeLike
Thank you very much!
LikeLike
Chris
Outstanding job as always, another masterpiece. Curious about the colors and clear coats you used on your Schwalbe. What brand and which colors did you use for the main interior color and top/bottom exterior camo colors? What color did you paint the Jumo engine inlet starter cone and exhaust cone? In the past you’ve said you only apply gloss coat on aircraft where decals are applied. Did you do that here, or use an overall gloss coat and which brand did you use? Also, which brand/type of flat coating did you employ? Do you thin these clear coats like you do camo paint, or straight from the bottle?
Thanks for sharing your superb work with us.
Scott
LikeLike
Glad you like it Scott, the main cammo colours are all Gunze Sangyo Aqueous Hobby Color and they are H417 RLM76 Light Blue, H421 RLM81 Brown Violet and H422 RLM82 Light Green. For the cockpit interior colour I used Tamiya XF-24 Dark Grey. This is bit lighter than RLM66 but I think it looks a bit better in scale. The engine inlet starter cones and exhaust onions were painted with Alclad Lacquer ALC 106 White Aluminum. The exhaust onions were given a thin coat of flat white over this colour to match my reference. I use undiluted Future Floor Polish as my gloss coat and I do tend to only cover the areas where the decals are to be applied. My flat coat of choice is Windsor & Newton Galleria Acrylic Mediums Matt Varnish which I do thin with about 30% Iso Propyl Alcohol.
Hope this is enough info. Let us know if it’s not.
Cheers,
Chris.
LikeLike
Awesome, Chris, thanks a bunch!
LikeLike
Superb job, Chris! I do like your brand of Leather Treatment (greasy finger:-) Bottle it and flog it :-))
Regards
Z
LikeLike
I don’t think I produce enough of it Zig but thanks for the suggestion.
LikeLike
Hi Chris, I haven’t left a coment in a while so I thought I’d better check in and say I’ve thoroughly enjoyed all your last couple of builds. They’re Inspirational as always ! I always wait with antisipation to see what you do next.
I also have the revel Me 262 wating patiently in the stash but I have to finish all the kits I got on the go at the moment. I’m working on the Has. 1:32 bf109g-6 and the Revell 1:32 He 219 …… and a few others…. ahhhhh !
I hope all is well with you and your family down under
Cheers,
Peter Olsen
LikeLike
Hi Pete, great to hear from you again. Sounds like you’ve got plenty to keep you busy while we get through this. Just want to say that if I was to do another Revell 262 I would lengthen the nose wheel oleo by about 1mm. This will make the model sit with a slightly tail heavy attitude which is how most of the operational Schwalbes look in my references. Also don’t forget the prop blades on the He 219 which have the same concave profile on their front as well as their back. A pain in the arse to fix but, I think, necessary.
We’re all doing well and hope you are as well.
Cheers,
Chris.
LikeLike
Dear Chris,
All of your works are masterpieces! I’ve watched your models posted here and on hyperscale for 10 years. I do my models now usually imitate your techniques, such as your black/brown mix for shading. I’m wondering if you do washing after the black/brown mix procedure, or before it?
LikeLike
Hi Leonard, I usually give the panel lines a very thin black wash first and then do the black/brown airbrush shading after that.
I’m really glad you like my models so much and I hope that I can keep up the standard for a few more years yet.
Stay safe and build more models,
Chris.
LikeLike
Magnificent Work Mr Wauchop!
I wish l could build and finish half as good as you.
I have long loved the Me 262.
LikeLike
Thanks Dave, I love the 262 as well. It looks great from every angle.
LikeLike
If THEY call off the social strangle b4 27 May, we can go for a beer or two 🙂
It’s only one birthday in a year, and you up 365 days to me (if I remember correctly):-))
Zig
LikeLike
Hi Chris,
Have you used your Aztek airbrush on this beast? If you still use it, how do you go about cleaning the Aztek? Any particular method, cleaning agents? I’ve posted this question here, in the About section but you probably haven’t seen it…
Regards, Tomasz
LikeLike
Reply to this is on the About page.
LikeLike
Awesome work. I have a question. Did you make a light grey wash for the rivets? I want to know how you made them look like that
LikeLike
No Federico I do not use a grey wash. I use an MDC rivet maker which leaves a circle rather than a hole and after an initial coat of a light colour (usually the undersurface colour) the darker cammo colours are applied. Before the top cammo colours are thoroughly dry I gently polish the area with the finest Micromesh cloth. This removes the top layer of paint revealing the slightly raised, round, rivet heads.
I have been using this technique for quite a few years now. Takes a bit of practice but I think the results are worth the effort.
LikeLike
Thank you Chris, i’ll try to figure out how to do them. Keep on the good work!
LikeLike
Hi Chris, l love your work. I was wondering what (if any) final clear coat you use on your models? They seems to have a beautiful finish, and through all of my experimentation I have only found satin or matt varnishes to dull any effect considerably.
Keep up the great work,
Thanks,
Scott
LikeLike
Hi Scott, the model has been given a flat coat using Winsor and Newton Galeria Matt Medium thinned about 50/50 with Isopropyl alcohol. You tend to be able to control the amount of flatness by the number of coats applied and I have found that this product doesn’t dull the colours much at all. It is a bit expensive but you do get a lot for your money.
It is easily the best flat clear that I have ever used and I recommend that you give it a try.
Cheers,
Chris
LikeLike
Chris, I wanted to ask this when I first saw these pictures, but somehow I forgot. The picture with the engine nacelle where you mention the Riedel starter shows some coloring/shading on the panel lines (over bare plastic). I assume it is just spot checking for any misalignment issues, right? Or any other reason?
Thanks in advance, Tomasz
LikeLike
Yes you’re right Tom. It’s just Gunze RLM 02 and I use it to check my filling, re-scribing and alignment.
LikeLike
This is Magnificent! Love the detail, great talent.
LikeLike
Chris, Fantastic work as always, just simple elegance at it’s best. One question if I may. For the filling and re-scribing of panel lines, etc., on the nose and gun bay areas, are you using epoxy putty, such as Milliput, to fill in the gaps left from the poor fit of access doors and reshaping of the nose area? Other than using cyanoacrylate adhesives for filling such areas, not sure what other products would be able to be cleanly re-scribed. I have attempted to do scribing over typical model filling putties but never had success with that, just ends up as poor scribe lines. Thanks.
LikeLike
The filler I used on the panel lines was Tamiya white putty mixed into a thickish slurry with Tamiya Extra Thin cement. This mix forms a very strong bond with polystyrene plastic. I use a fine paint brush to apply this mix and, after it has cured for 12 hours or so, it is sanded smooth and the panel lines can be carefully re-scribed.
Hope this helps.
Cheers,
Chris.
LikeLike
Beautiful piece of work there Dude-!! But this can’t be the 1987 Revell kit as I’m starting mine and debating (for 2 seconds) as to whether or not to drop the dime on a aftermarket tub. The kit’s factory tub….su@ks-!!! Looks absolutely nothing like yours. I’m willing to go that extra mile in the detail department but this kit is about to be rendered to the scrap yard.
LikeLike
Wow, what a stunning model ! Very unusual camo pattern – super realistic. One of the best 1/32 me262’s i’ve ever seen made up. Kind regards – Paul Bremner (UK)
LikeLike
Thanks Paul. I’m pretty sure that this kind of scrappy, rushed paint job was pretty common in the final months of the war.
LikeLike
Outstanding work Chris. Love the use of glazes that brilliantly capture the manner in which the camouflage was applied to these machines.
My only comment would be that the Werknummer 111745 would appear on both sides on the fin. This is common to those in the 1117xxx series and confirmed by photographs on sister machines produced before (e.g. WNr.111733, “White 12”, JV 44) and after (e.g. WNr.111747, uncoded, JV 44) Schallmoser’s “White 5”.
Best,
David
LikeLike
Hi Dave, you’re right about the Werknummer but I had to make it out of individual numbers cut from spare decal sheets. Unfortunately I couldn’t find enough numbers to produce the number twice and as there are no clear pics showing the port side of the fin I forced myself to believe (and hoped others would do the same) that there was no number applied to that side. Please forgive me. Glad you like the rest of the model though.
Cheers,
Chris.
LikeLike
Chris
Nod need to apologize. It tells us that there is a need for a decal firm to create sheets of Werknummern in the various DIN fonts and sizes.
BTW, I just discovered your site and am looking forward to exploring it! Hope all is well in Oz. Just starting to sense the arrival of spring here in Eastern Canada (my daffs are coming up).
Cheers
David
LikeLike