Hasegawa 1/32 Ki-61 Hien (Tony) Photos by Brett Green

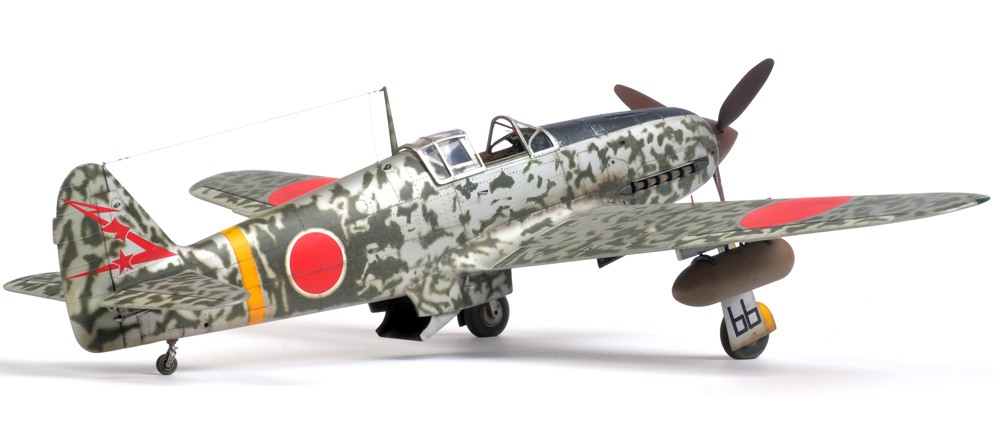
Hasegawa’s 1/32 Kawasaki Ki-61 Hien of the 244th Sentai based in Japan at Chofu whilst performing home defence for the Tokyo prefecture in ’45. This Sentai was under the command of Major Tembico Kobayashi.

Hasegawa’s 1/32 Kawasaki Ki-61 Hien of the 244th Sentai

Hasegawa’s 1/32 Kawasaki Ki-61 Hien of the 244th Sentai

Hasegawa’s 1/32 Kawasaki Ki-61 Hien of the 244th Sentai
Hasegawa’s 1/32 Kawasaki Ki-61 Hien of the 244th Sentai

Sounds like repeating myself but what can l say…another nice model. I especially like how the camouflage turned out. Was it very difficult to put it on?
LikeLike
Not difficult Tomasz, FUN!
LikeLike
Nice build Chris!! Love those 1/32 scales for us visually impaired (not that you are, I am). Like to have a cockpit “shot”, or two; but I know it’s just as lovely as the outer skin. Looking forward to more pictures. Saw the 1/32 UHU in the store the other day, and at $55.00 USD, that’s a steal. WOW, just in time for a present under the tree. Have a Merry Christmas down under now, ya hear.
LikeLike
That is cheap. I would love to get another one but I would have to build a new display cabinet to house it in!
There are several shots of the cockpit interior of the Ki-61 in an article I did for issue 003 of Military Illustrated Modeller. If you can’t get the mag let me know and I’ll see if I can post some pics here.
You have a Merry Christmas Bill and keep in touch.
Cheers,
Chris.
LikeLiked by 1 person
awesome.
LikeLike
Another rippah’ Chris !!! I really love the way you Interpreted the paint scheme, well done !!!
Hey Chris, did you see my Ki-61 I did in the July 2010 Edition of TMMI ? If Not I would love to send you some pics to See what you think….
Cheers,
Pete.
LikeLike
Peter, your article was one of my main inspirations when I built this, and I am looking at it right now. Beautifully weathered, especially the paint chipping on the cowling’s anti-glare panel and prop. Love it!
LikeLike
Thanks Chris, usually when I want some inspiration I look at pics of your built up models. So its nice I could returned the favor …….at lease in some small way.
cheers,
Peter.
LikeLike
Hi Chris, schemes for Japanese planes are very interesting, especially that lead to a big impact, I put together one day would be a Mitsubishi G4M, after making a good library research, a new project is unbeatable and is a challenge for all lover modeler details
Best Regards
Benjamín
LikeLike
I agree Ben, Japanese aircraft are very interesting and I find that doing the research is almost as interesting as building the model! I love trying to match the reference photos as closely as I can when painting and weathering. The Hasegawa 1/72 ‘Betty’ is a beautiful kit, but probably not as detailed as the Tamiya 1/48. Of course the Tamiya kit is huge which is becoming a bit of an issue in my household these days!
Cheers,
Chris.
LikeLike
Two thumbs up , well done. I have 2 Revell Tony’s in box, and another one 90% built and painted by my best friend who passed away and I inherited it and will finish it in memory of him, and have saved the others for years , since I read that Revell sent there mold’s of the Ki-61 Tony and J2M3 Raiden (which I have 1 built and 2 in boxes) to Revell/Japan they released this kit and two others (the Mitsubishi J2M3 Raiden and the Kawanishi N1K1-J Shinden-kai) during the 1972 time frame. As far as I know, these were the only efforts of Revell/Japan in 1/32 scale and, given the subjects, it was clearly directed to the domestic market. After a few batches the molds of all three kits should be traded to be injected in another Revell subsidiary (after rumors it was Revell/Mexico, So the molds were sent by ship… and the ship sunk. Instant collectors gold. I have been away from the hobby way to long due to 2 separate injury’s that should have snuffed my candle out. It didn’t and thru your creativity , you and others have re-sparked my flame to build. Excellant job again , you have set the bar pretty high for me in a good way. Thanks again for that delicious eye candy.
LikeLike
Good to hear you’re still kicking Mike. I remember having the 1/32 Revell Ki 61 in my shop years ago, which I bought from some ones collection, and being pretty impressed with the surface detail it had. It came with one other kit but I can’t remember what it was. Although I seriously considered keeping them for myself, the shop keeper in me won out and they both sold for quite a high price. I loved painting this Hasegawa kit which again fetched a very good price from a very happy client.
Glad you are enjoying the pics,
All the best,
Chris.
LikeLike
Chris, gorgeous build! Can you remembe what you used for the bare metal? It appears dull yet not flat…very nicely very touch. Thank you.
LikeLike
Chris, what did you use for the bare metal? It is dull, but not flat. Nice touch! Cheers and thank you again.
LikeLike
Hi Nick, the paint I used for the bare metal was Tamiya AS-12 Bare-metal Silver, This was decanted from the spray can and applied with my airbrush. Once dry this, rather bright silver, was given a coat of Polly Scale Acrylic Flat Finish. Unfortunately this is
no longer available, but I’m sure any good flat coat would do the job. These days I would just use Alclad white aluminium and dull that down a bit.
Hope this answers your question.
Cheers,
Chris.
LikeLike
Hello Chris,
I was lucky enough to find your page while searching for photos of this kit, which I have and am excited to get started on. I was wondering if you could tell me anything about how you applied the green spots? Yours is the best depiction I’ve seen and it’s something I’d really like to get right on my own build.
Thanks so much, this whole page is a treasure trove. Also, happy holidays!
LikeLike
Hi Jon,
I’m really glad you found me! A 50/50 mix of Gunze Sangyo H60 IJA Green and Tamiya XF-13 JA Green was used for the green blotches which were carefully sprayed freehand trying to follow my reference photo as closely as possible. Once dry the blotches on the fuselage around the cockpit and wing root area were gently polished using a well worn nail buffer. This removes a lot of the soft, sprayed edges giving a worn effect that matches a lot of reference photos I have. Instead of a nail buffer I would now use one of the finer Micro Mesh cloths.
I don’t think it is still available but I did write a fairly comprehensive build article (with lots of W.I.P. photos) on this model in issue 003 of Military Illustrated Modeller.
Really hope this is of some help.
Cheers,
Chris.
LikeLike
Thanks for taking the time to get back to me, I appreciate it – although I was afraid that the answer would, indeed, be “freehand” lol.
Before I saw your build, I had been pretty much set on doing a bare metal finish. I just don’t often see a mottled finish on this kit that adds to the look – most are distracting, break up the nice lines of the plane, don’t look to be in scale, or just plain don’t look good. I don’t want to gush too much, so I’ll just say that your paint job has the opposite effect and it’s convinced me to give it a try.
Also, I found the article that this build was featured in – some really great looks at it there, and good tips. I’ll have it close by during my build.
LikeLike