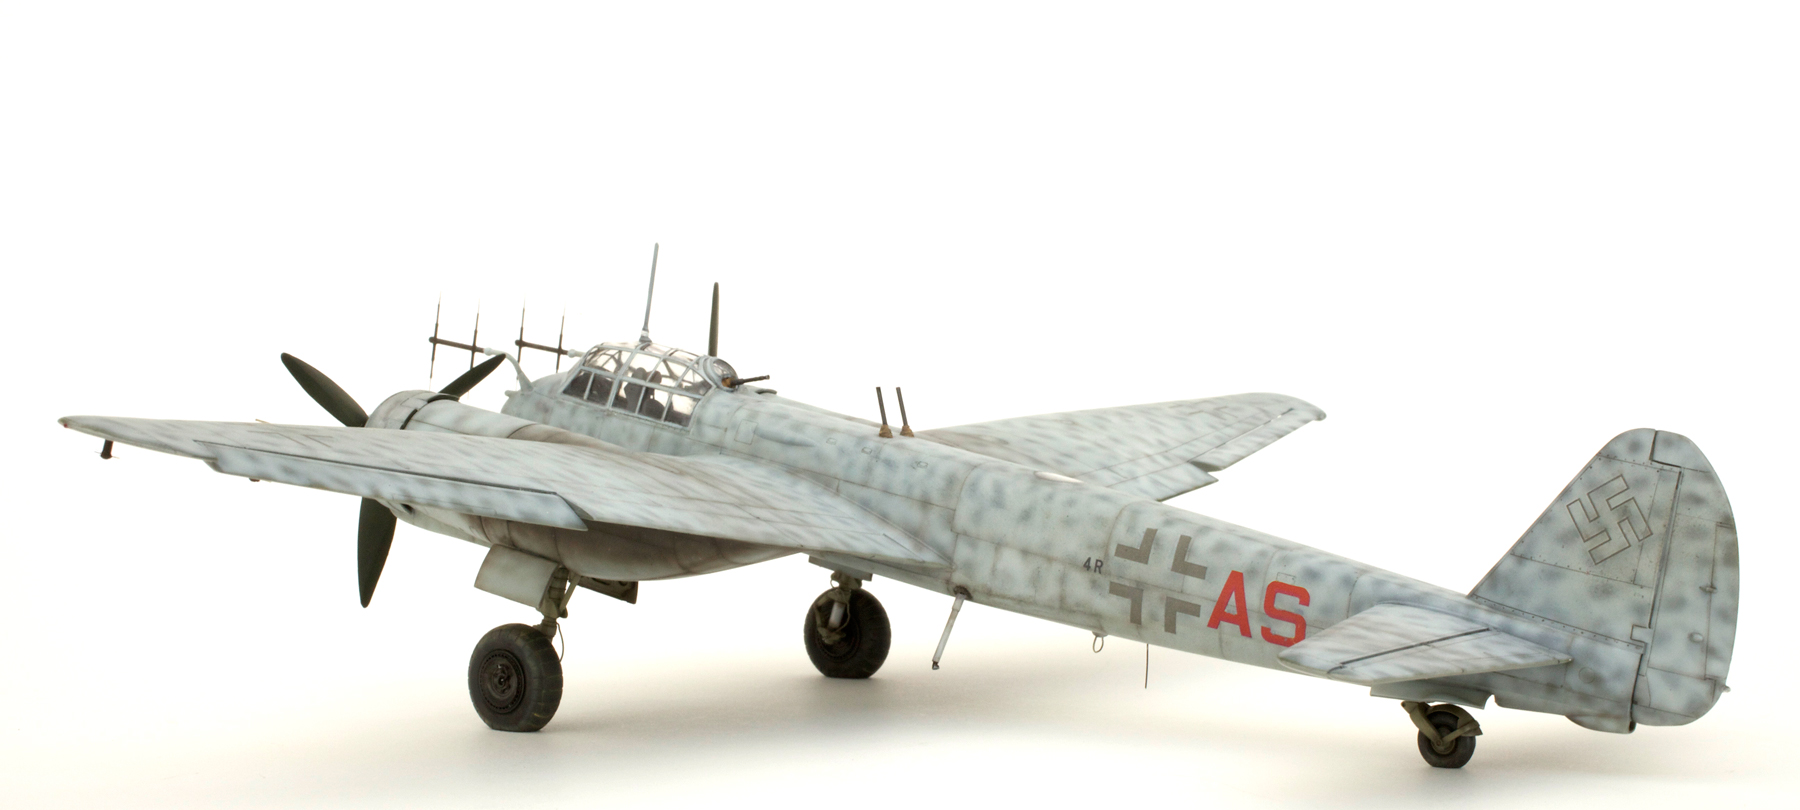
Hasegawa 1/72 Ju88C-6
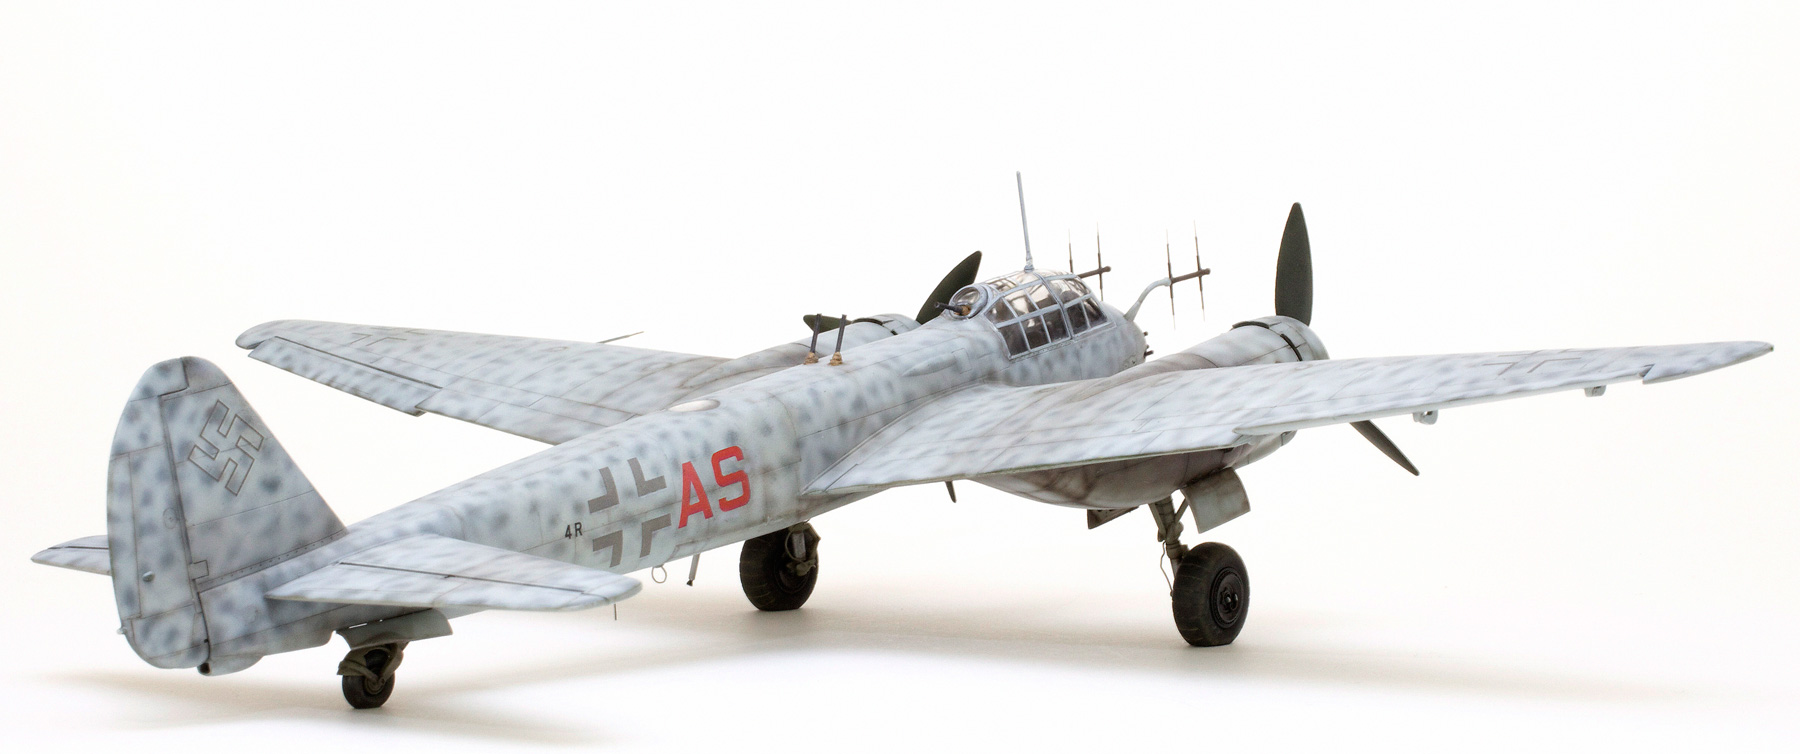
This Ju88C-6 is believed to have been flown by Hauptmann Tober of 8./NJG 2 in early 1944. It was equipped with FuG220 radar and upward firing Schräge Musik 20mm cannon.

A few extra details were added to the cockpit interior. These included safety harnesses cut from .005″ plastic card with simple buckles made from fine copper wire, rudder pedal cables from same and various control levers on side console from fine brass wire. The pilot’s seat was hollowed out using a motor tool and the radar operator’s seat had a new headrest added using brass wire and plastic card.

Cockpit interior painted and waiting to be installed.

Kit radar dipoles were replaced with scratch-built items made using fine telescoping brass tube and wire from Albion Alloys.

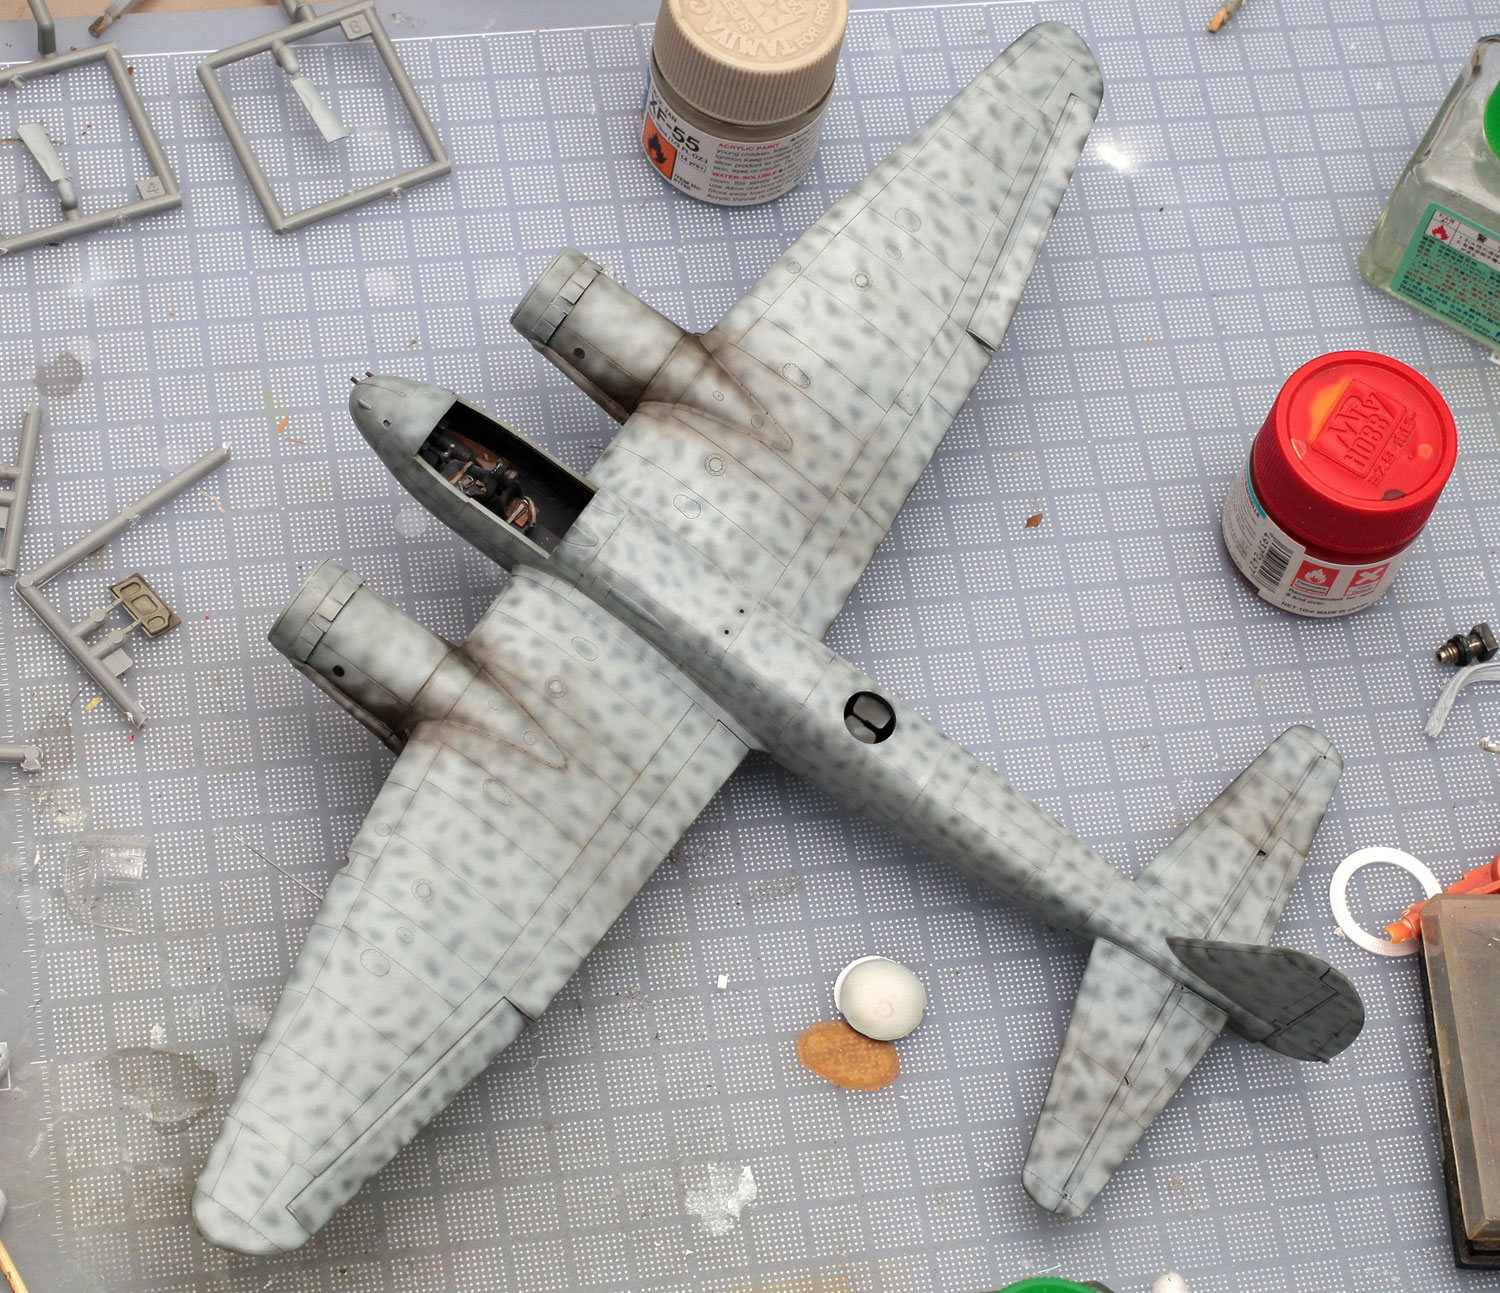
Undercarriage plumbed, painted and weathered. Tyres have also been flat-spotted.

The very thick kit pitot tube was replaced, again using Albion Alloy telescoping brass tube.

Although being the right shape, the prop blades were way too thick and so were sanded to a thickness much closer to scale.

The model was given a standard 70/71 splinter paint scheme on the upper surfaces.
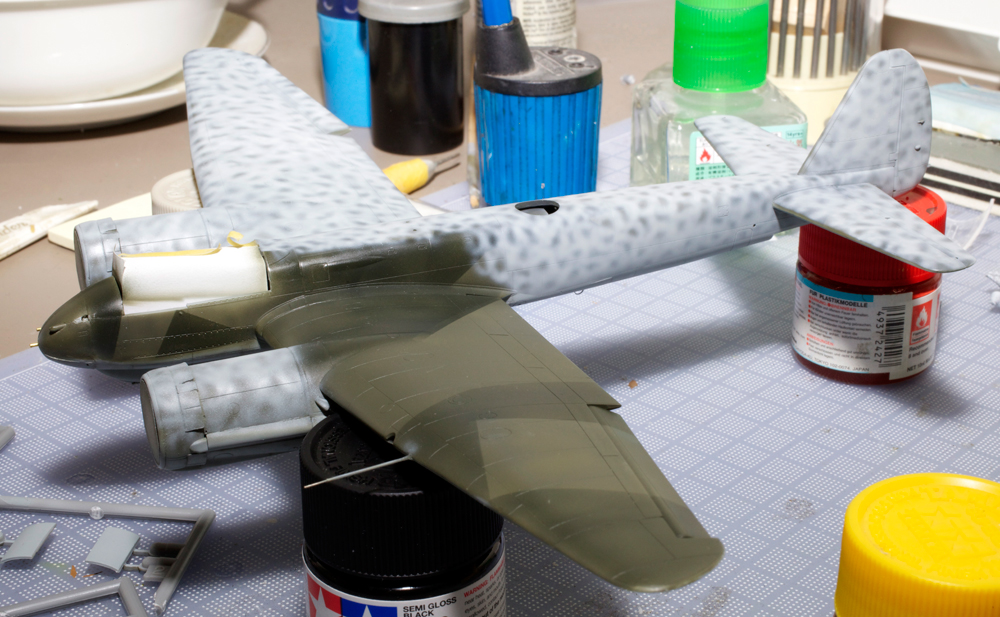
This was followed by a fairly loose squiggle of RLM76. In this shot you can just see the nose-mounted machine gun barrels which have been replaced with brass tubes.
The finished camouflage with exhaust staining added.

Kit Schräge Musik barrels were replaced using brass tube.
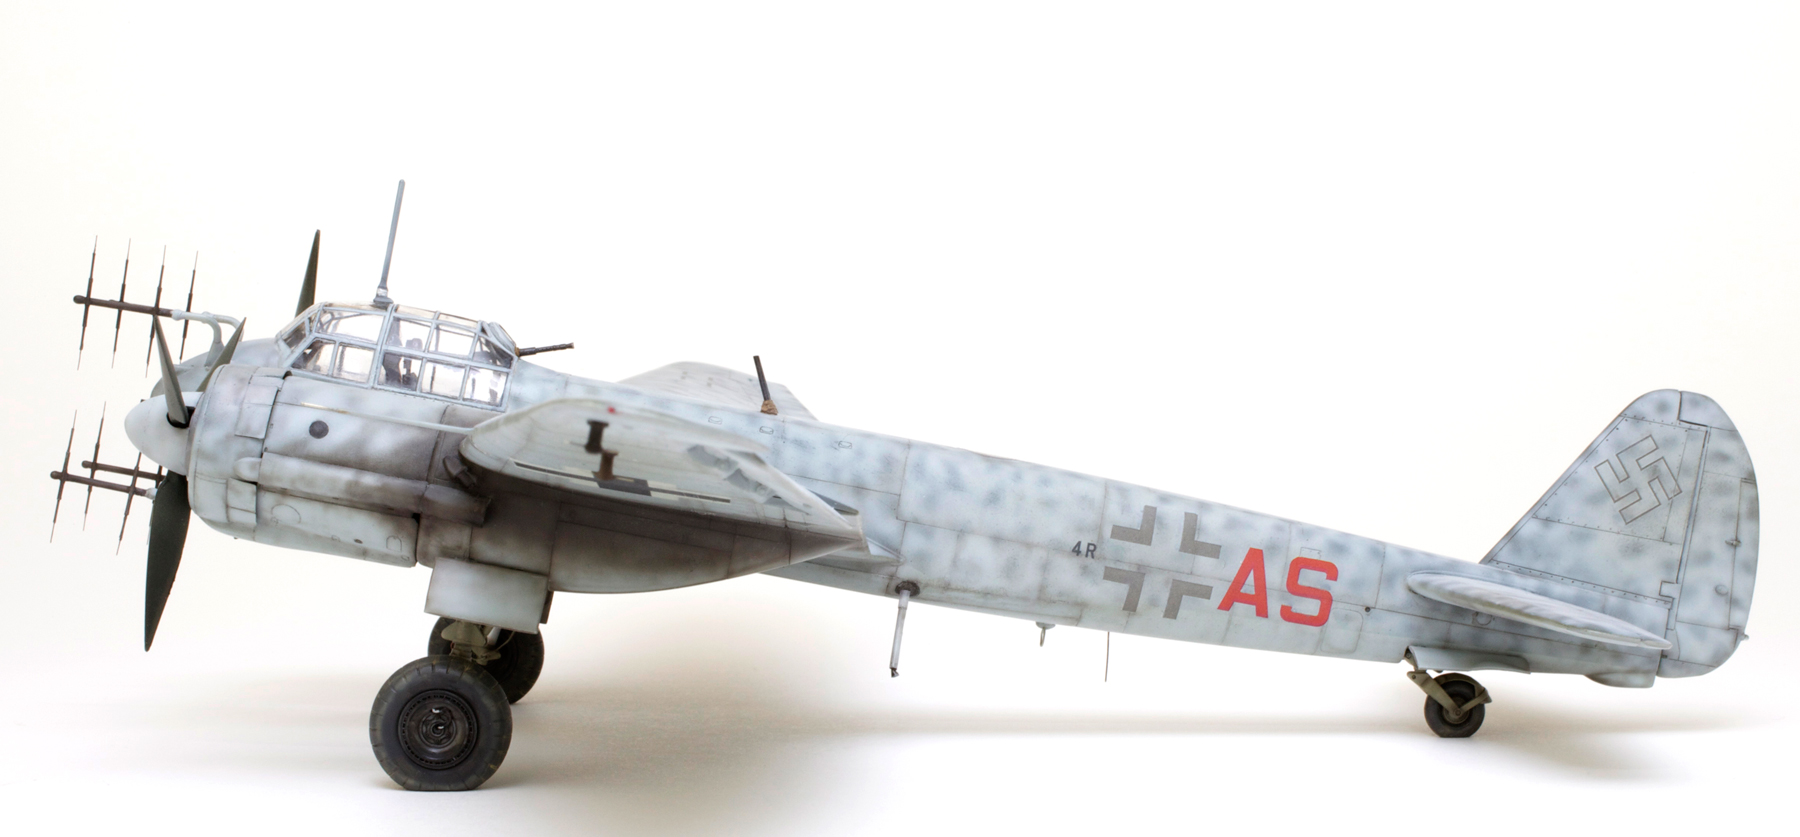
A new DF loop was fabricated using some flat p/e stock from the spares drawer and an FuG 25 whip antenna was added using fine brass wire.

Lots of exhaust stains and oily streaks around the engine nacelles and undercarriage doors. To a lesser degree this staining is also visible on the horizontal tail surfaces (top and bottom).
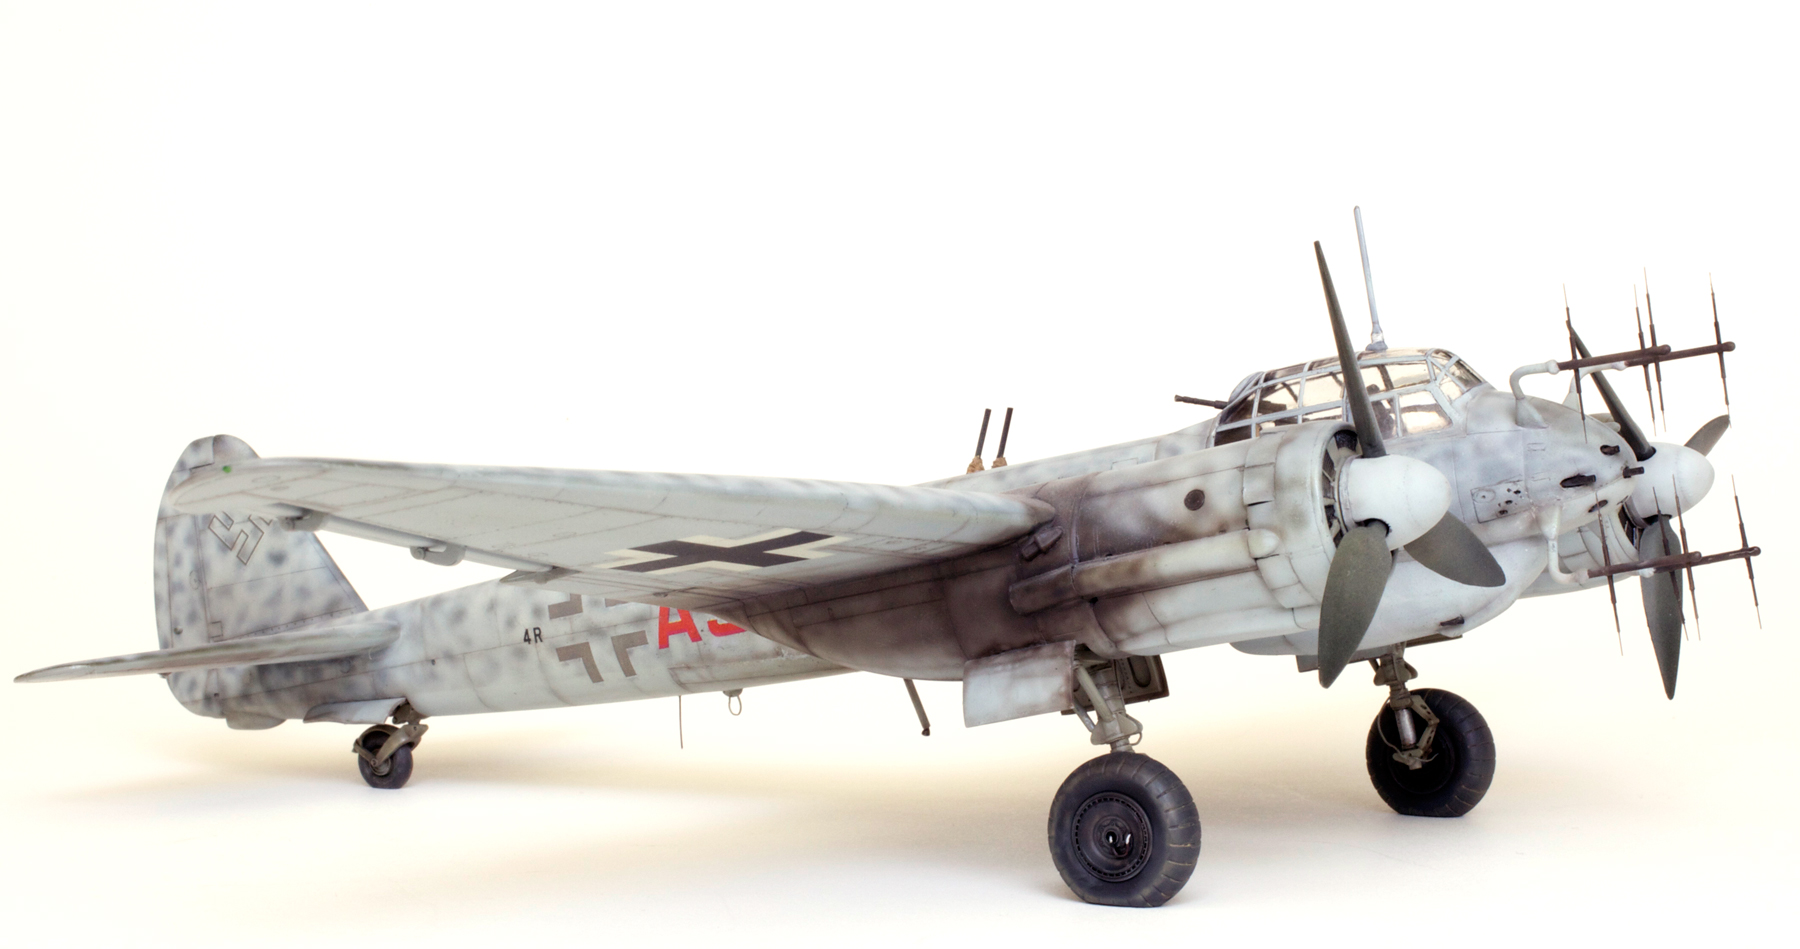
This shot shows how heavy the exhaust staining is. Also in this and previous shots, the demarcation line between the upper and lower camouflage is still just visible on the fuselage sides and nose. This is the result of the slightly lighter application of the RLM76 squiggle which corresponds pretty well with my reference photos.
Finished.

Hi Chris, Nice to hear from you again 🙂 Excellent job and pretty nice build article (despite being very compact 😉 )
Cheers, Tomasz
LikeLike
Hi Tomasz, yes 1/72 is starting to get a little too compact for these old eyes.
LikeLike
Lovely stuff Mr Wauchope! Good to see that the eyes are standing up and letting you build in 1/72 scale!!
LikeLike
Thanks Rog! The 1/72 kits are pretty quick to build and even quicker to paint. Adding the fine detail is what’s getting harder to cope with!
LikeLike
G’day Chris,
Yeah it looks real nice…its tougher in 1/72 I’m finding. I have lots going on here. Too much to spend time on plastic… Glenn is in trouble and stuck in hospital and I have to come back and help him out…
I have an AIRFIX 1:76 Matilda tank on my Photobucket site if you care to look. Sadly I can’t post on Hyperscale as I get hacked and computer shut down. I’m on the old ladies PC at the moment. Right now I’m rebuilding whole system with a RUBY designed rootkit that I can’t get rid of. Even re-formatting it the bug still remains. I fear its in the MBR of the HDD…this is about the 25th rebuild in 10 years…and several HDD’s.
Such is life…
PHILIP>
LikeLike
Hi Phil,
The Matilda is looking great. When you’re back give us yell and let us know how Glenn is.
Cheers,
Chris.
LikeLike
Chris another splendid example of the Ju88 in my favorite scale. I have a Hasegawa G-6 in its early stages. Your C-6 is gorgeous and love the color ways and markings on this one! I may be knocking on your door for some tips on my G-6 its going to be a bit of a nail biter for me.
Much Aloha Clint
LikeLike
Always here to help. This kit did prove to be a bit of a challenge, especially around the cockpit and nose area.
Give us a yell if you need a hand.
Cheers,
Chris.
LikeLike
What a beautiful build! Simply awesome.
LikeLike
Thanks Roger, good fun and quick to paint in this scale.
LikeLike
Another fantastic aircraft Chris! Those antennas are incredibly delicate and really add “crispness” to the whole model.
Do you always paint a camouflage underneath the squiggles when doing late-war german nightfighters like the JU-88 above?
And also, what thinners do you recommend or use yourself? I’ve been trying the Gunze lacquer and levelling thinners with the Gunze H-line and Tamiya acrylics as I’ve read about them being very good. But I’m still getting far better results with plain old Tamiya X-20A.
Looking forward to seeing your Mossie when it’s done.
Cheers!
LikeLike
Hi Emil, yes the antennas are very delicate, but I think in this scale it does make a huge difference to the scale look and, as you say, the ‘crispness’ of the model. As for the camouflage, I only use this method when I think it is appropriate, and after studying the photographs of this particular aircraft I am sure that this was the method used. Of course on later aircraft the base colour was usually RLM75 with various squiggles and blotches of RLM76 and, sometimes, other colours as well.
As for thinning Gunze and Tamiya acrylics, I always use Isopropyl Alcohol which is what Tamiya X-20 is but is much cheaper if you can buy it in bulk!
The photos of the Mossie are not too far away.
Cheers,
Chris.
LikeLike
Thanks Chris!
LikeLike
Hi Chris
That looks more like your 48 Dragon kit from Absolute Hobbies days. Great!
zig
LikeLike
Great to hear from you Ziggy! We were talking with a friend yesterday about visiting Poland and I thought of you and Chris visiting the shop. Weird eh?
Hope you are well.
Cheers,
Chris.
LikeLike
Hello Chris,
your models -and especially painting- are always a delight!
One thing I’d like to ask is what decals did you use for your G-6 and what reference?
Thanks very much.
Alex
LikeLike
Hi Alex,
I’m really glad you enjoy the models. In answer to your questions, the decals I used are the ones supplied with the kit and as for reference, there are several photos of this aircraft after it had made a very heavy forced landing which I found after a short search of the net on http://forum.12oclockhigh.net/showthread.php?t=31717
As well, there is a photo and a very nice colour profile of this plane in Squadron/Signal publications ‘Junkers Ju88 in action Part 2’.
Hope this helps.
All the best,
Chris.
LikeLike
Wow somehow I missed this in October! Beautious work as usual and I really like the paint work on this one. I’m working on a G-6 currently and will probably take me well through the winter. Seeing this is a boost of inspiration Chris much thanks!
Aloha Clint
LikeLike
just incredible paint job … a great referency to work paint with a Corsair…
best regards ..
FT
LikeLike