Airfix 1/24 Hawker Typhoon

My favourite aircraft flown by the Allies during WWII has always been the Hawker Typhoon especially when fitted with the bubble canopy, armed with rockets and painted with full invasion stripes. I (and a lot of other people) had been hoping for a 1/32 scale kit from one of the major companies when Airfix surprised us all with this ‘slightly’ larger offering. It is a big, beautiful kit which (apart from the car door) includes just about every option you could wish for. When Brett rang and asked if I would be interested in painting a pre-production model that he was building for the next ADH ‘How To Build’ book I jumped at the chance.

The only thing that I was disappointed with was the rather basic detail on the rockets. In my opinion this is an important feature on this large kit so I was hoping for a little more effort from the designers. This shot shows all eight RPs finished with scratch-built detail added by me.
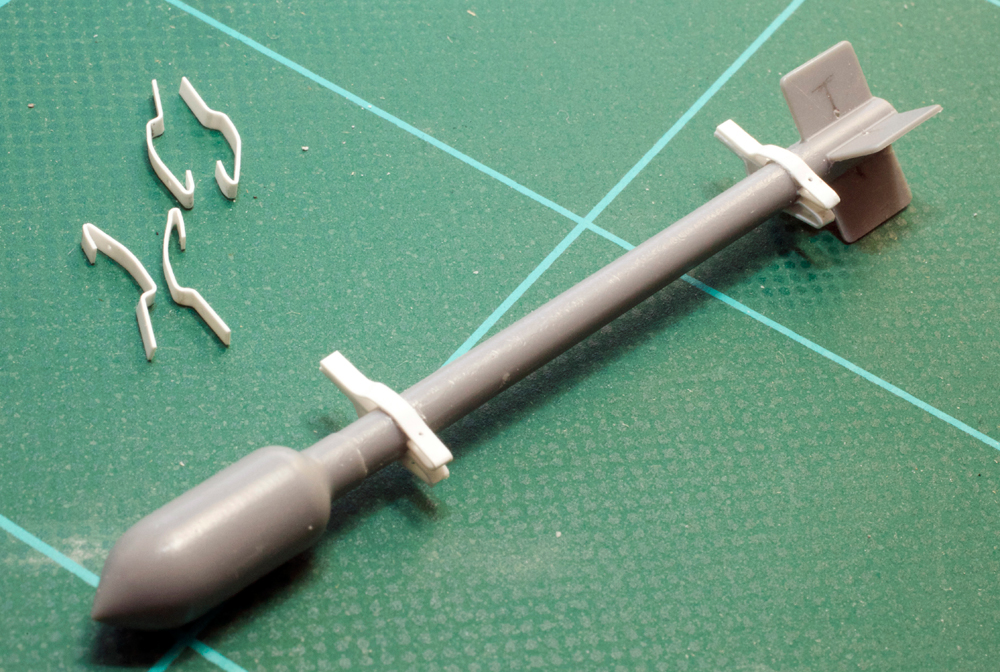
The first detail that I decided to add was a more accurate representation of the kit’s solid moulded rocket saddle plates. New brackets were made by carefully bending .010 x .040 Evergreen plastic strip to match the various reference photos I had at hand. After the removal of the moulded kit brackets these scratch-built items were glued in place. These are not entirely accurate but they’re a lot better than the kit offering.
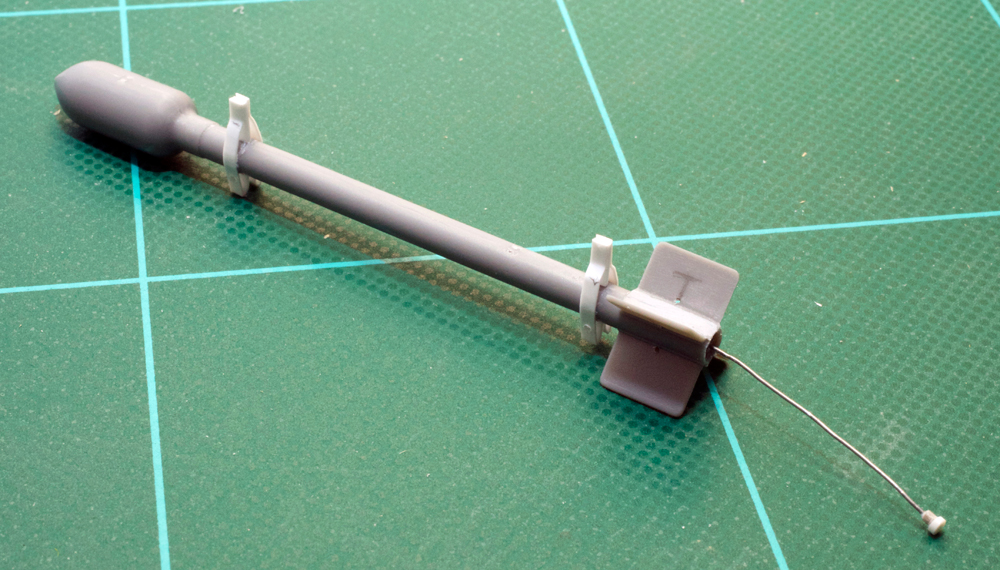
The Weak Link Leads or ‘pig tails’ were the next detail to be added. These were relatively simple to make using plastic rod for the plugs and .355mm solder wire for the leads.

Brett had constructed the model with the engine fully exposed and painted. Both wing cannon bays were also open and complete. I painted it in this configuration with the thought in mind that I might be able to fit the engine cowling and gun bay panels over this completed work. I was wrong! But after the photos had been taken and the model was now mine the engine received a severe pruning and, with a bit of persuasion, the cowls and panels were made to fit.

Brett seemed very pleased with the result and took some more photos which he has included in his new book.

The cowling on my model doesn’t fit perfectly but that’s because it was fitted as an afterthought. I’m sure that if I had initially constructed it with the cowling closed, the fit would have been very good. A few added details seen in this shot include the dorsal whip antenna and the replacement cover plate with wire handle on the bottom of the retractable footstep.
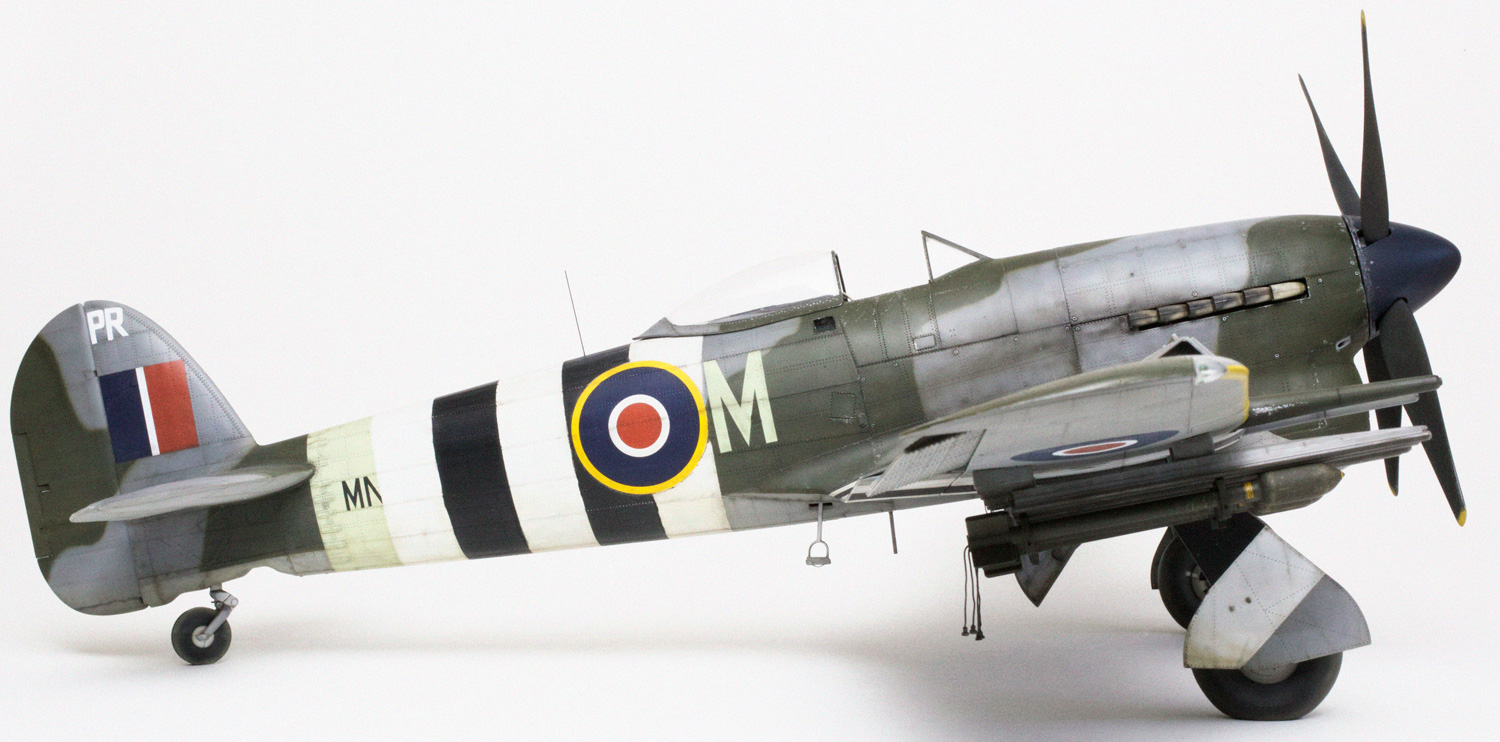
Markings were sourced from XTRADECAL sheet no. X24-003 and represent aircraft MN131/PR-M of No. 609 Sqn., 123 Wing, 2 TAF, RAF Thorney Island, 6 June 1944. The decal instructions indicate that this aircraft had a three blade prop and a short chord tail but on careful examination of the one available photograph of this particular plane it is impossible to tell what the tail configuration is and, even though it is spinning, the prop looks to me as though it has four blades. So because Brett had already securely glued the Tempest tail in place and, in my mind, it should’ve been fitted with a four bladed prop, that’s the way it was going to be!

What a brute.

My favourite angle.

Lovely stuff Mr Wauchope. I have orderd mine and it is winging its way from the UK to Perth as we speak.
LikeLike
Thanks Roger, I’m sure you will enjoy it. Should keep you busy for weeks!
LikeLike
Hi Chris,
I like it a lot! I always have had in mind that a big scale demands on more detailng work and painting process should be more accurate. Your modelling skills have that balance.
By other hand, I am curious about yellow tone in gun bay doors. Is this a Yellow Zinchromate like US aircrafts?
please send me your comments.
LikeLike
Thanks Guillermo and yes I’m pretty sure the colour is the same as US Zinc chromate Yellow. One of the colour photos I was using as reference had some of the panels as a brownish red and the rest sure look like Zinc chromate Yellow. Another shot shows them as all yellow and another as unpainted aluminium. Take your choice.
Hope this answers your question,
Cheers,
Chris.
LikeLike
Thanks Chris,
Yes, your answer resolves my questions. I know the brownish red coat was a primer used in some aircrafts and a aluminium paint was used, too.
Cheers.
Guillermo
LikeLike
Hi Chris,
I like it a lot! I always have had in mind that a big scale demands on more detailng work and painting process should be more accurate. Your modelling skills have that balance.
By other hand, I am curious about yellow tone in gun bay doors. Is this a Yellow Zinchromate like US aircrafts?
please send me your comments.
Thanks
Guillermo
LikeLike
Yeah its a very nice paint job Chris. I wish I could get my hands on this kit but I don’t think it will ever happen. The cost of the kit currently is way out of my reach. I had built the old Monogram 1/48 kit in 1998 which I had to mod everything just to make it half way decent for the 1998 IPMS USA Nationals. I always wished a good kit, with it all “open and hang out” on the Tiffie would show up one day. We now have this wonderful 1/24th kit. Airfix did something really amazing, and they have to be congratulated for taking such a bold move. With your build I would have liked to see that big engine open and flaps down but that’s just me. Also, I wonder what kind of intake/filter this aircraft had. Sadly there are no photos I can see here. Congrats on the build with Brett and I hope the Brett Green book sells well.
Phil.
LikeLike
Thanks for your thoughts Phil and there are plenty of shots of this model with its engine exposed in Brett’s website and in his new book. The kit supplies several intake filters but apart from the standard one they are all a bit ‘clunky’ so we went with the standard one.
All the best,
Chris.
LikeLike
Totally brilliant!
LikeLike
Thanks Greg.
LikeLike
Awesome finish but the PR M was a 3-blades Typhoon !
LikeLike
You maybe right Christian but the only photo that I have seen of this aircraft looks to me as though it is four. Please let me know where to find conclusive evidence of the contrary because it is not too late to change it.
LikeLike
Great work! Keep us posted if you do anything else.
LikeLike
Hi Chis – just saw your Hasegawa 190 on H.S yesterday, very nice indeed ! Your stain work on the fuselage under side looks incredible !
I’ve got some new WIP pics of my 1:32 Tamiya F4u-1 corsair over on large scale modeller if your interested…
here’s the link……..
http://forum.largescalemodeller.com/topic/3081-132-tamiya-f4u-1-white-126-tojo-eats-sh/
Let me know what you think…….
Will you be at Telford this year, if so I would love to say Hi, anyway I hope this finds you well.
cheers,
Peter.
P.s Love the Typhoon, fantastic stuff !!!
LikeLike
Hi Pete, the Corsair looks fantastic! I especially love the paint chipping. Let me know when you have more pics. I have just taken my own photos of the 190 and hope to post tim here very soon. Sorry to say I won’t be at Telford but Brett will be there so say hello to him instead. I will let him know to expect your greeting. Tell him you’re a friend of mine.
Have fun,
Chris.
LikeLike
Thanks Chris, I’m looking forward to your pics.
cheers,
Peter
LikeLike
Hey Chris, while I’m at it I also put my 1:32 Eduard Bf 109e-3 pics up on Hyperscale plastic pics. I think you’ll get a kick out of of them…..
Peter
LikeLike
That looks fantastic Pete. I haven’t seen that scheme before but, looking at the photos, you’ve captured it perfectly! Congrats!!
Cheers,
Chris.
LikeLike
Chris, a fantastic job, I really like your approach to modeling. At the same time I have a question, or rocket launchers changed this because this is what gave Airfix is not very similar to the original
LikeLike
Hi Artur? The reason I changed the rocket saddle plates is because the kit only offers them as solid details moulded to each rocket tube which, in my opinion, is not acceptable in this scale. It was fairly easy to reproduce them but of course there are now beautiful turned brass and P/E offerings from MASTER at http://www.facebook.com/MASTERbarrels?fref=photo.
LikeLike