Hasegawa 1/32 Ju87G2 STUKA ‘KANONVOGEL’

My latest build is a commission job and my client supplied me with the EagleCals decal sheet EC#97 containing the markings for Hans-Ulrich Rudel’s last Stuka. He requested that I build the plane in these markings.

He also supplied me with the Aires Resin cockpit set. Rudder pedals and seats have yet to be installed in this shot.

Aires starboard cockpit wall.

The kit instrument panel was used in preference to the P/E item in the Aires set. The dial faces were cut from the kit decal sheet and applied individually. Once set, a drop of gloss clear was placed onto each dial.

The kit’s push-rod arms were replaced with Evergreen plastic rod. The Voyager prop spinner can also be seen in this photo.

I chose to glue the supercharger flap closed which required two small hinge brackets to be attached to the back of the door.

Voyager’s beautiful turned aluminium gun barrels and brass muzzle brakes were also supplied. These prompted me to install scratch-built plumbing to the gun pods.

Gun pod complete and painted.
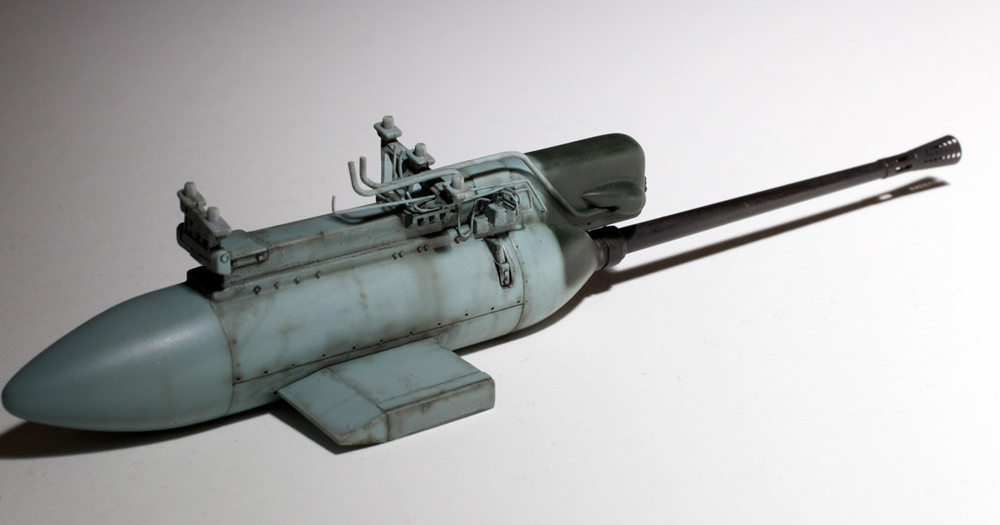
And weathered.

Upper camouflage on. Panel line weathering has begun on starboard wing.

Upper and lower surface weathering has now been applied.

Completed model. Detail showing gun pod installed and exhaust pipes and exhaust staining on fuselage.

Wing root weathering detail.

Four shots of the completed model.


Great to see this model with realistic paint job in these SUPER SIZE photos :o) !
I had been recently watching some gun cam footage of these in action on YouTube.
I downloaded your model photos and put them in a modelling inspiration folder.
LikeLike
My aim is always, hopefully, to inspire others.
LikeLike
Amazingly realistic as always Chris, I know your client will be thrilled with the completed build. I truly is a pleasure to see your work.
LikeLike
Thanks Frank, always appreciate your kind words.
LikeLike
Chris,
You left me with open mouth!! I would like to know if your are planning to publish a book with step by step process, you got an excellent balance in your weathering work.
Thanks for share.
LikeLike
No book planned, too much like hard work.
LikeLike
Chris,
Yes, I know it, but it worth
LikeLike
Hi Chris, it looks amazing !!! The wing root weathering and the exhaust stains look absolutely fantastic ! You have such a great artistic style…….but I think you’re tired of me telling you that 🙂 The gun pod detail is also very cool.
How long did the project take Chris and did you have any issues with the fit of the open sliding canopy ? I have the 1:32 Hasegawa Ju 88D-8 night stuka in my stash and was wondering about this.
I’m tinkering with the Tamiya 1:32 F4u-1 when I get a little spare time. I put some pics up on Hyperscale a little while back, here’s the link if you missed it…….
http://www.network54.com/Forum/47751/thread/1378388583/1-32+Tamiya+F4U-1+cockpit+WIP
I think you’d have a blast with that kit.
Cheers ,
Peter.
LikeLike
Thanks everybody for the kind words and no Pete I never get sick of compliments. This one took a little longer than usual, but this was mainly due to the vague instructions for the very complex Aires set and yes I did have issues with the sliding canopy which does not fit open or closed. It is sitting unglued in the open position at the moment and will stay that way unless my client advises me otherwise.
Peter your Corsair is looking great,but because of size restrictions I don’t think I’ll be building one for myself. Hopefully someone will ask me to do one for them.
All the best,
Chris.
LikeLike
Damn that looks awesome
LikeLike
Perfect !
i hope i can do it in the near future.
LikeLike
Chris, the subtlety of painting and weathering on this model is simply superb. Was this weathering done as your other’s have been, with Tamiya black/red brown mix airbrushed on? Also I like the dust on the wheels and spats. Is this Tamiya weathering powder? Again, a very beautiful model.
LikeLike
Thanks Barry, and yes all the weathering was done with the Tamiya black/red brown mix using the airbrush. The dust on the wheels and spats is a mix of Tamiya buff and flat earth also applied with the airbrush. This colour was used for the dust and dirt build-up on the wing roots and under the rear fuselage as well and was also carefully airbrushed. The only time I used a paint brush on the exterior was to,very carefully, apply a black wash to all the panel lines. This was done before or after the other weathering colours were sprayed, depending on the effect required.
Hope this goes some way to answering your questions.
Cheers,
Chris.
LikeLike
Hi Chris, i’m a long time fan but first-time asker here =)
So i like to ask you: (1) how did you come up with your signature black/red brown postshade idea? (2) At what pressure setting is your airbrush on when painting and weathering? (3) if i wanted to realistically weather an aircraft interior with ONLY an airbrush, how do i go about it? (4) how do you decide when to use or not use a line wash with your postshade?
Thanks for your time, appreciate it man!
LikeLike
To answer your first question KAYSEE, I have always tried to achieve the most realistic finish as I possibly could, so about 40 years ago, after studying all the colour photos that I could find of WWII aircraft and tanks (especially Allied pics of Luftwaffe planes and AFVs), and after a bit of trial and error, I decided this mix was the best colour to replicate exhaust and fuel stains and general build up of oily grime.
Answer number 2, for general coverage I spray at around 28 p.s.i. and for fine work (like weathering) I wind the pressure down to about 15 p.s.i.
Answer number 3 – I’m not sure why you would want to only use the airbrush for this task but if that’s what you want to do I would use the black/brown mix thinned about 80% thinners to 20% paint. With this mix loaded in the airbrush and the airbrush set to its finest setting, carefully shade around all raised detail and into all recesses. I would always give these areas a dark oil wash before shading with the air brush to give the most realistic finish.
To answer your last question, I always use a very watery semi-gloss black line wash on all panel lines before carefully shading them using the airbrush and the thin black/brown mix.
Hope this answers your questions,
Cheers,
Chris.
LikeLike
Chris this is one of if not the best you’ve done. I’m especially taken by the cannon pod detail. The weathering gives the impression of a well used machine without making it too beaten up. Just the right balance. Most impressive!
LikeLike
Thanks William, I did really enjoy doing this one and I think that if you’re having fun you always do a better job. There is a lot of good photographic reference available for the Ju87G, with some great shots of the cannon pod detail. Good reference is a huge plus and inevitably makes the job a lot easier.
LikeLike
Most impressive Chris! I agree with William above: this must be one of your best models, if not THE best. I find myself staring at the pictures once and again and I think how beautiful is this hobby and how inspiring is to witness each new model that you present to us. One further question regarding the camouflage, which I would define as truly magnificent: which are your preferred colours for the classical 65/70/71 scheme like the one that this war-beaten Gustav is wearing?
Keep up the fantastic work Chris!
Cheers,
Oscar, from Chile
LikeLike
Oscar, I am very glad that you have enjoyed looking at this model so much. I always try to do a better job on each new model and it does help when the subject is a favourite. The paints that I prefer to use are Gunze Sangyo and Tamiya acrylics. I find that most of the Gunze colours are fairly accurate and they also go through the airbrush very smoothly. Clean-up is also a lot less toxic.
Thanks for your encouraging words.
All the best,
Chris.
LikeLike
Hi, would you be interested in another JU 87 commission build with aftermarket?
Regards
Richie
LikeLike
Sorry Richie, but the short answer is no. I just don’t have the time.
LikeLike
No problem, thanks anyway…. I’ll just keep practicing and watching your work…..
Regards
Richie
LikeLike
Hi, what color do you use for the cockpit? I know it’s RLM66, but when i look at original pictures, i think that Gunze, Vallejo ect. RLM66 is a way to dark.
Cheers,
Marc
LikeLike
Hi Marc, I agree it is very dark but it is probably very close to the real colour so I use Tamiya XF-24 Dark Grey. This is about one shade lighter than the Gunze RLM66 so I think looks more in scale.
LikeLike
Stellar as usual Chris, your blog is s source of motivation and, in fact, I have been inspired by your build and I got the same kit and aires cockpit. I wonder if you could tell me your thoughts on the assembly and installation of the aires cockpit, was it hard to do? does it fit well in the fuselage? or, it requires a lot of work to make it fit? Cheers and the Stuka is like the real McCoy.
LikeLike
Hi Chris, your models look so realistic! It blows my mind. I am just getting back into this hobby and I am so inspired by your masterful work.
How do you do your panel line weathering(all that subtle shading)? Is that done with an airbrush or some sort of pastel/pencil or oil medium?
P.S. Thanks for showing your amazing work to us! I’ve subscribed to your mailing list and am looking froward to seeing more of your masterpieces in the (hopefully near) future!:)
LikeLike
Hi Anton, really glad that your’e enjoying my work and to answer your question- I first give the panel lines a wash using thin mix of, usually, semi gloss black. After this has dried the panel lines are very carefully sprayed with an extremely thin mix of Tamiya XF-1 Flat Black and XF-64 Red Brown and the airbrush adjusted to its finest setting. These colours are mixed about 50/50 and are thinned to semi transparent consistency. I also use this mix as a major component in most general weathering.
I hope this goes some way to answering your question. If not feel free to ask more.
Always glad to help if I can.
Cheers,
Chris.
LikeLike
Thanks so much for the quick reply Chris. It definitely helps to answer my question!:) I will experiment with the different airbrush pressure and paint dilution (using the 50/50 mix of the paints you mentioned) to see if I can achieve anything remotely similar:). In regards to you saying :’ feel free to ask more’ – be careful because I DO have so many questions for you!!! lol. But in order to not bother you I will instead first hungrily absorb all the content on this website, searching for any tips and tricks. It really helps to get a glimpse into your build process by seeing the photos and your comments under each of them, they help to answer a lot of the questions that aspiring modellers like myself might have. So thanks again:)
LikeLike
Hi Chris,
I have been following your exemplary work through various magazines over the past years; always a pleasure to see a new build and the Stuka is a fave subject of mine, you have done it proud. We met some years back when you had Absolute Hobbies in Willoughby and later at Wings and Things at Dee Why. I think my last purchase from you was a Tamiya RC Tiger 1 which you will be pleased to know still wreaks havoc in the wife’s perennials. I am about to embark on my own Kanonenvogel and wondered if you knew the part no for the Voyager prop spinner and blades? Anyhow all the best, look forward to your next build
Cheers,
Greg Richardson
LikeLike
Hi Greg, great to hear from you. To answer your question, the part number for the Voyager prop blades and spinner set is VA320302.
Cheers,
Chris.
LikeLike
Great work on the Stuka.How did you do the spiral spinner?
LikeLike
Hi Eric. From memory I’m pretty sure it was a decal from the EgaleCals Sheet and was applied with the help of a of lot decal setting solution.
LikeLike
Outstanding work Chris.
How did you do/paint the inner frame of the canopy..?
LikeLike
With great difficulty! It’s a pain in the neck but with a lot of patience I masked the frame on the inside of the canopy with Tamiya masking tape and airbrushed them with RLM 02. In retrospect I wish I had sprayed a bit of darker shading down the side of each frame first. This would have given them a bit more dimension but it’s too late now. Next time perhaps.
Cheers,
Chris.
LikeLike
Thanks Chris. What about rivets or riveted look in the frames? Thanks in advance…
LikeLike
Their position was marked and then a shallow hole was drilled. Thin dark paint was then carefully applied to each indentation.
LikeLike
Chris, Love your work! Are you taking commisions? Thank you, Peter
LikeLike
I’m really glad you like my work Peter but I’m afraid I stopped accepting commission work about five years ago.
LikeLike
Thanks Chris. Anyone you’d recommend?
LikeLike
Diese grauenhaft falschen Propeller versauen leider das gesamte Ansehen dieses Modells! Schade . .
LikeLike
Outstanding work as usual Chris. The Stuka has been a shelf queen of mine since bringing it home to Melbourne from Rainbow 10 Shizuoka 2006! Recently resurected to complete. May I ask your process for painting the exhausts ? they are incredible the most realistic colors i have seen.
LikeLike
Brett, first a very thin mix of the light colour (Tamiya XF-57 Buff) was carefully applied to the desired areas being very careful not to over do it. Next my thin black/brown mix was subtly spayed around the outer edges of the Buff and into any panel lines where I think the exhaust would have built up. There are some good pics of Ju87Gs showing this effect which is what I tried to replicate. The exhaust stacks were first painted with the black/brown mix and the buff was then added tending to be heavier towards the top of each pipe. Some careful shading was then added to each end using the b/b mix.
I really hope this explains it enough and if not get back to me.
Cheers,
Chris.
LikeLike
Thank you for the detailed explaination and sharing your methods it really helps us !
LikeLike