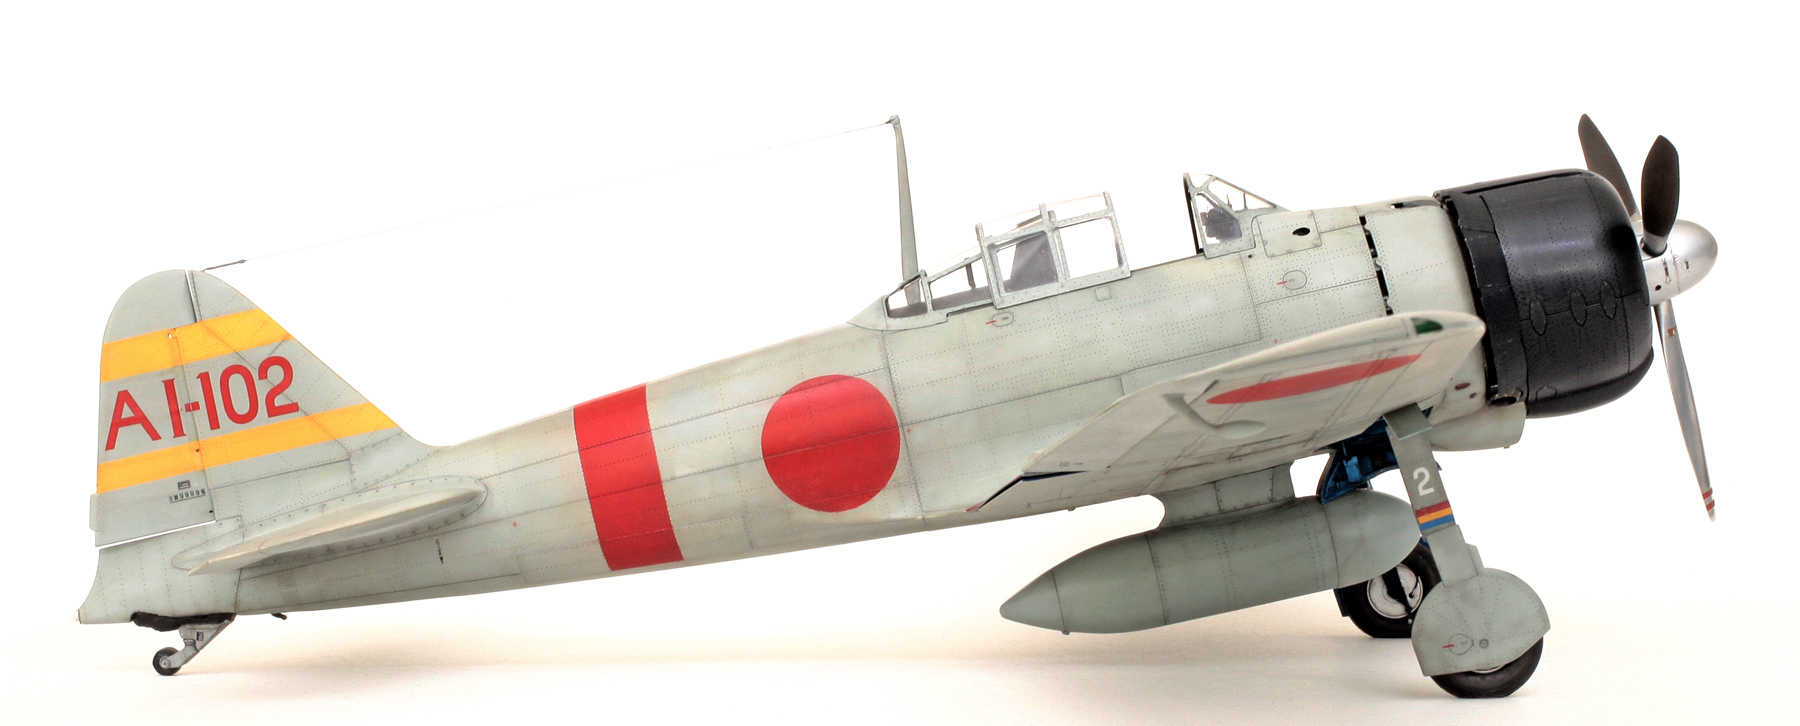
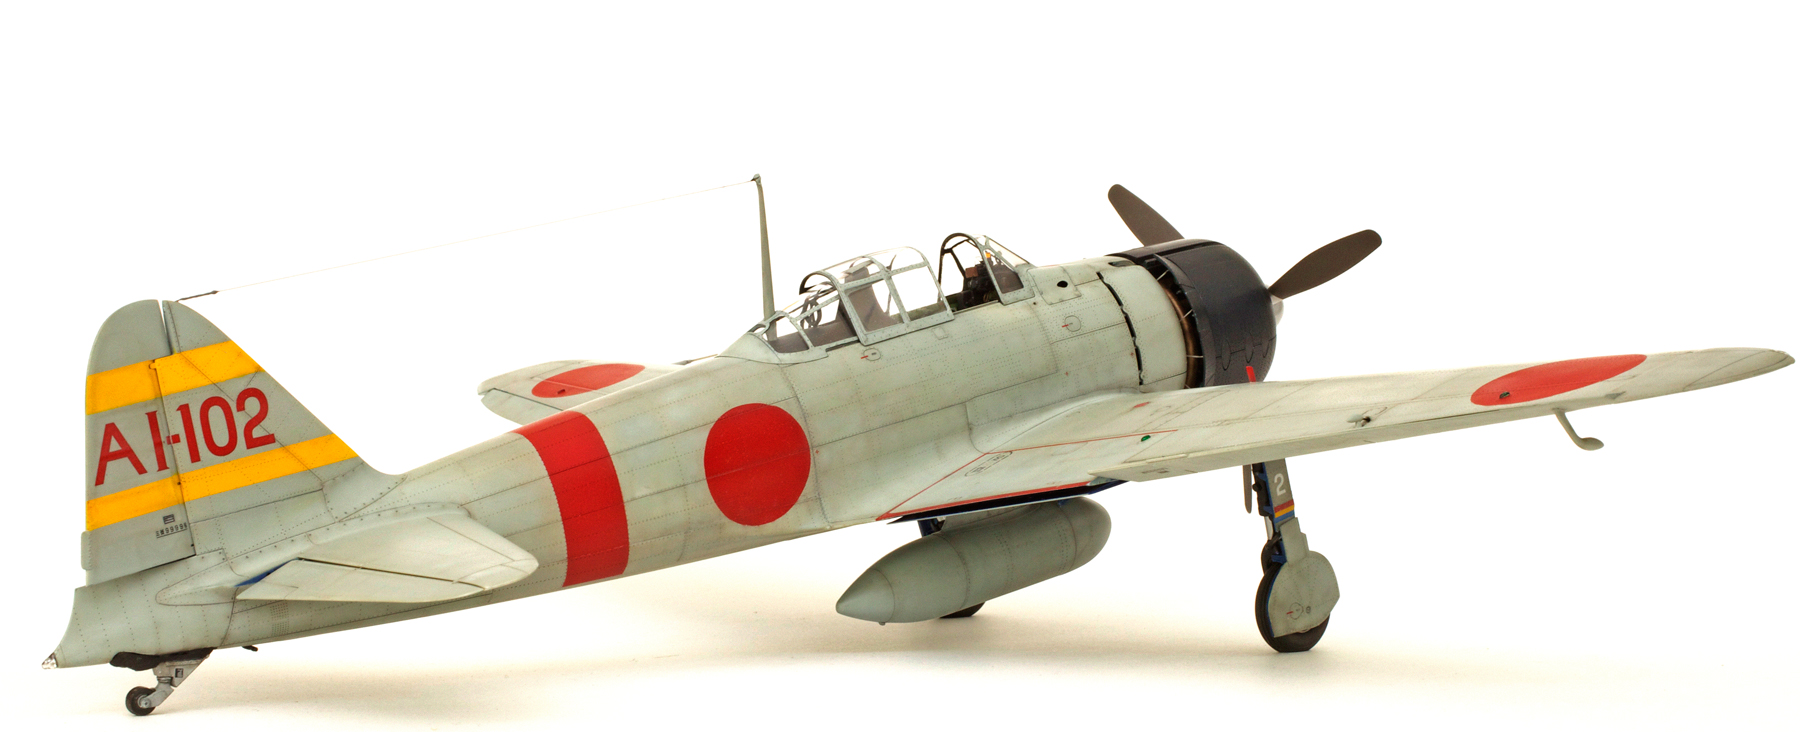
Tamiya 1/32 Mitsubishi A6M2b ZERO Model 21

Aircraft flown in the Pearl Harbour attack by Lt Saburo Shindo, Air superiority command, 2nd strike unit, aboard carrier Akagi, lead ship of Carrier Div. 1 Hawaii, December 8, 1941.

The first step in my order of construction (step 40 in the kit instructions) was the beautiful little Nakajima ‘Sakae’ Model 12 engine. Here I have added a wiring harness and some other plumbing using various gauges of copper wire.

Wired, plumbed and painted.


The engine fully painted, assembled and ready for installation. The firewall, with its oil and fuel tanks attached, is only dry-fitted to the engine mount at this point.

Cockpit elements complete. Lots of extra detail added here, including wiring, handles, pushrods and HGW’s brilliant micro textile seat belts. The main colour used for the cockpit interior is Tamiya XF-71 Cockpit Green with a good dash of Gunze Sangyo H58 Interior Green added to knock the brightness out of it.

The instrument panel was next.

Cockpit module complete and ready to be installed.

With the interior components installed, the main construction was completed and painting commenced. After the application of the main cammo colour of Gunze H61 IJN Grey was completely dry, the weathering process began. This was commenced by carefully running the very sharp point of a 6B graphite pencil along and around all panel lines and fastener screw heads. These rather dark lines were then muted down by very carefully over spraying them with a thin mix of IJN Grey with a dash of my black/brown mix added. Before this colour was completely dry the entire surface of the model was polished using a few drops of water and the second finest Micromesh cloth. This formed a slurry of the shading colour which was wiped away using a soft cloth leaving this slightly darker, subtle colour in the recessed surface detail. After this process was complete I decided to mask and spray all the national and tactical markings and the wings’ red ‘Don’t Step’ safety lines. Once this was complete I very carefully polished the entire model using the finest Micromesh cloth. This gives the model a beautifully even, glass-like sheen.

The sprayed red safety lines. Also in this shot can be seen that each rivet on the rear cockpit combing has been carefully dotted with a Prismacolor sliver pencil.

The shiny surface can be seen a bit better in this rather poor quality shot. The engine has also been fixed in place at this point.
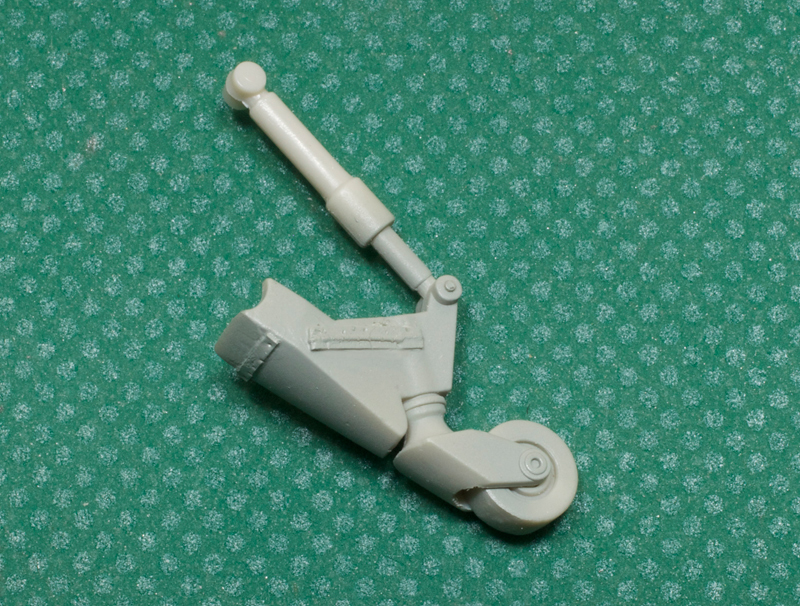
Because the kit’s tail wheel is made to actually retract, Tamiya has left off its very prominent sealing boot which would interfere with its operation. I wanted to include this feature so some tiny attachment brackets were made from thin plastic strip and glued in place. The tail wheel was then permanently fixed in the fully extended position and the sealing boot was added by filling the gap around it with Milliput. Then, with the aid of some good reference photos, the putty was sculpted into the appropriate shape.

Tail wheel with boot finished and installed.

Folded and extended wing tips are provided and can be easily interchanged. These are the folded tips.

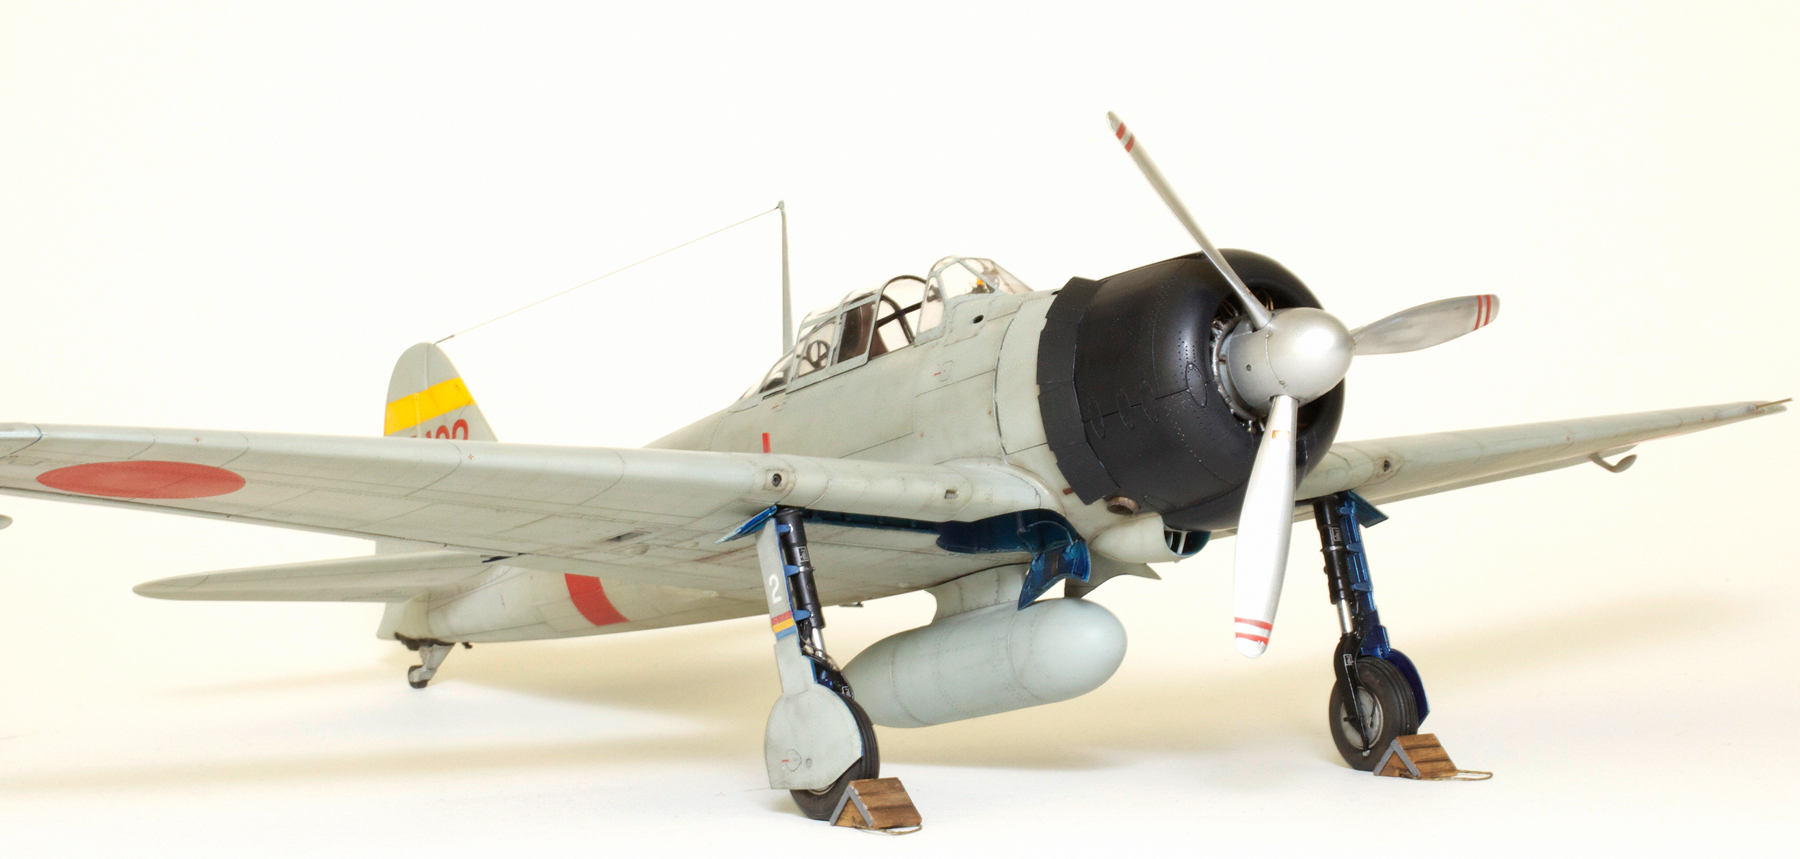
Two sizes of wheel chocks are supplied, these larger ones are to be placed in front of the wheels while there are smaller ones to be placed at the rear. I could’t find any photographic evidence of the smaller rear chocks being used so I only finished the larger front ones. I added some extra detail by cutting a simple wood grain texture into each panel with the tip of a scalpel; adding end cap plates from plastic strip, and replacing the rather thick white string supplied in the kit with a much finer, smooth cord.
GALLERY


Beautiful craftsmanship Chris! Great to have you back.
Regards,
Tomasz
LikeLike
Another master piece, thanks for sharing
LikeLike
Great work – as usual.
LikeLike
Very clear, clean build and report.
LikeLike
Beautiful build of a beautiful airplane!
LikeLike
Masterful work, Chris. Thanks for sharing your techniques.
LikeLike
I enjoy the big pictures.
I use quality Samsung 23″ 1080p computer screen to view your photos.
I drag them into photo editing like free Irfanview and give them some sharpness with shift + s key x 2.
Much better. Shows off your quality work with more detail and impact.
The finished model looks quite real. The white background gives it away.
If you are ever after more Pearl Harbor research –
Batley Townswomen’s Pearl Harbour
LikeLike
Great as always!
2016-05-30 9:54 GMT+03:00 STATIC CAPITAL :
> Chris Wauchop posted: ” Aircraft flown in the Pearl Harbour attack by Lt > Saburo Shindo, Air superiority command, 2nd strike unit, aboard carrier > Akagi, lead ship of Carrier Div. 1 Hawaii, December 8, 1941. The first step > in my order of construction (step 40 in the kit” >
LikeLike
Love it Chris ! very cool,
hope all ‘s well.
cheers,
Pete.
LikeLike
Beautiful build. Pity the overall color is way too gray and light and not glossy enough. This same paint, J3 olive grey, was also applied in the wheel wells and on the inner sides of all landing gear covers. Spinner is too shiny, it was actually aluminum paint. Weathering may be a bit too much, all Zero at PH were fairly new and well maintained, all built by Mitsubishi.
Very, very nice.
Cheers,
Mario
in New York
LikeLike
Wow.. the color is amazing, looks very realistic.
I am currently assembling this one.
Nicely done, sir.
LikeLike
Just discovered this master piece. Very well done.
LikeLike
Sin palabras !!.
Las fotos son mas elocuentes.
LikeLike
Muchos gracias Carlos!
LikeLike
Hi. On the images of the cockpit, the edges and highlights are stained with brown. Can I ask how you achieved this effect please?
LikeLike
This effect is done by very carefully airbrushing the edges and any recessed detail with a very, very thin mix of red brown and a dash of flat black. This technique takes a bit of practice but if you’re using a half decent airbrush which can be set to a very fine line, you’ll get the hang of it pretty quickly. This is a very subtle effect but, as you can see, it does make a real difference.
Give it a try.
Cheers,
Chris.
LikeLike
Thank you. I have the airbrush… I will give it a go! I am building an A6M5 at the moment and using your build as inspiration.
LikeLike
Chris…thank you for the work you do. This site has been a great tool as I got back into modeling after 40-some odd years (funny how that works w/lot of us). Your attention to detail and your descriptions of how you do the things you do are immensely appreciated. I used your guide for my Zero (https://www.fdmodels.net/blog) and I do have a question…when you attached your aerial to the tail…did you use a gaspatch buckle and how did you attach it? I bought a few buckles and although not “official”, they look the part.
LikeLike
Hi Wes, glad to have been of some kind of help to your build but you don’t look as though you need any help to me. As for attaching the aerial wire to the tail, it was simply supa glued into a pre-drilled hole in the fin and the insulation was built up with white glue and painted grey.
Love the blog by the way,
Cheers,
Chris.
LikeLike
Appreciate it and thanks. I too started in the mid 60’s and probably built every single Monogram and Revell models there were…but dropped it after going to College and a couple of careers. When I got back in it was your blog and others who inspired me to get back into the hobby. There are thousands of us out here who appreciate the work you do and just needed a little help to get going again.
I still can’t figure out how you do that miniature wire work and make it look so tight…do you have any special, or favorite mini-drills and bits you use? I go through Amazon and can’t find anything that doesn’t break or suck. BTW…hope you’re still getting some residuals from the Mosquito and other books you collaborated w/Greene on…the Corsair book saved me countless times and I’m still trying to get the nerve to build the Mossie.
LikeLike
Wes, there’s really no secret to attaching the antenna wire. On 1/32 scale kits I use nylon mono filament, which glues extremely strongly with CA glue. With the Zero I first drilled a hole through the side of the antenna mast near its top and then a deep hole into the mounting position on the upright tail fin. Tie and glue a slightly longer than needed length of the nylon thread to the mast. Add drop of CA glue to the other end and, using tweezers, feed it into the hole in the tail. Use tweezers to hold it in place at the tension you require and in a about 5 seconds it will be permanently glued in place.
As for the drill bits, they are quite fragile and I try to keep spares of most of the smaller sizes.
Don’t be scared of the Mossie, it’s a beautiful kit. (No antenna wires)
Cheers,
Chris.
LikeLike
Beautiful work.
LikeLike