STATIC CAPITAL
Chris Wauchop Scale Models and Photography
Hasegawa 1/32 Focke Wulf Fw 190 A-5

Fw 190 A-5 flown by Oblt. Walter Nowotny, Staffelkapitän of 1./JG 54, Russia, summer 1943.

After some filling and re-scribing the first major job undertaken was to add the rivet detail. This was achieved with the aid of lots of Dymo tape as a straight edge, this MDC rivet punch and a good set of scale drawings.

With the scale drawings as a guide, and using a small metal ruler and graphite pencil, the start and end points of the rivet lines were marked out as accurately as possible. An appropriate length of the adhesive Dymo tape was then stuck between the pencil marks and using the rivet punch, the lines of rivets were carefully pressed into the plastic. The spacing between each rivet is done purely by eye and therefore is not 100% accurate but with practice (and I’ve had lots) it becomes fairly automatic and the result quite acceptable.

In this shot of the left fuselage half, as well as rivets, you can also see some of the detail that has been filled using Milliput.
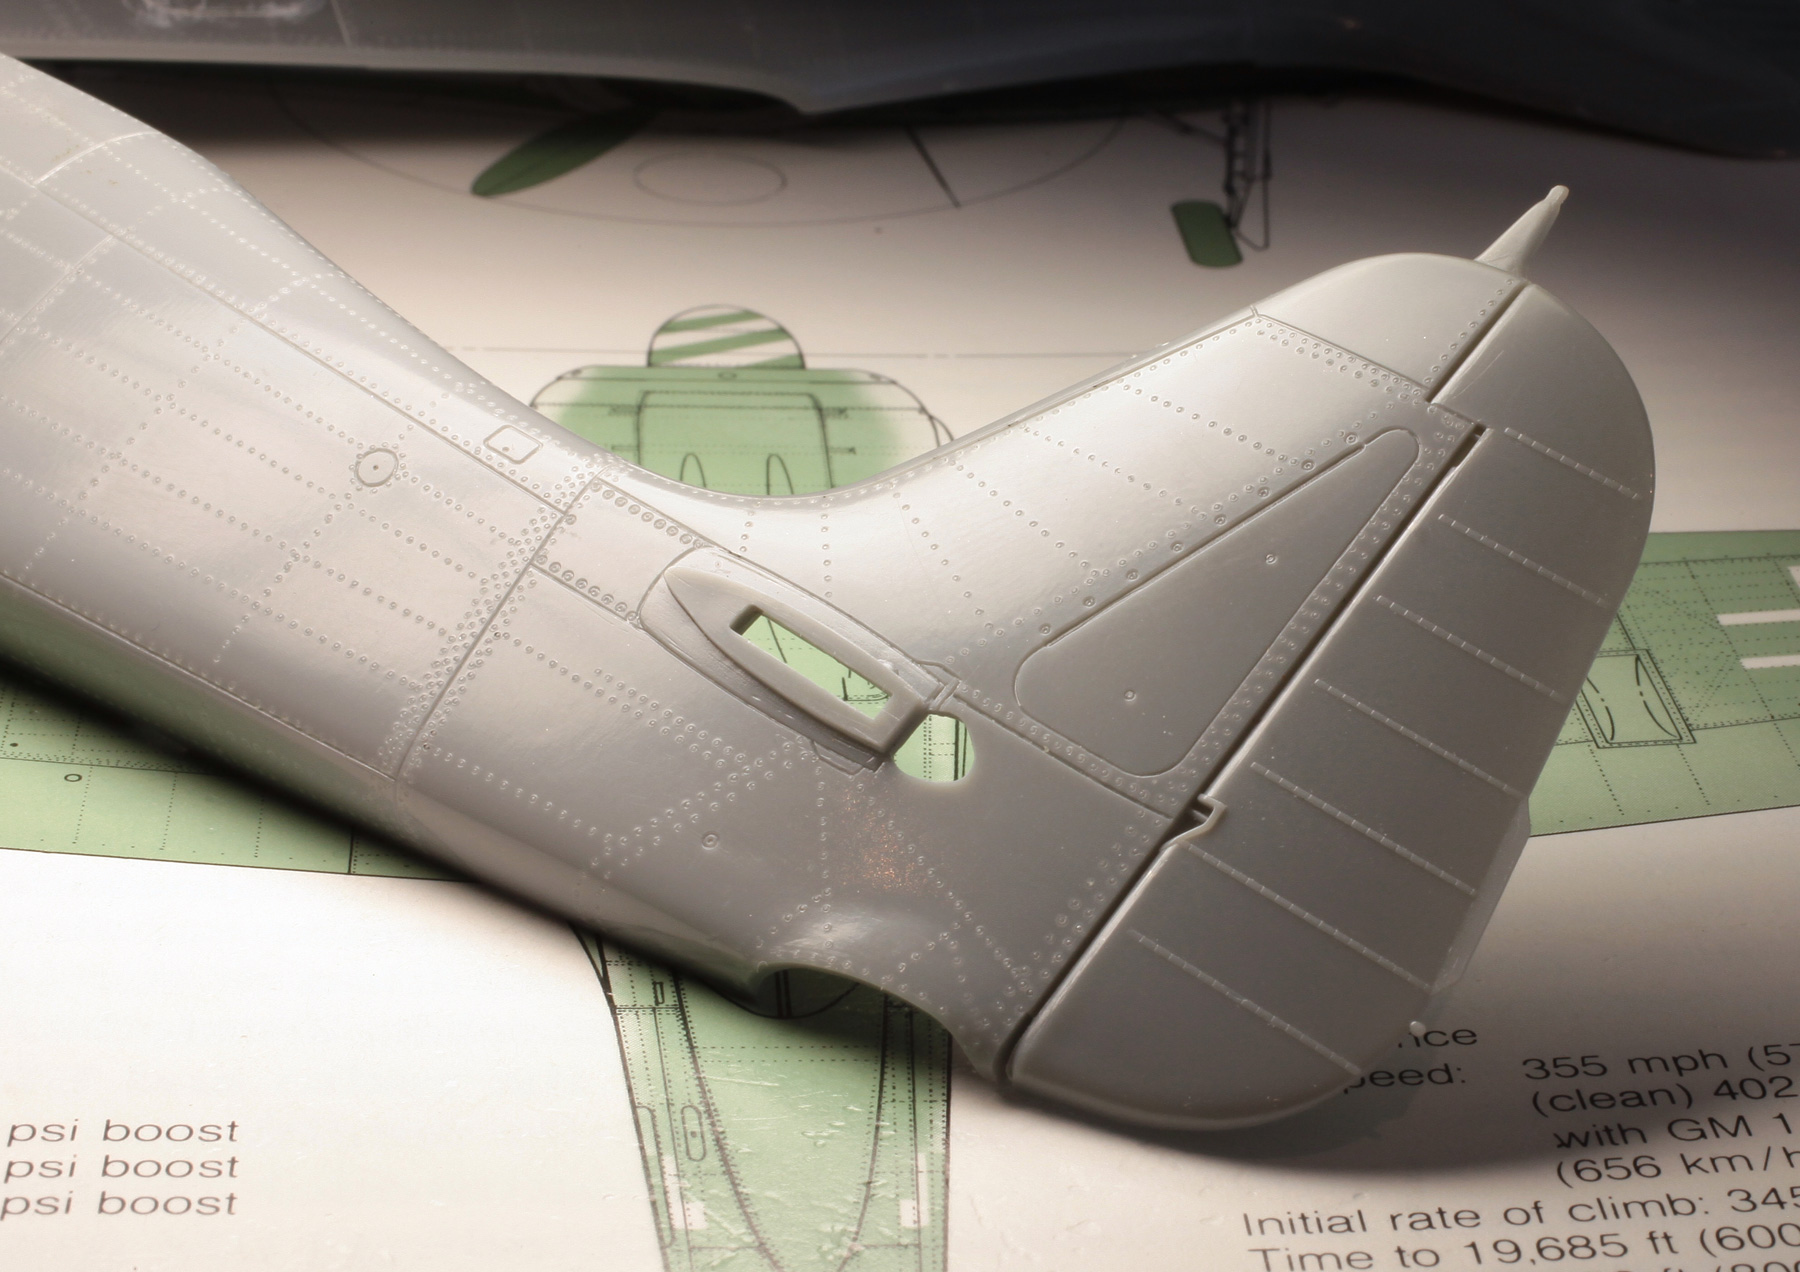
The extra effort taken in adding the rivet detail is time consuming but the result, although subtle, makes a big difference to the overall look and surface texture of the finished model.

In this shot of the almost complete cockpit tub can be seen the canopy guide rails which were added using Evergreen plastic strip.
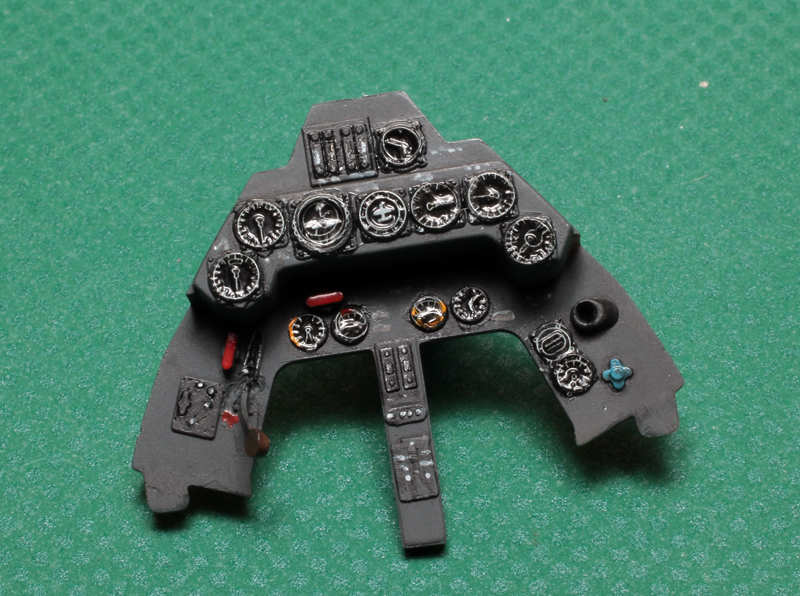
Each instrument dial was cut from the kit decal sheet and applied individually. Fiddly, but with these tired old eyes it’s a lot easier than painting ’em!

Safety harnesses were made from paper-backed lead foil and fine wire bent to shape to form the buckles.
Undercarriage parts plumbed, painted and waiting for installation.

The yellow theatre markings and RLM 02 in the wheel wells and flaps were painted first and then masked off with Tamiya masking tape before the main camouflage colours were applied. In this shot the masking has been removed from the wing tips and wheel wells.

Upper surface colour application begins with the lighter of the two greens. This is my own field mix of RLM 71 Dark Green with about 30% RLM 82 Light Green to try and represent the improvised colour used by the JG 54 ground crews.
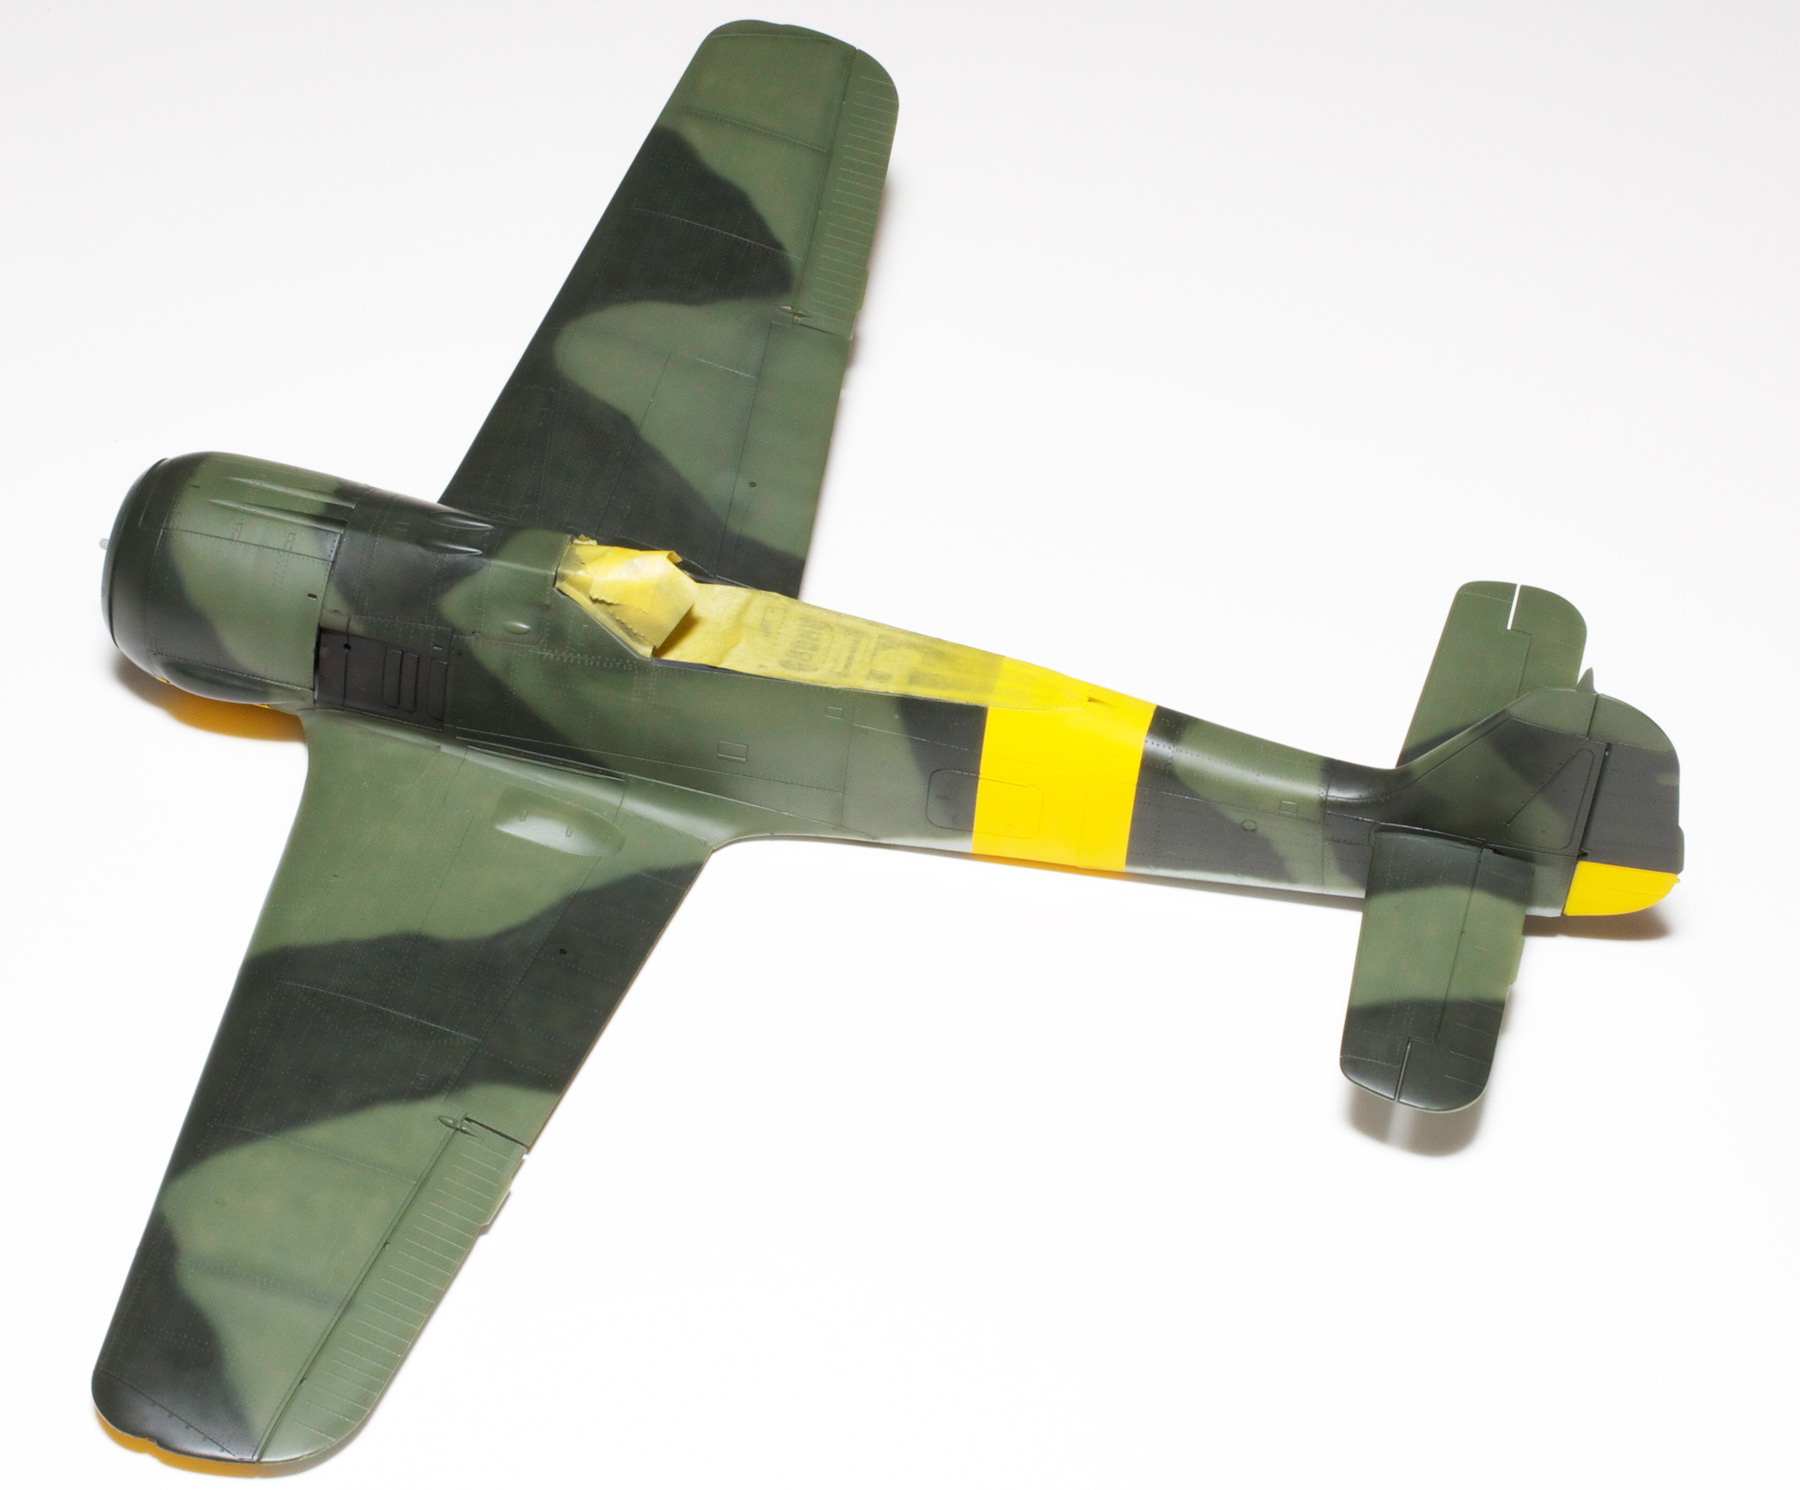
RLM 70 Black Green was used as the second colour for the upper surface camouflage. Masking tape has now been removed from all yellow theatre markings.

With all camouflage colours applied, masking tape removed and panel lines drawn in with a very sharp 6B pencil, weathering has begun.

With all painting and weathering complete the model is just waiting for the installation of all its dangly bits.

In this and the next close-up shot you can see how the rivets just show through the paint.

All the paint chips were carefully applied using a very sharp Prismacolor silver pencil. The light exhaust staining was achieved by first spraying Tamiya XF 57 Buff and then a patchy overspray of a very thin mix of Tamiya Red Brown and Flat Black. This colour was also used for the main, darker exhaust staining down the fuselage sides and the build-up along panel lines where appropriate.

The spiral on the spinner was carefully brush painted.

Nylon mono filament was used for the radio antenna with small drops of white glue for the insulators. The backs of the prop blades were first painted silver and then over-sprayed with RLM 70 leaving the tips silver.

The yellow markings were also dirtied up using the black/brown mix.

My favourite angle of the 190. Markings are from EagleCals decal sheet EC#83 FW 190A-5s.
Airfix 1/24 Hawker Typhoon

My favourite aircraft flown by the Allies during WWII has always been the Hawker Typhoon especially when fitted with the bubble canopy, armed with rockets and painted with full invasion stripes. I (and a lot of other people) had been hoping for a 1/32 scale kit from one of the major companies when Airfix surprised us all with this ‘slightly’ larger offering. It is a big, beautiful kit which (apart from the car door) includes just about every option you could wish for. When Brett rang and asked if I would be interested in painting a pre-production model that he was building for the next ADH ‘How To Build’ book I jumped at the chance.

The only thing that I was disappointed with was the rather basic detail on the rockets. In my opinion this is an important feature on this large kit so I was hoping for a little more effort from the designers. This shot shows all eight RPs finished with scratch-built detail added by me.
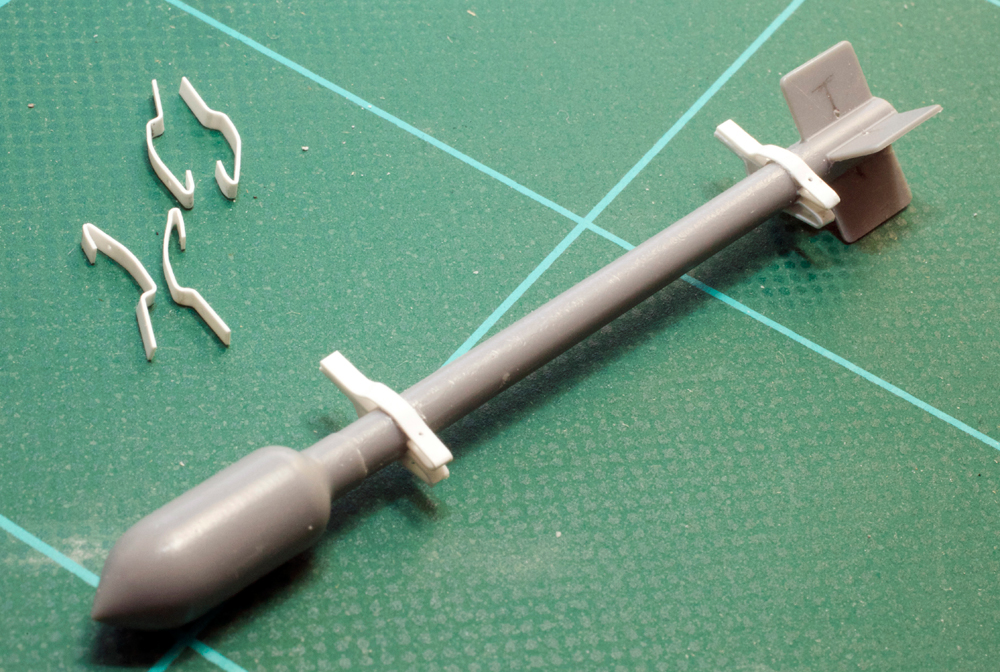
The first detail that I decided to add was a more accurate representation of the kit’s solid moulded rocket saddle plates. New brackets were made by carefully bending .010 x .040 Evergreen plastic strip to match the various reference photos I had at hand. After the removal of the moulded kit brackets these scratch-built items were glued in place. These are not entirely accurate but they’re a lot better than the kit offering.
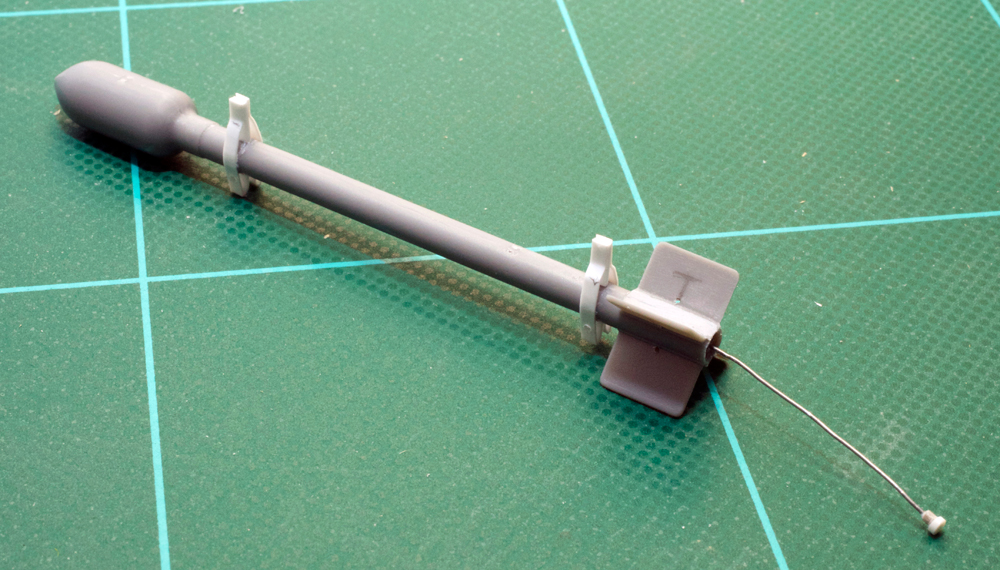
The Weak Link Leads or ‘pig tails’ were the next detail to be added. These were relatively simple to make using plastic rod for the plugs and .355mm solder wire for the leads.

Brett had constructed the model with the engine fully exposed and painted. Both wing cannon bays were also open and complete. I painted it in this configuration with the thought in mind that I might be able to fit the engine cowling and gun bay panels over this completed work. I was wrong! But after the photos had been taken and the model was now mine the engine received a severe pruning and, with a bit of persuasion, the cowls and panels were made to fit.

Brett seemed very pleased with the result and took some more photos which he has included in his new book.

The cowling on my model doesn’t fit perfectly but that’s because it was fitted as an afterthought. I’m sure that if I had initially constructed it with the cowling closed, the fit would have been very good. A few added details seen in this shot include the dorsal whip antenna and the replacement cover plate with wire handle on the bottom of the retractable footstep.
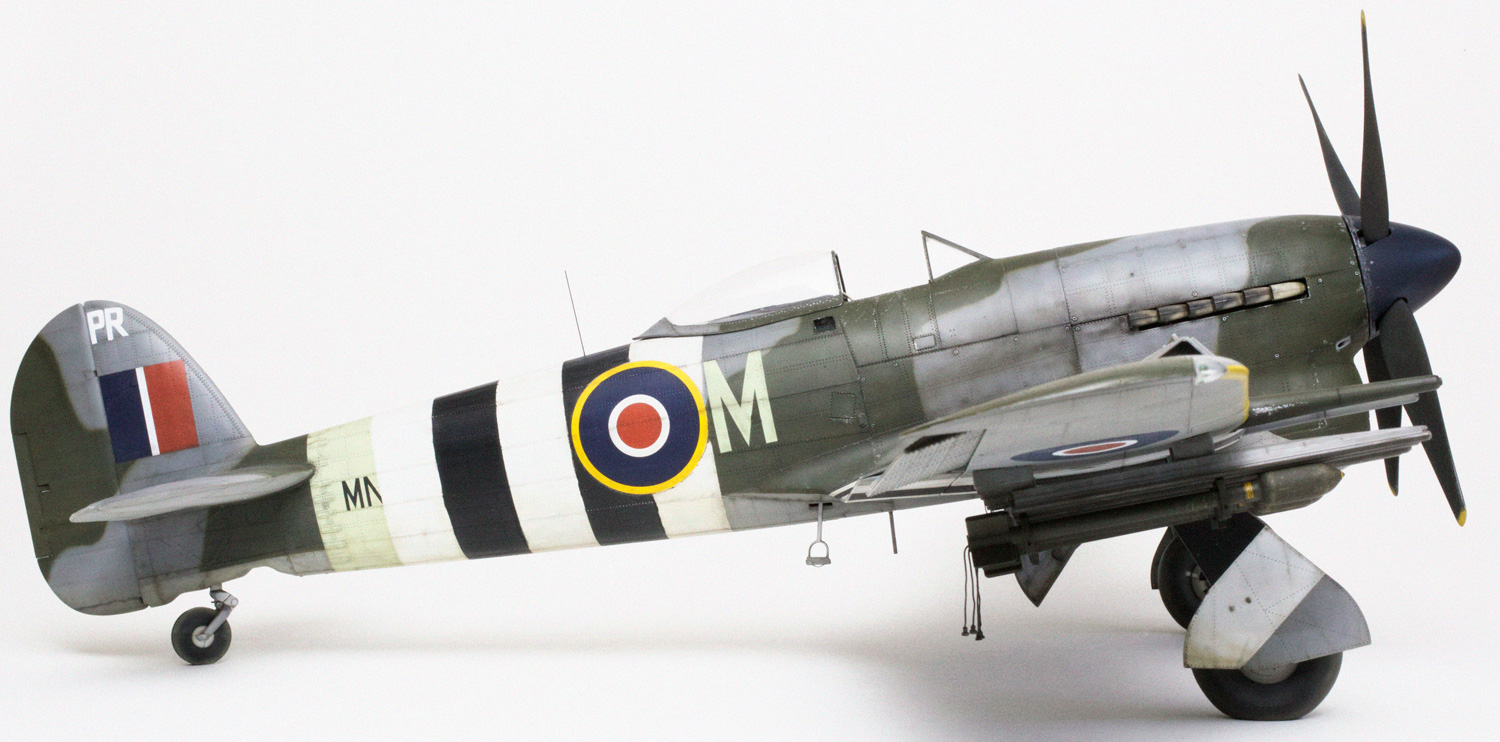
Markings were sourced from XTRADECAL sheet no. X24-003 and represent aircraft MN131/PR-M of No. 609 Sqn., 123 Wing, 2 TAF, RAF Thorney Island, 6 June 1944. The decal instructions indicate that this aircraft had a three blade prop and a short chord tail but on careful examination of the one available photograph of this particular plane it is impossible to tell what the tail configuration is and, even though it is spinning, the prop looks to me as though it has four blades. So because Brett had already securely glued the Tempest tail in place and, in my mind, it should’ve been fitted with a four bladed prop, that’s the way it was going to be!

What a brute.

My favourite angle.
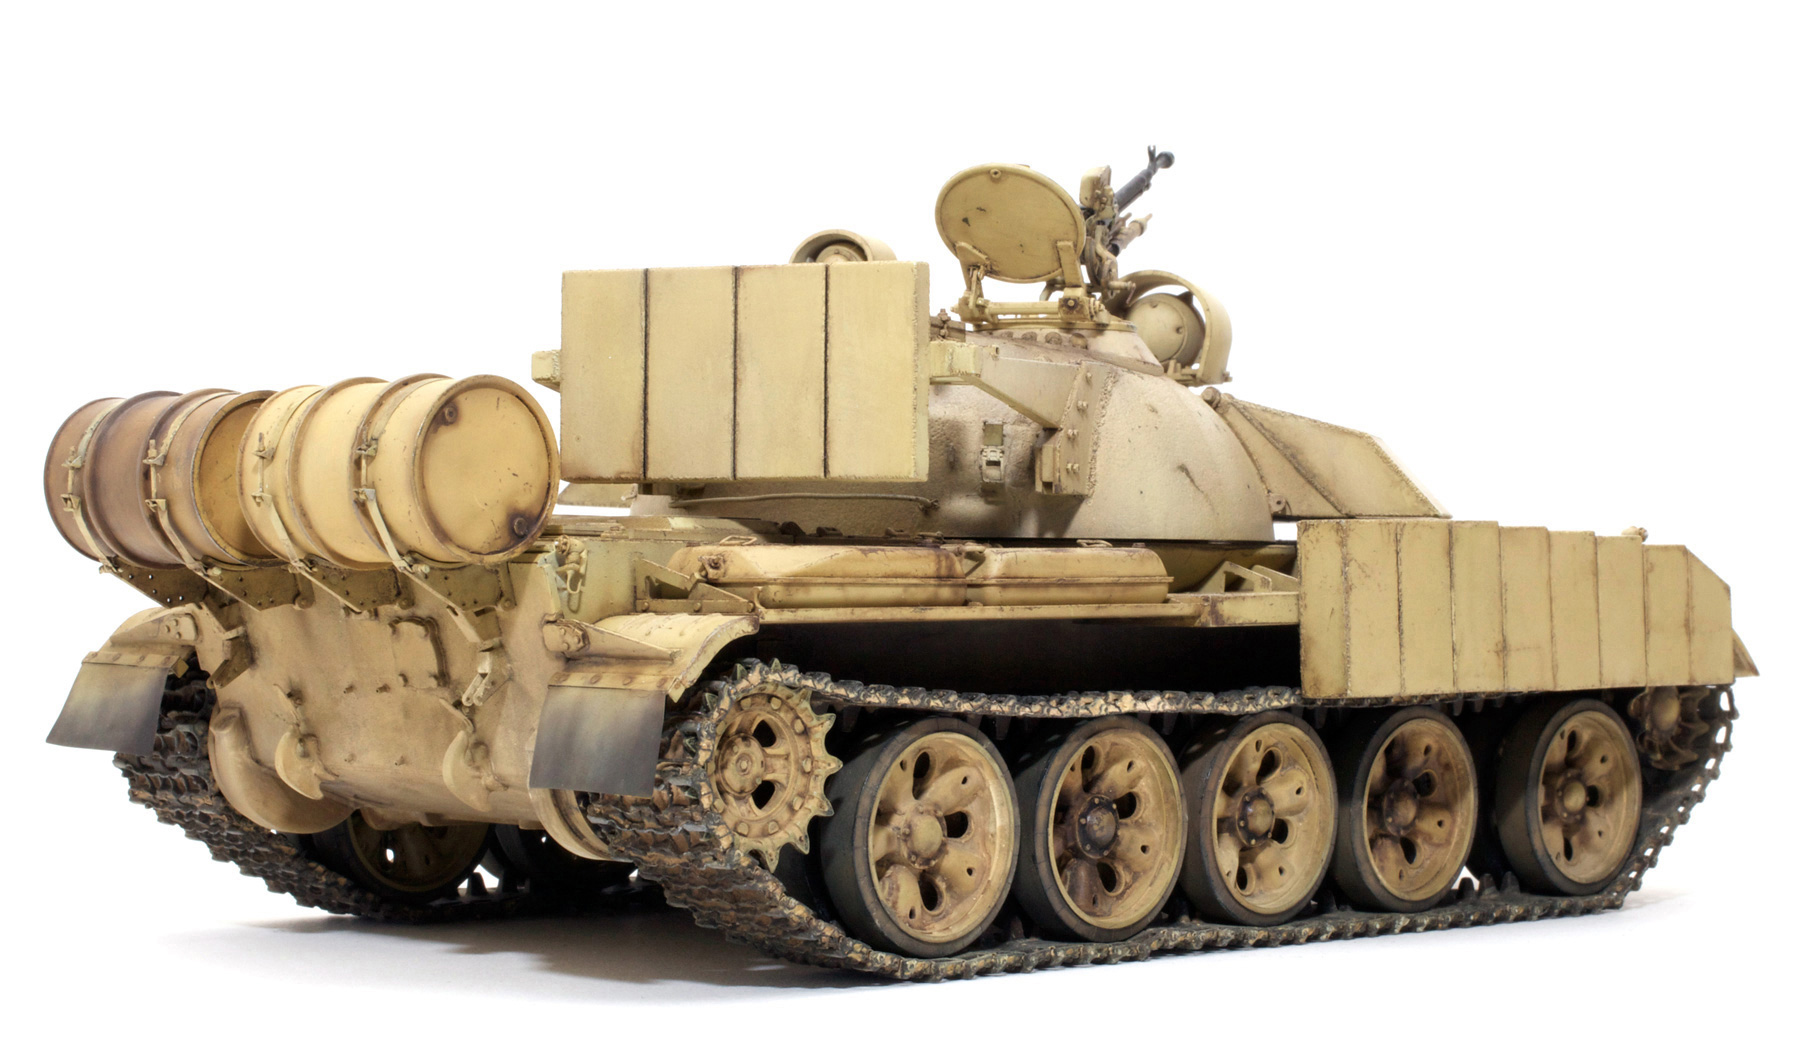
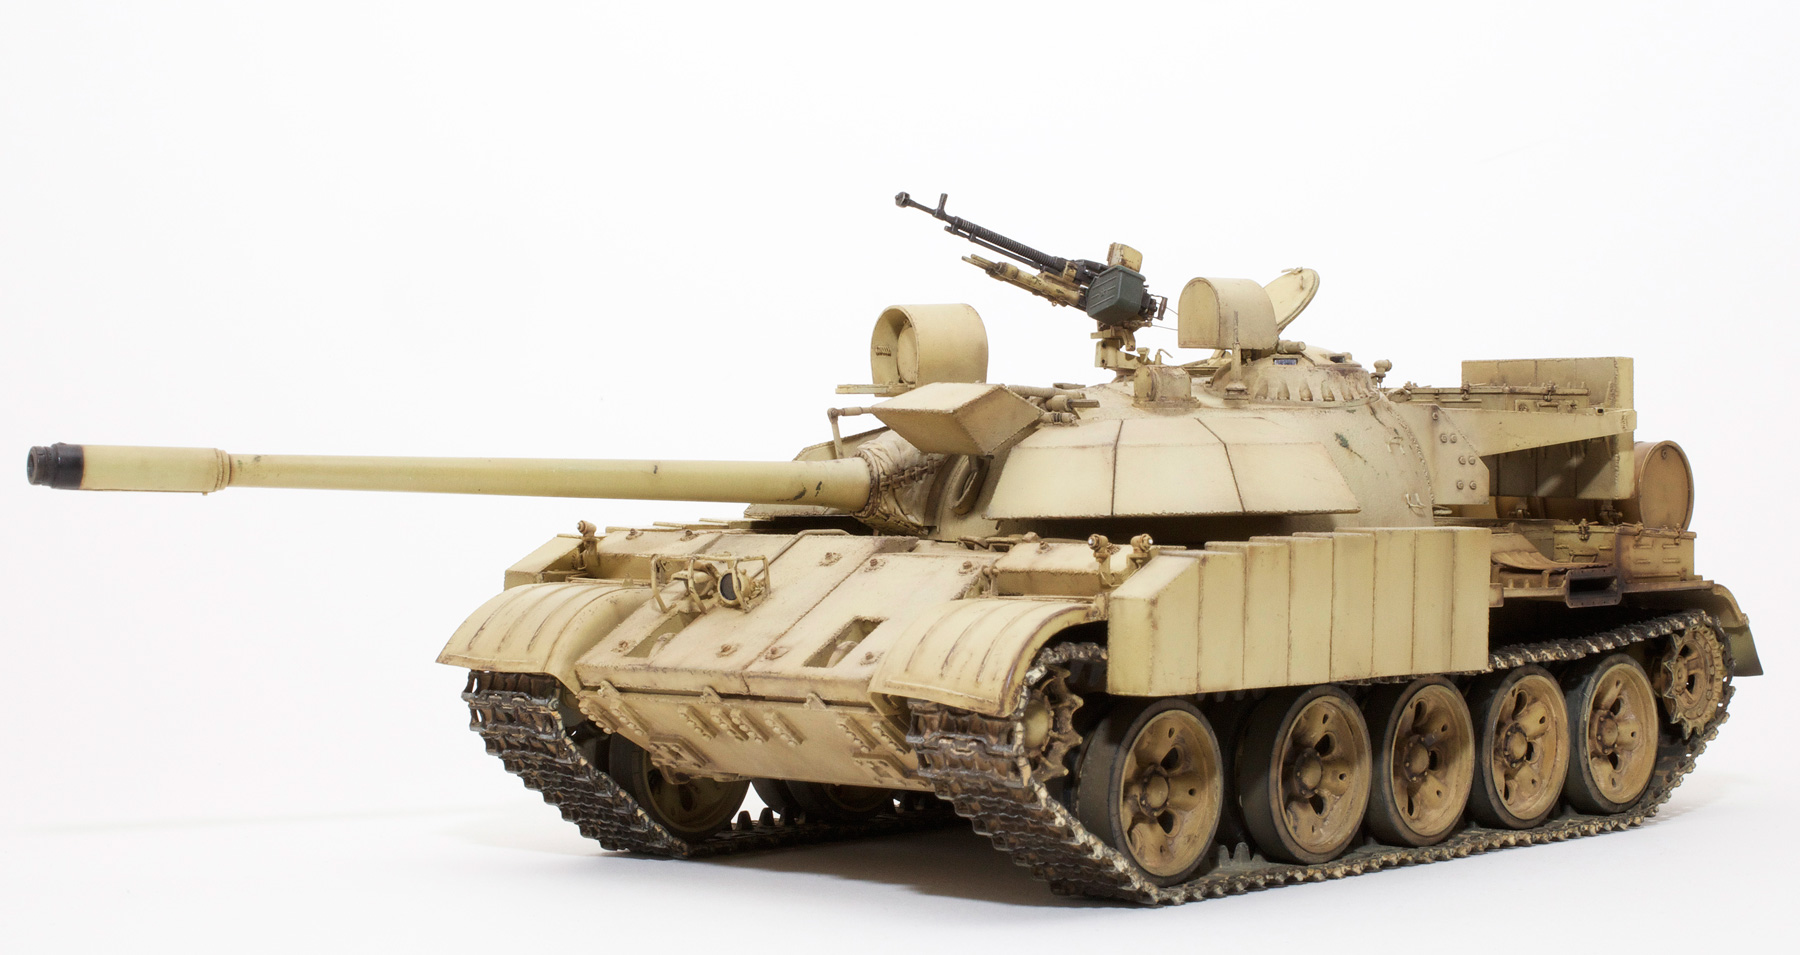
Tamiya 1/35 T-55 ENIGMA

The Enigma was a modified T-55 that was encountered on several occasions by Coalition forces during Operation Desert Storm. The modifications to the original Russian design consisted of hollow steel boxes that Iraqi Army engineers had welded and bolted to the tank’s turret and hull in an attempt to add more armoured protection to its most vulnerable areas. This was not entirely successful, however, as it seems all but three or four of the Enigmas encountered were quickly despatched.

A lot of extra details were added to the model. These included the Eduard P/E set designed for this kit, Aber’s turned aluminium gun barrel, as well as many scratch-built items.

One of the more elusive details peculiar to this vehicle was the locking mechanism for the hinged portion of the turret armour. I’m not sure that my attempt at replicating this is entirely accurate, but it’s the best I could manage with the available reference.
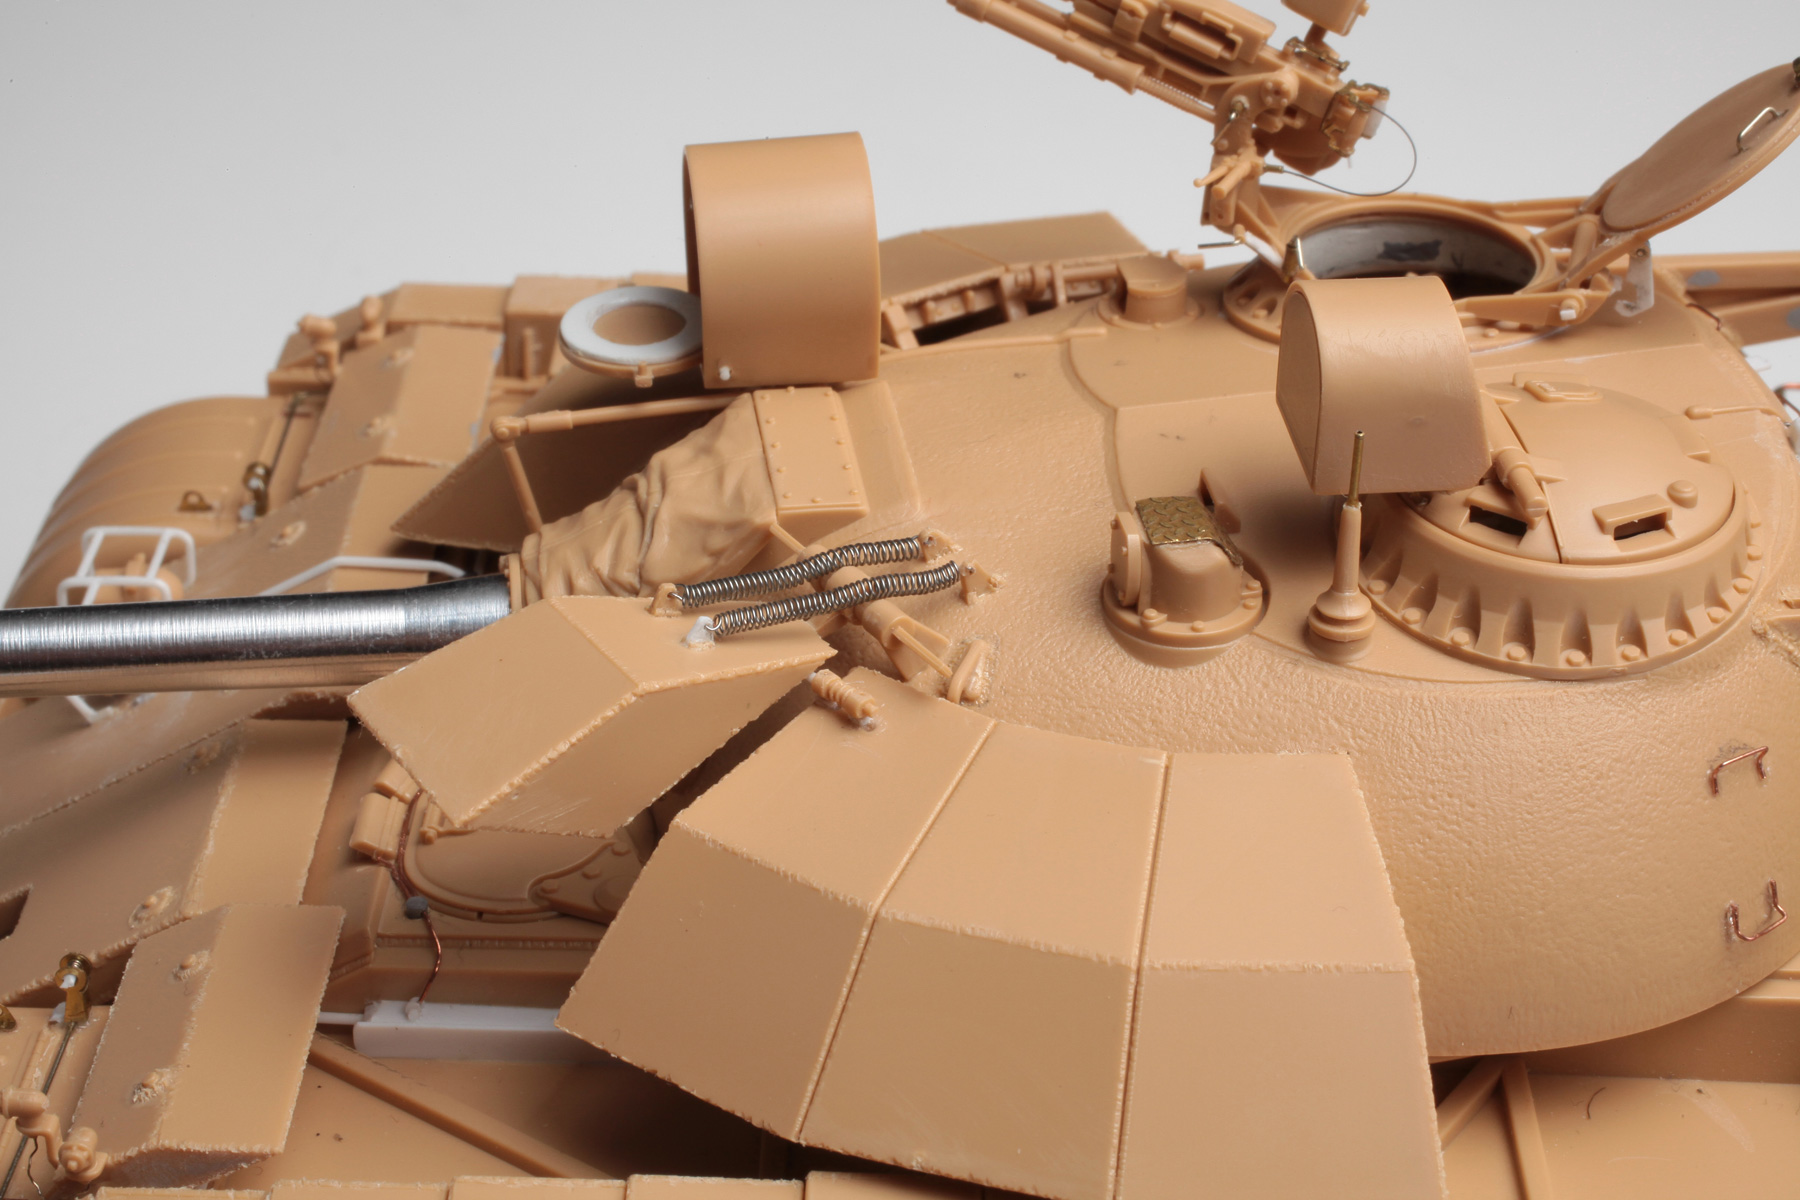
The kit’s moulded springs for the hinged armour section were replaced with new items made by coiling fine copper wire around a brass rod of the appropriate diameter. This took a few attempts, but the end result was worth the extra effort.

The rear of the turret received lots of extra bits. These were mainly modified kit parts with some scratch-built items. The rather crude weld seams where the rear bracket is attached to the back of the turret can be seen here. These were made by gluing stretched sprue along the joins using lots of liquid cement. While the plastic was still soft the texture was created using the point of a needle.
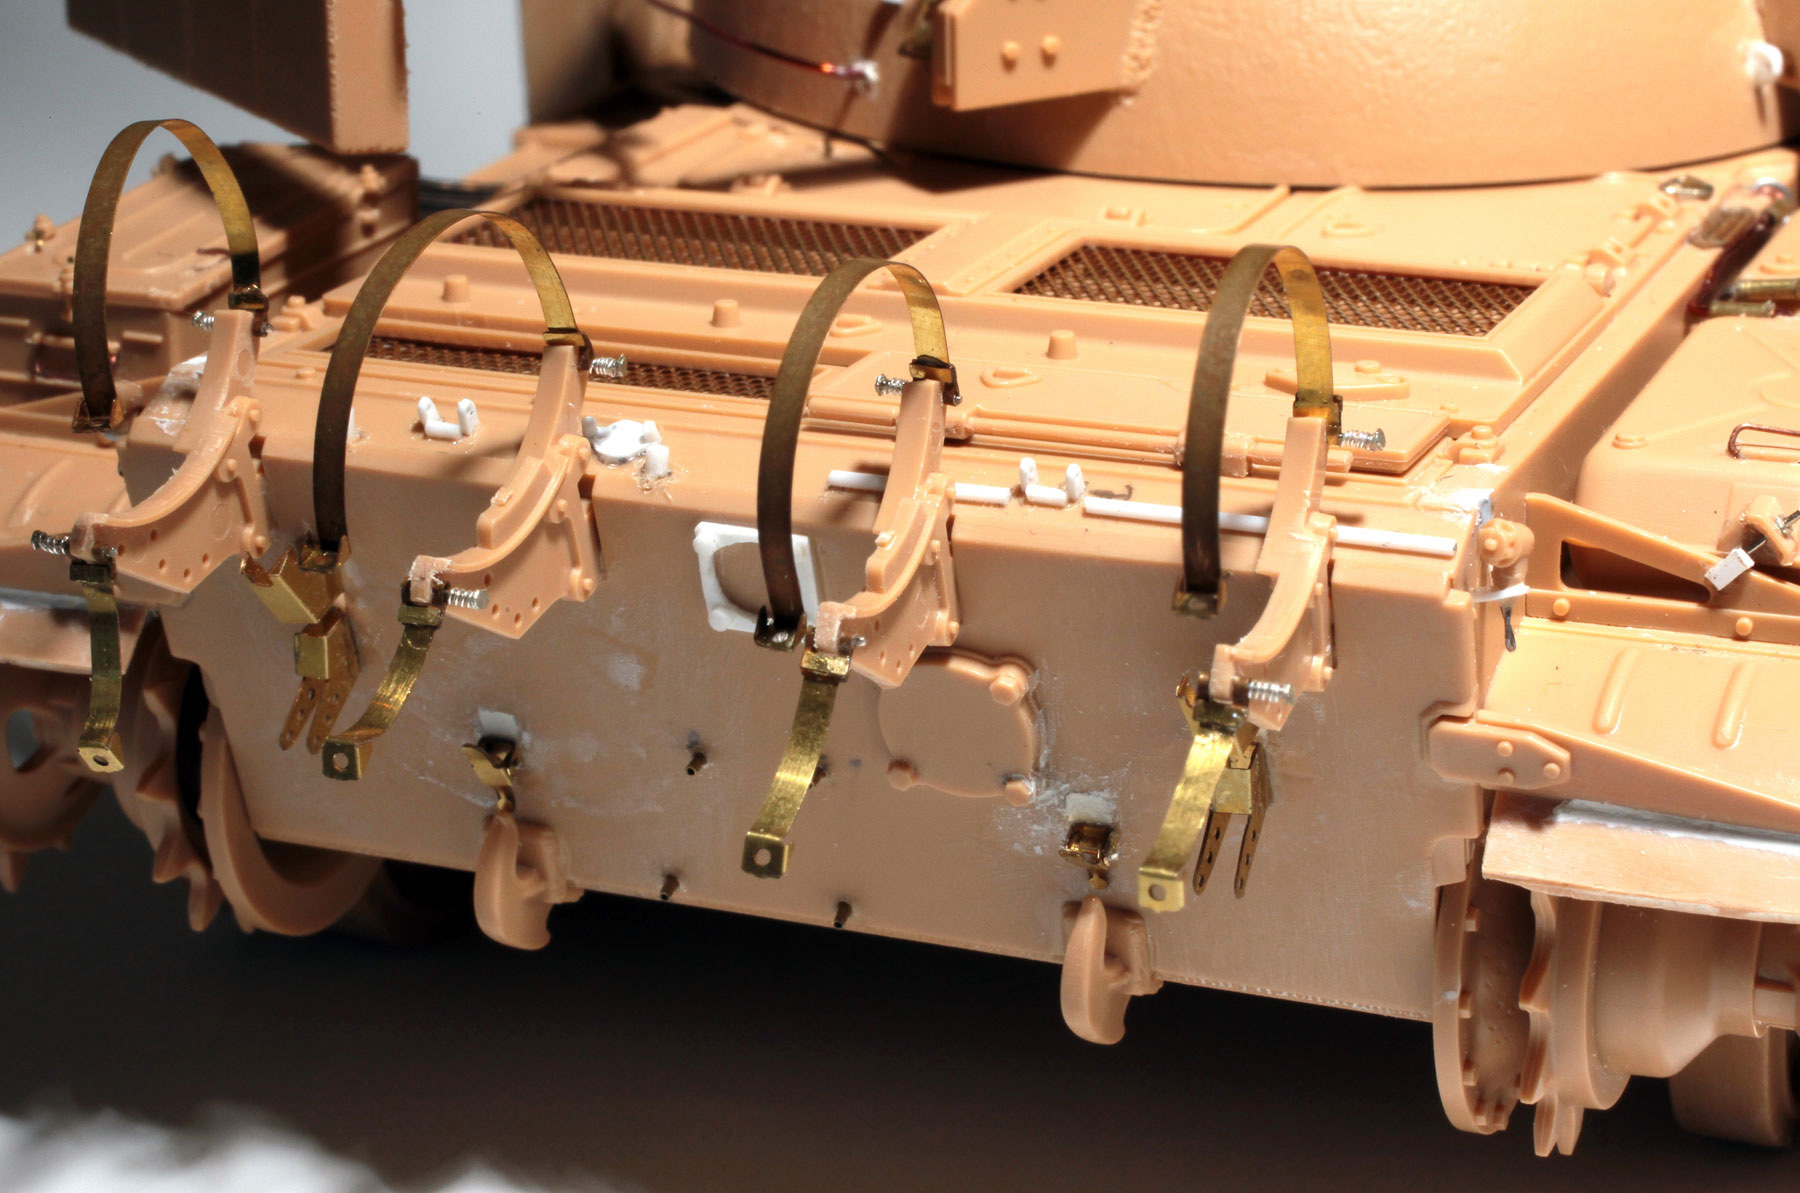
The same goes for the rear end but this time the additions were mainly P/E with a lot of scratch-built bits.

In this shot of the finished model the rough weld seams can be seen more clearly. Also visible are lots of small scratches and wear, which were added using very sharp colouring pencils. The Dushka and its mount also received quite a bit of extra detail.

Exhaust staining and more scratches.

Oil staining on the wheel hubs was achieved using a fairly heavy black/brown oil paint wash. I was also very happy with the rubber look of the tyres and the P/E mud flaps.
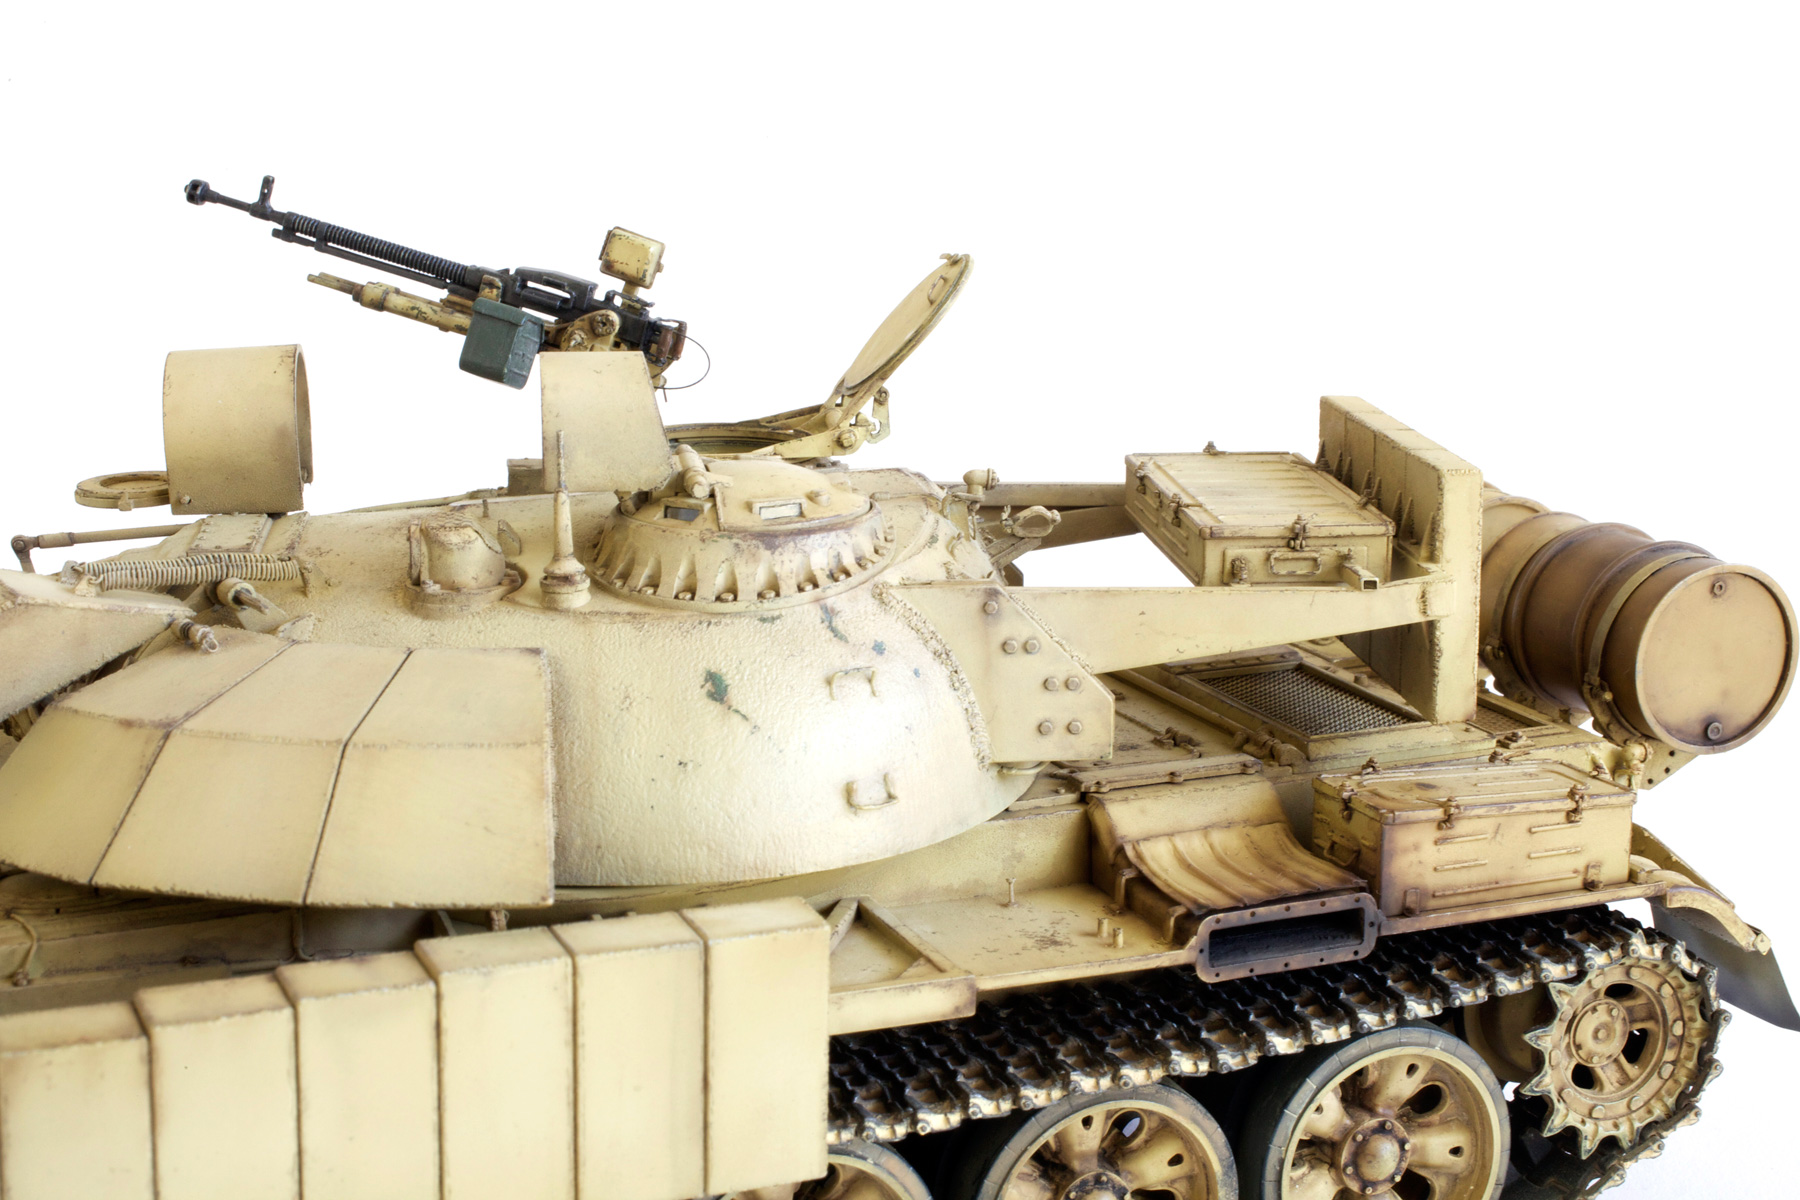
Visible in this shot are the lenses added to the commander’s hatch vision ports and the scratch-built latch hook on the gunner’s hatch lid.
ADDITIONS AND ENHANCEMENTS MADE TO THIS MODEL
- Kit weld seams on the appliqué were roughed up with the aid of a motor tool.
- All other weld seams were added or enhanced using liquid cement, stretched sprue and the point of a needle.
- Plumbing was added to the fender fuel cells.
- Replaced most molded-on handles with copper wire.
- Replaced molded plastic springs for front-hinged armour with coiled copper wire.
- Scratch-built the hinged armour’s locking mechanism using plastic rod and strip, brass wire and spare P/E bits.
- Replaced kit headlight cage with item made using .020 plastic rod.
- Added conduit and cabling to all electrical fittings.
- Opened main spotlight cover and added internal details.
- Added driver’s hatch external details.
- Replaced kit’s main gun barrel with item from Aber.
- Added securing bolts to front appliqué armour.
- Lots of extra detail added to rear end of vehicle using plastic sheet, plastic rod, brass tube and P/E.
- Kit tracks were replaced with WWII Productions Resin Track Set 35008. T-55 TRACK.
Messerschmitt Bf 109 GALLERY
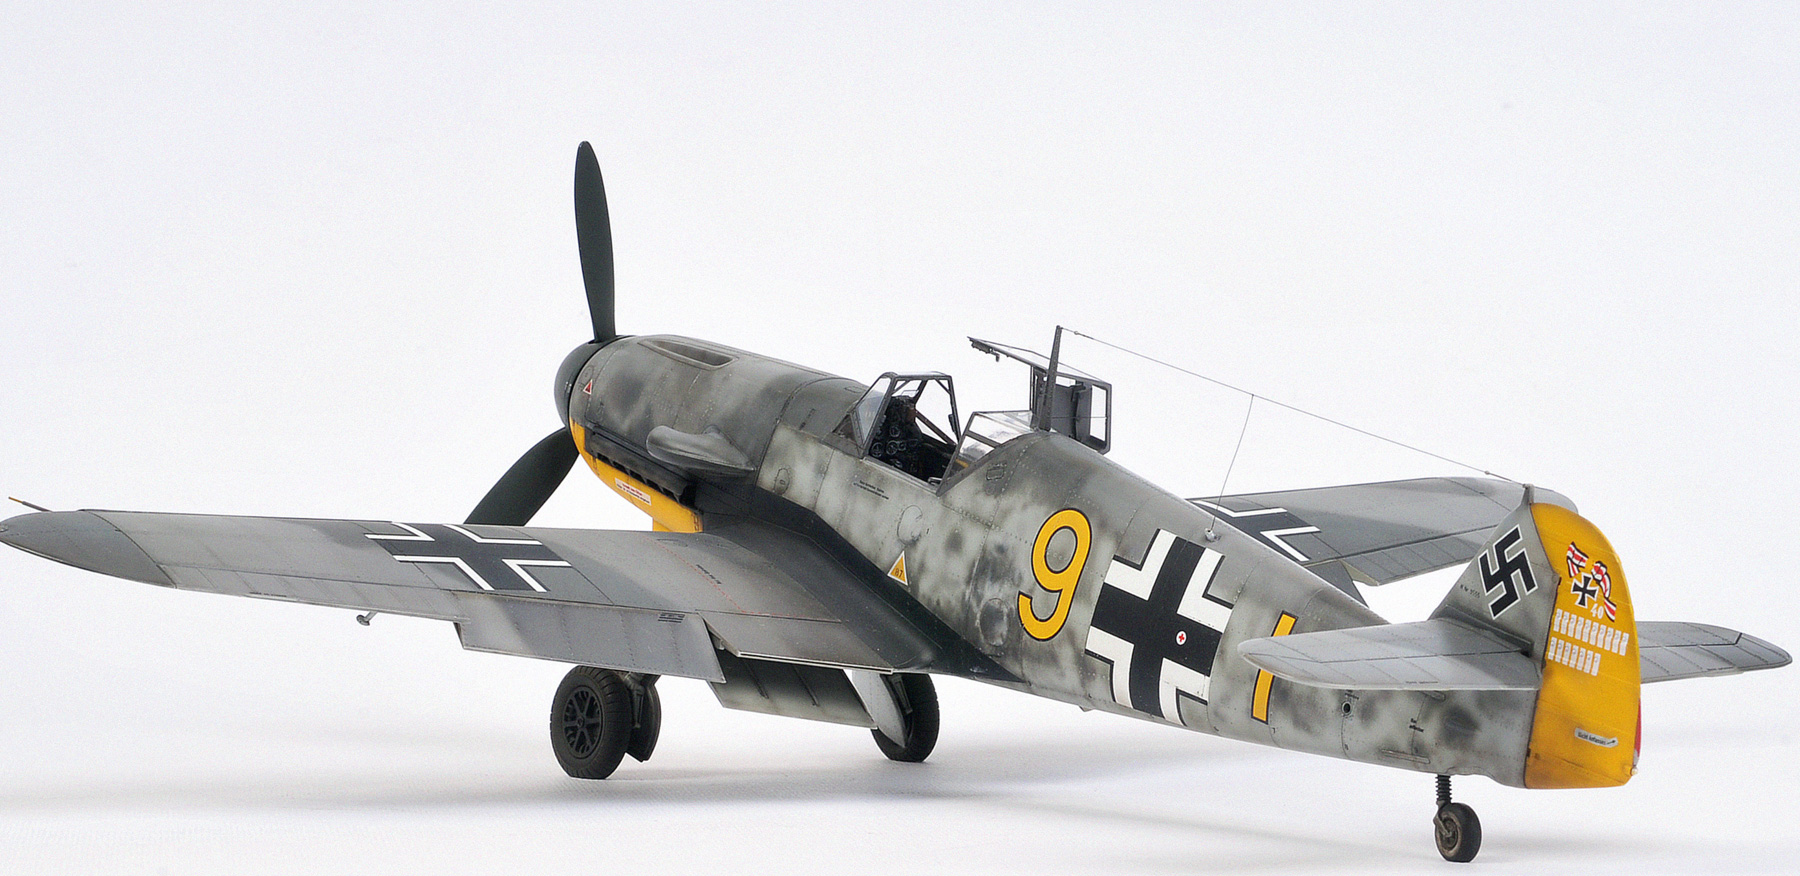
Hasegawa 1/32 Bf 109 F-2 from 9./JG 2 carrying the markings of Staffelkapitan Siegfried Schnell while on Channel coast duties in France, 1941.

Hasegawa 1/32 Bf 109 F-4/Trop in the 3./JG27 markings of Leutnant Hans-Joachim Marseilles, Libya, February 1942.

Hasegawa 1/32 Bf 109 G-14 converted (by Brett Green) to a G-10 with Type 110 cowl using the Cutting Edge set from 2004. Markings depict an aircraft belonging to JG 300 in 1945.

Revell 1/32 Bf 109 G-6/U2 from JG 53, Germany, 1945. A nice kit but really needs (at least) replacement prop blades and cowling bulges.

Hasegawa 1/32 Bf 109 G-10/R3 as flown by Feldwebel Horst Petzschler, 10./JG 51, Eastern Prussia, May 1945.

Tamiya 1/48 Bf 109 G-6/R6 W. Nr. Unknown 8./JG 4 pilot unknown Lüneburg, Germany, spring 1944.
Erla built Bf 109 G-10 of 2./JG27, Schwerin-Görries, Germany, mid April 1945.

Hasegawa 1/32 Bf 109 G-6 representing the aircraft flown by Leutnant Eric Hartmann, 9/JG52, Russia, October 1943.

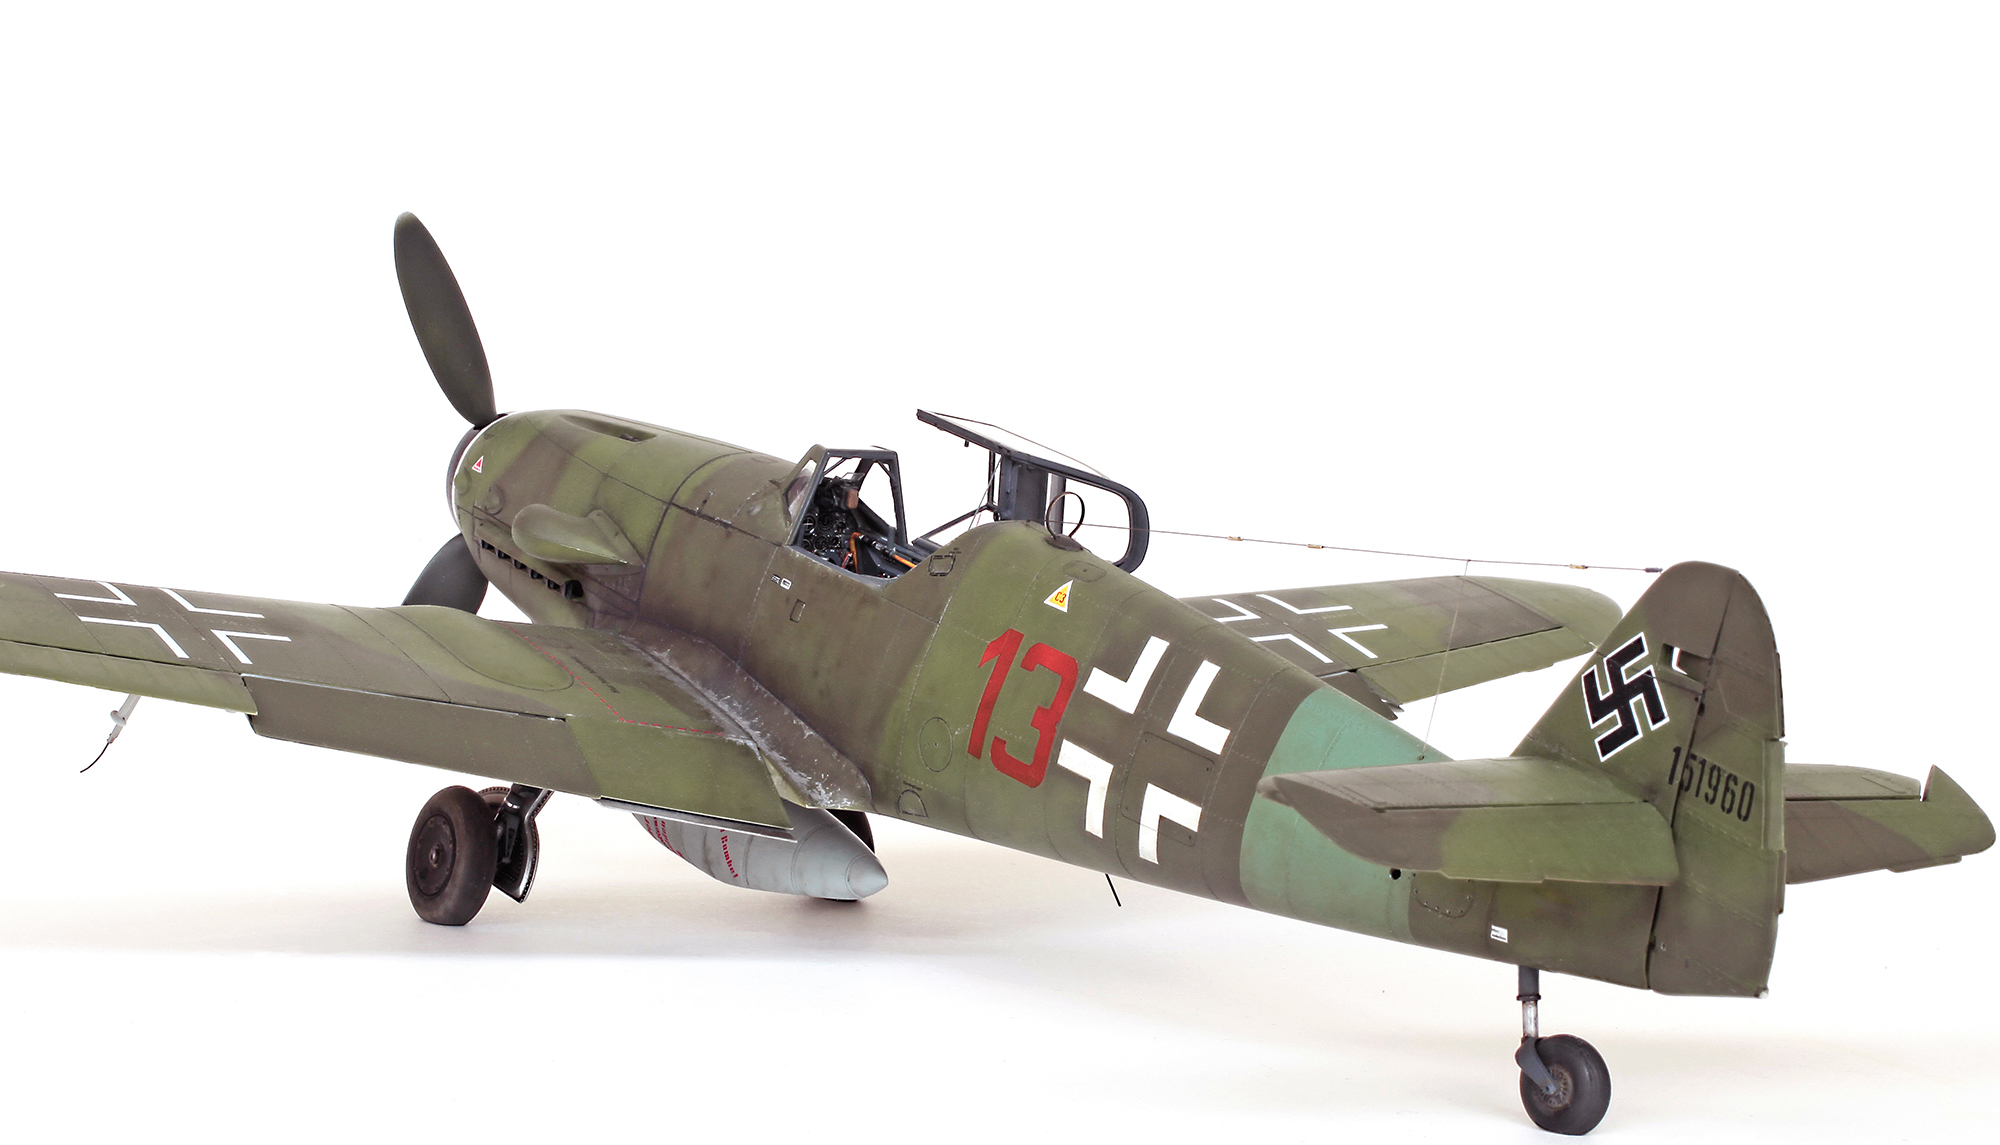
KoTARE 1/32 Bf 109 K-4 of 9./JG 3, Leck or Pasewalk, Germany, April 1945.
Zoukei-Mura 1/32 Focke-Wulf Ta 152 H-1

New photos and the original build shots of a model which I completed back in 2011.

Cockpit interior complete, just waiting for the installation of the instrument panel and seat.

Even though it was going to be concealed behind closed cowlings I still gave the beautiful little Junkers Jumo 213E engine a quick paint job.

Cockpit and other interior details are fixed in place.

Once the main construction was complete the engine was attached to the front of the fuselage.

This shot shows some of the extensive riveting that was added to the entire external skin of the model.

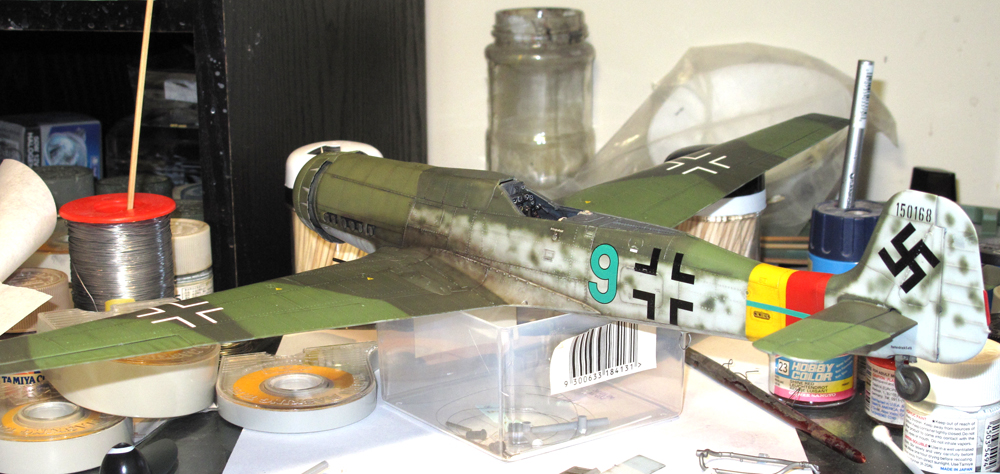
The application of the main camouflage colours. Undercarriage and various other smaller parts have also been painted and weathered.

Mottling, Reich defence tail bands and some weathering have now been added.
Decals are now in place. They represent the markings of a JG 301 aircraft flown by Oberfeldwebel Willi Reschke.

A better shot of the lower surface riveting.

The competed model.


Hasegawa 1/32 Ju87G2 STUKA ‘KANONVOGEL’

My latest build is a commission job and my client supplied me with the EagleCals decal sheet EC#97 containing the markings for Hans-Ulrich Rudel’s last Stuka. He requested that I build the plane in these markings.

He also supplied me with the Aires Resin cockpit set. Rudder pedals and seats have yet to be installed in this shot.

Aires starboard cockpit wall.

The kit instrument panel was used in preference to the P/E item in the Aires set. The dial faces were cut from the kit decal sheet and applied individually. Once set, a drop of gloss clear was placed onto each dial.

The kit’s push-rod arms were replaced with Evergreen plastic rod. The Voyager prop spinner can also be seen in this photo.

I chose to glue the supercharger flap closed which required two small hinge brackets to be attached to the back of the door.

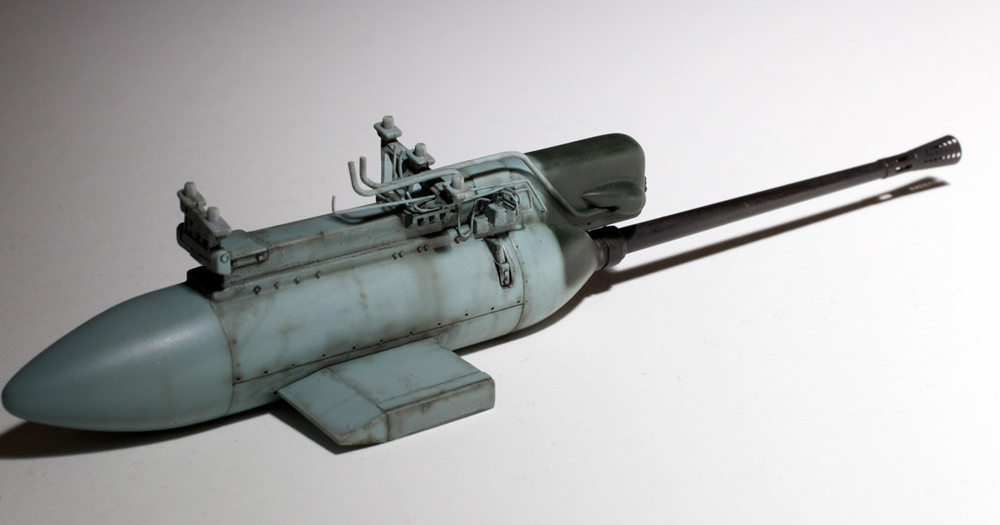
Voyager’s beautiful turned aluminium gun barrels and brass muzzle brakes were also supplied. These prompted me to install scratch-built plumbing to the gun pods.

Gun pod complete and painted.
And weathered.

Upper camouflage on. Panel line weathering has begun on starboard wing.

Upper and lower surface weathering has now been applied.

Completed model. Detail showing gun pod installed and exhaust pipes and exhaust staining on fuselage.

Wing root weathering detail.

Four shots of the completed model.


Hasegawa 1/48 Kawasaki Ki-45 Toryu (Dragon Slayer)

This is the 1/48 scale Hasegawa Ki-45-KAI in the markings of the 3rd Chutai/53rd Sentai based at Matsudo airfield, November 1944.

A full build article of this model appears in March ’09 issue 161 of Tamiya Model magazine.

I have added a bit of grain to these photos through Photoshop just to take away that ‘digital sharpness’.

This was a commission build of one of my favourite I.J.A. aircraft.

This is a beautiful kit with virtually no vices. (None that I can remember anyhow.)

Hydraulic lines were added to the undercarriage legs and an ignition wiring harness was added to the front of each of the Ha 102 engines.

The interior is straight out of the box. I think I probably added a simple scratch-built harness to the pilot’s seat but can’t be sure.
More Photoshop.

I was so impressed with this kit that I built one for myself.

I built this one in the colours of the aircraft flown by 1st Lt Takumi Yamamoto of the 8th Hakkou-tai, ‘Kinnou-tai’, Special Attack Squadron, based at Nielsen Air Base in the Philippines.

Lt Yamamoto flew this Toryu on its Kamikaze mission on December 7th 1944. This and eight other Nicks were destroyed while attacking U.S. forces in Leyte Gulf.
Dragon 1/48 Junkers JU 88 G6

I built this kit back in the ’90s when it was first released. At the time I was very proud of the result which, if memory serves me correctly, won me a first place trophy at my local IPMS monthly competition.

After sitting in open shelves for a dozen or more years the old girl was looking pretty dusty and sad but still relatively intact so I decided it was time for a facelift.

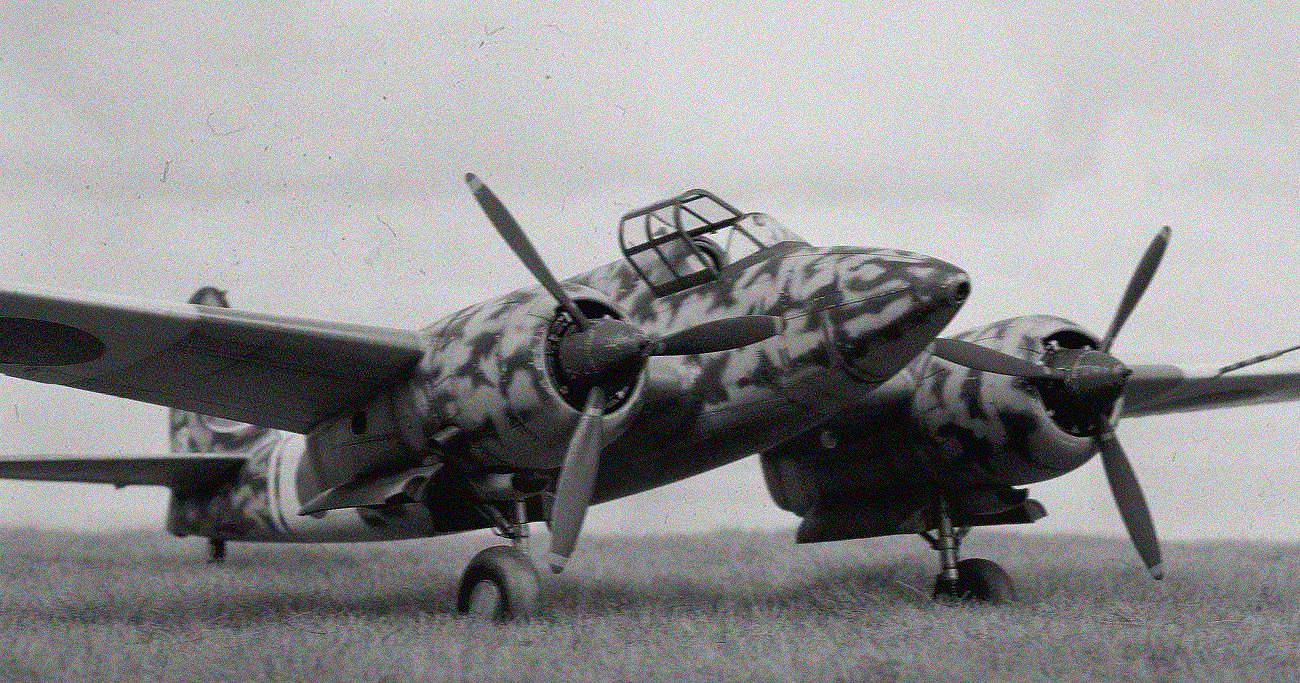
The type of scheme that I chose was one that had fascinated me for many years—ever since the mid ’70s when I purchased a slim publication on the Arado Ar 234 which contained a photo of a rather battered Ar 234 standing in a damaged hanger at Manching airfield. Behind this aircraft are standing three Ju 88 G night fighters, two of which have their tails painted with this rather peculiar, dark outline. I always assumed that this paint job was done in an attempt to fool Mosquito pilots into believing that they were in pursuit of an earlier marque of this aircraft or even another Mosquito and the ensuing, if only brief, moment of confusion gave the Luftwaffe pilot time to make an escape. I have never been able to find any other explanation.

After a careful but thorough clean-up of the model and the removal of the old decals the search commenced for some markings. Fortunately Brett came to my rescue by giving me an old set of Ministery of Small Aircraft Production decals which contained the markings for an aircraft carrying this scheme. I can’t remember which NJG this plane belonged to and as I have not been able to find any pics of this subject the paint job is purely speculative. The model was painted in a typical scheme following the method that I believe was used for many late war Luftwaffe night fighters, this being RLM76 lower and vertical surfaces, and a solid coat of RLM 75 Grey Violet on all the upper surfaces and canopy frame. The 76 Light Blue was then sprayed over the Grey Violet leaving irregular patches of the darker colour. These darker patches were toned down a bit with a thin overspray of the RLM76. The tail was carefully masked using Tamiya masking tape and the dark silhouette was then sprayed black. A very thin mix of Tamiya Flat Black and Red Brown was then applied to all panel lines and very gradually built up to form the heavier exhaust and gun dust staining.

The decals were applied and once set the entire model was given a coat of flat clear and she was done. Hope you like it.
Revell’s new 1/32 Me Bf 109 G-6

This is a test shot of Revell’s new 1/32 Me 109 G-6. The model was built straight from the box by Brett Green and painted and weathered by me. I did add a few enhancements which included a new D/F loop, an FuG 25a ventral aerial, a new wire on the end of the Morane aerial mast, the canopy’s locking handle and retaining wire (with tension spring), the grab handles on the inside of the windscreen frame and the radio aerial wire.

Decals were sourced from Eaglecal and slightly modified to represent a JG 53 Bf 109 G-6/U2 found by advancing American troops at the Henschel Aero Engine Works in Attenbaum near Kassel. I assume that if it was based there it was probably performing factory defence duties or maybe it was just there having a new engine fitted; which I think is the more likely scenario due to the mismatched camouflage on the engine cowling. There are a couple of odd inaccuracies with this kit but these will be dealt with fully by Brett in ADH’s new ‘How To Build’ book (below), which is due out soon and will feature this and at least three other full builds.
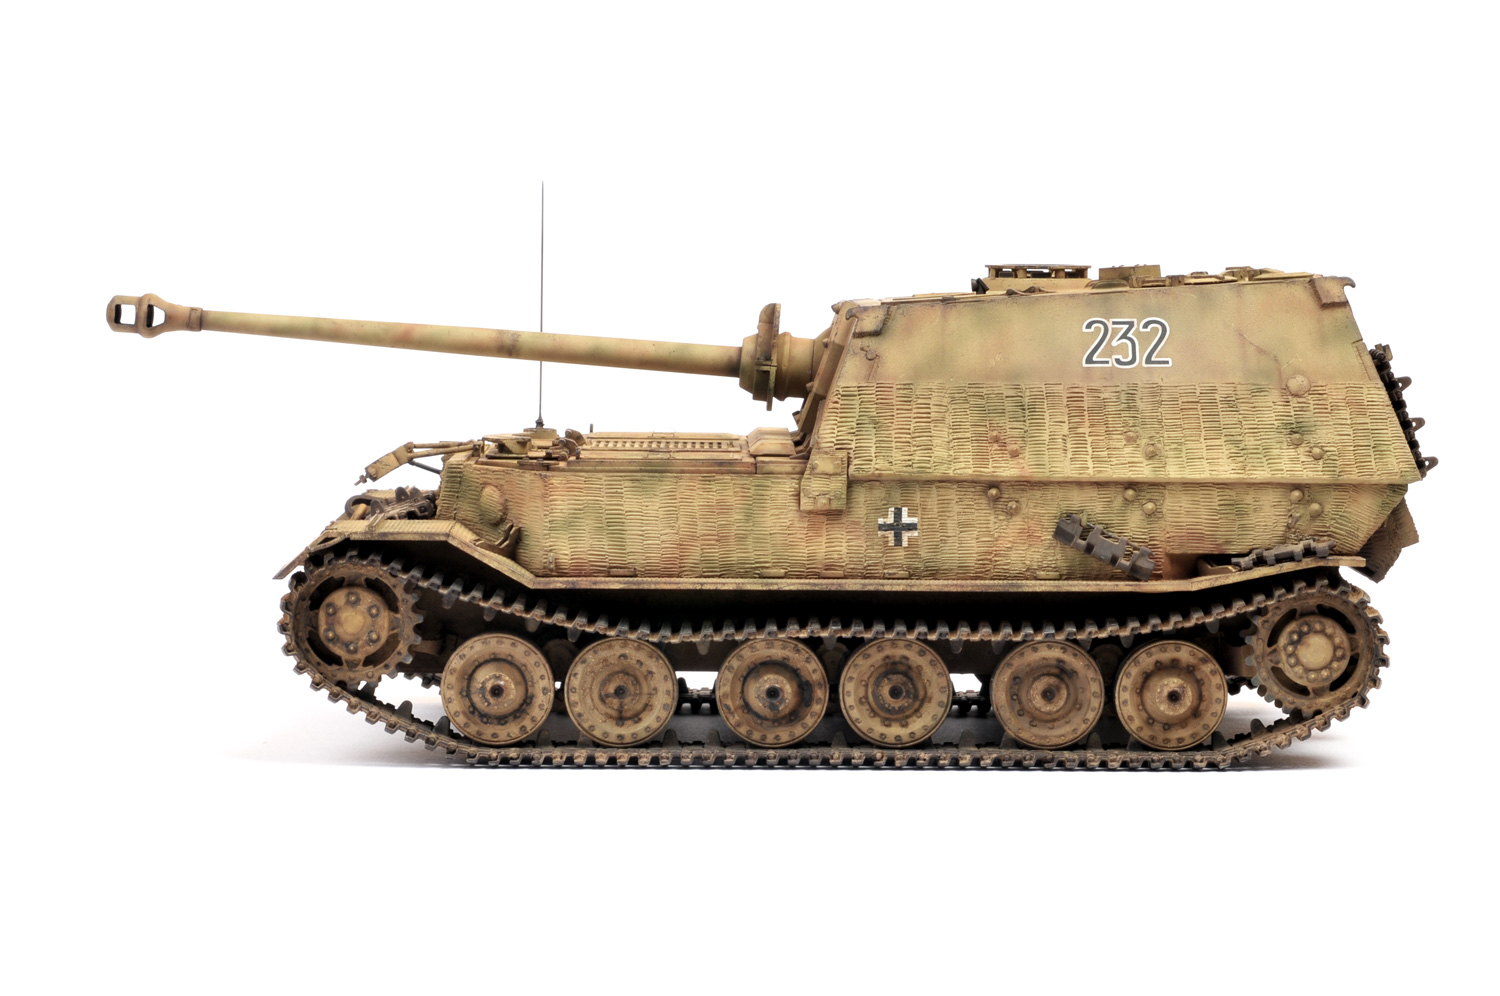
Tamiya 1/35 SdKfz 184 Elefant

The Elefant.

Zimmerit. I was supplied with Tamiya’s self adhesive zimmerit but was not happy with the result it gave so I replaced it with my own, using white superfine Milliput and a small screwdriver. This was a very time-consuming job but was worth the extra effort. In this shot you can also see weld beads that were added using stretched sprue softened with liquid cement and textured with the point of a scalpel blade.

This shot shows some of the extra detail added. This includes brass and copper wire replacement hatch handles, hinge bolts cut from plastic rod, hooks for hanging the tow cables made from P\E scrap and a bracket to hang the sledge hammer from plastic card.

With construction complete the model received a coat of dark yellow and the tracks were painted a mixture of Tamiya red brown with a touch of flat black.The contact points of the tracks were coloured with a Prismacolor silver pencil.

The camouflage colours were sprayed quite subtly as per my reference and a bucket from the spares box was appropriately beaten up and hung from the jack bracket. The kit’s string tow cable was replaced with copper twine.
A couple of spare track links were hung from the tow cable hooks on this side.

The tracks, road-wheels and generally all lower areas were liberally coated with a mix of pastel chalk dust and turpentine.

All the raised detail received a very carefully applied wash of oil based black/brown. This included a heavier but no less careful application to the detail on all the running gear.

The spare track links (front and rear) received a very heavy dusting of pastel chalk powder.

Lots of scratches were added with the aid of a very fine brush and a very sharp 6B pencil.

More wear and scratches.

Finished! Or so I thought.
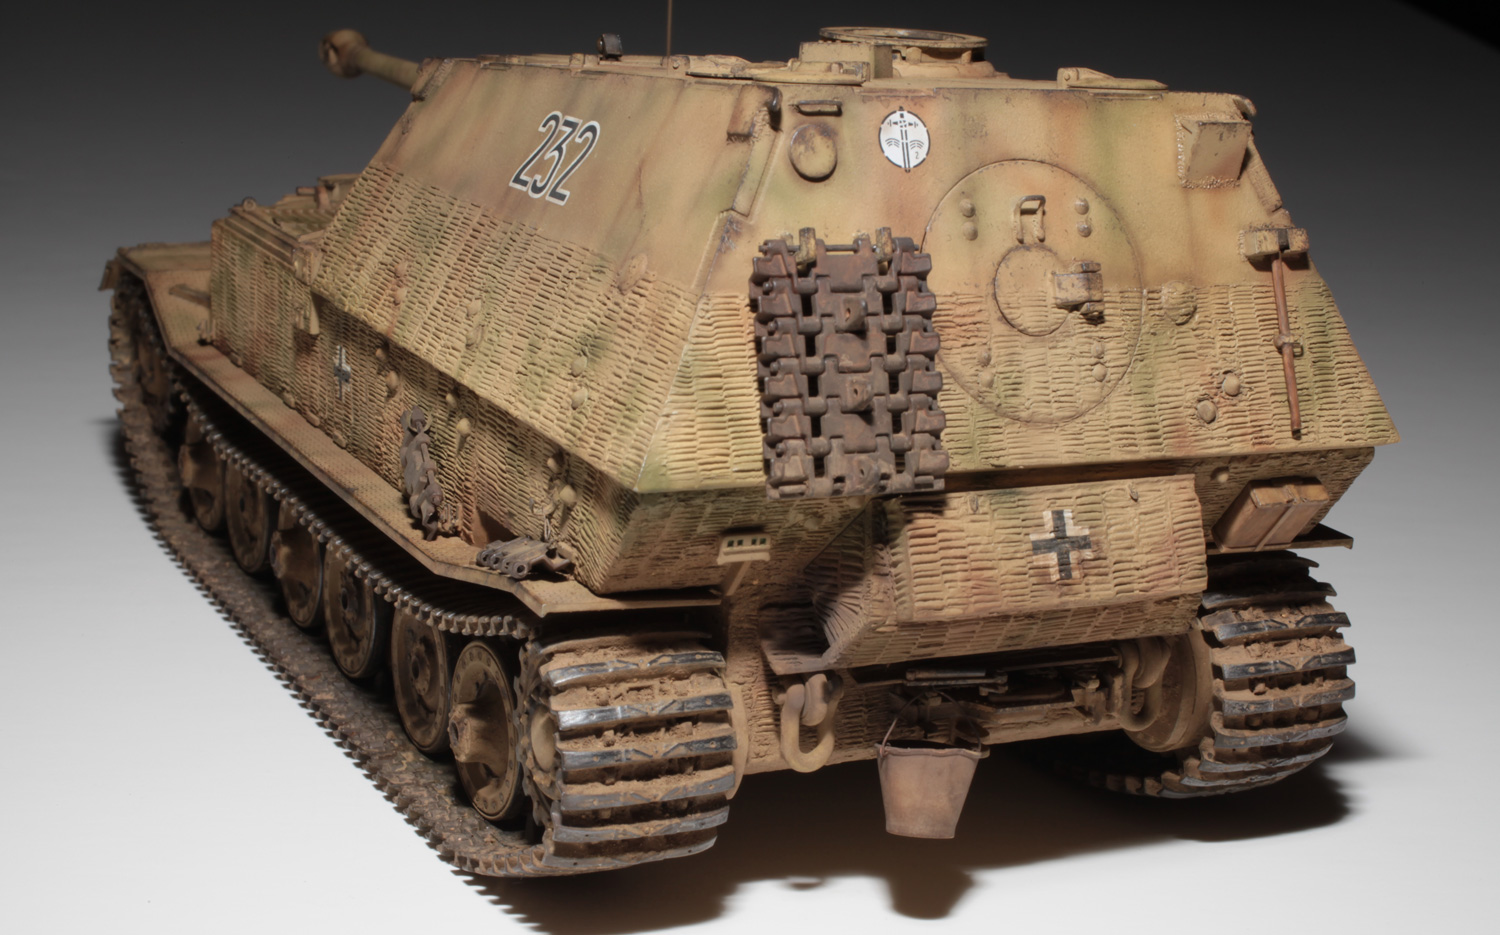
At this point I realised that I had forgotten to apply the tactical number decal to the rear end.
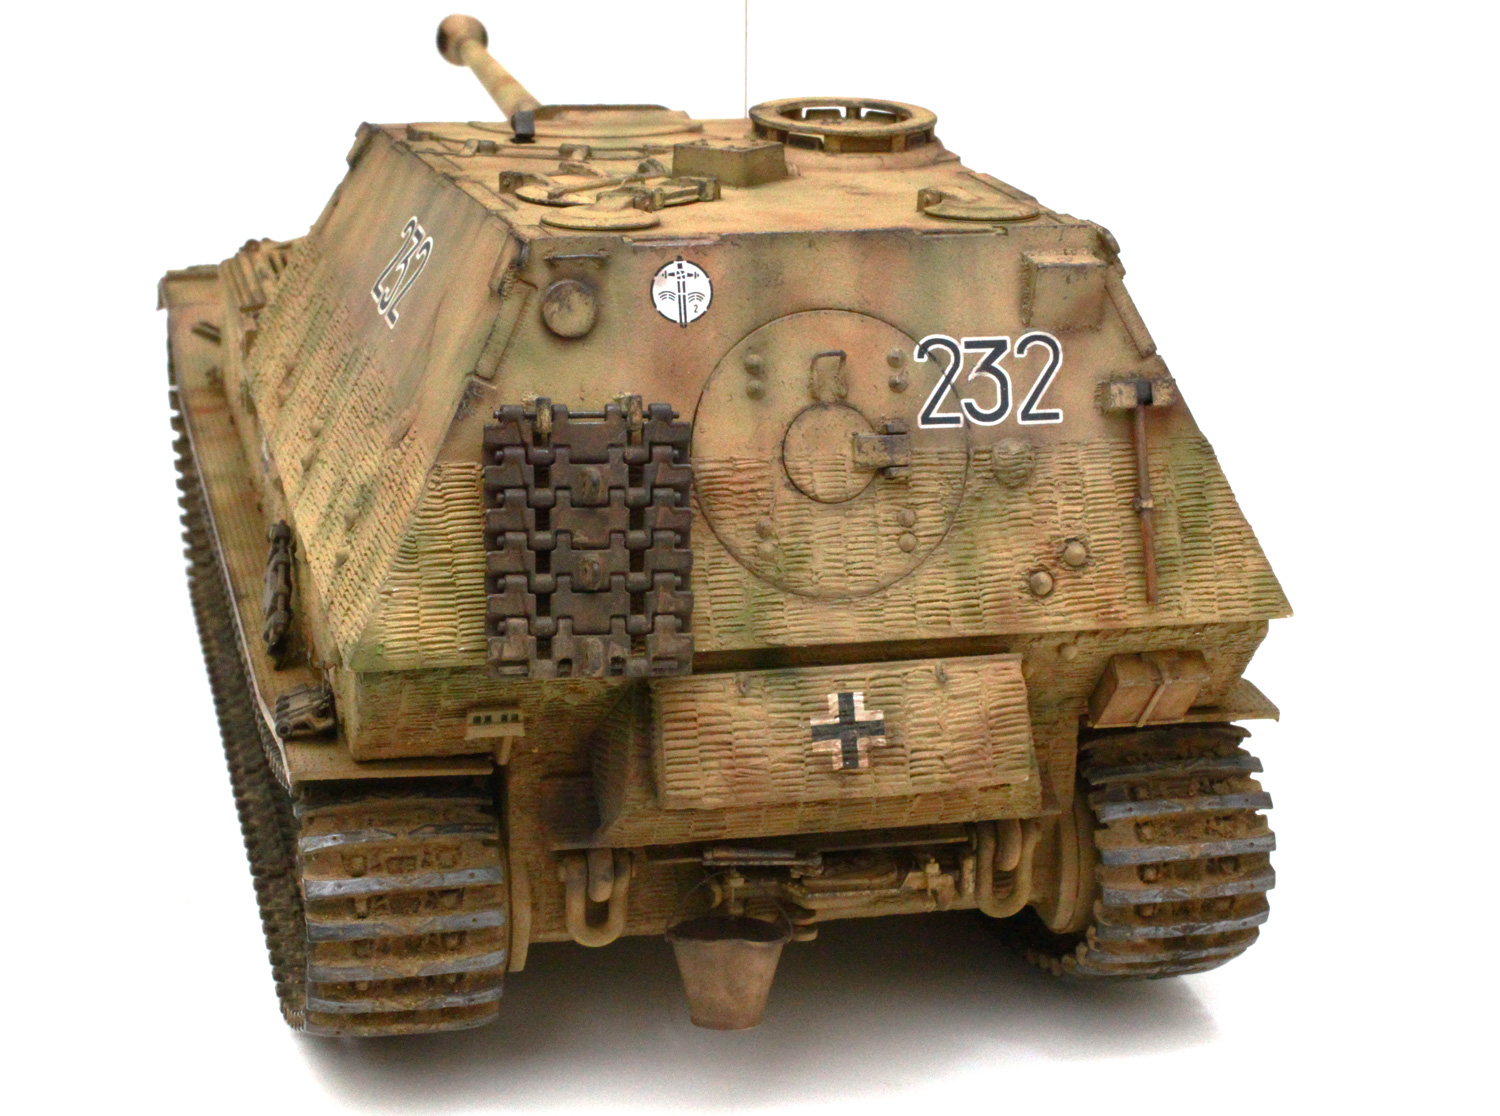
Finished!
